Category Archives: Game Programming

First Monkey-X Game: Creating the Player

One of the first things I like to do when making a game is to build the fundamental mechanics in first. In this case it will be the player’s character and the ability to move around the screen.

In order to keep the code clean, we will separate the character out into its own class.

Draw

We will start by adding the character to the game and drawing it in the form of a rectangle. To do this we need to give the Character class a ftObject representing a box. Then we will create a character in the game’s OnCreate method.

We also need to update the OnRender method to tell the engine to draw all of the objects

Now when you run the Main file you should get a black rectangle on a red background.

Pretty basic but that is what we are going for.

Movement

Now that we can see the player, let’s add some controls so they can move around the screen. We will put the handling of the controls in the Character class by giving it an Update method. This way we can keep the code clean. For now let’s use the arrow keys to move our player around.

Now all we need to do is call the character update method from our game’s OnUpdate method and we will have movement.

Run this and you should be able to move your little rectangle around with the arrow keys.

Boundaries

We don’t want the player to lose their character by it flying off the screen, so let’s prevent the player from being able to leave the viewable area.

We will do this by adding some additional checks in the Character class Update method.

Now when you run your code, you should be able to move the box around with the arrow keys but it should never leave the viewable area.

Our next steps will be to add enemies and the ability to shoot them.

Tutorial Part 5
Tutorial Part 7

Setup for Making Your First Game

Like most creative things, it takes a little setup before we can start actually making our game. A lot of this stuff you only half to do once, and future games are even easier to get started on.

If you have been following along, you already have Monkey-X installed and can open up the TED IDE to write some code. If not, go back to the first part of this tutorial and get it installed.

The Fantom X Module

For this first game we are going to use a Monkey module called Fantom X (previously Fantom Engine) to do some of the heavy lifting for things such as collision and user interface.

It includes access to Monkey’s Mojo framework and gives us a lot of nice tools.

Install the Module

Head over to fantomgl.com and under Fantom X, select download.

Once the zip file is downloaded, unzip the file and copy it to Monkey’s modules folder.

Monkey Modules Folder

Import Fantom X and Start Your Engine

Now that Monkey is installed and Fantom is installed, we need to bring the Fantom X module into our game file and create an instance of the engine. To do that we will import Fantom X, create our Game class, give it an engine object and start our OnCreate method.

This creates an instance of the Fantom engine that will be managing a lot of our game for us.

The Main function is what Monkey needs to have in the file that you build to run. In the Ted IDE you can click build and run and this should run without errors. All you will get is a black screen but that is alright for now.

Set the Scene

Fantom has Layers, Scenes and Objects. A Layer is a collection of Objects. A Scene is a collection of Layers. A game is a set of Scenes that are like the various states (menu, first level, etc) that the game goes through.

One of the things it needs to know when it starts up is which scene to start in. So we need to set the default scene in our OnCreate method.

Also the engine can operate with various Layers, allowing you to have a background and a foreground and to simulate height and depth for 2D games. While we set the default scene, we are going set the default layer as well.

Even if you are copying and pasting the code, it is a good idea to try to run it and make sure you don’t get any errors.

Add Update and Render Methods

The final part of our setup is going to be adding the OnUpdate and OnRender functions. We will go ahead and use the engine to draw some text in them just to make sure they are working.

Here we create our OnUpdate method and call the engine’s Update method. First we find out how long it has been since we last called this method with CalcDeltaTime. Then we divide that by what we expect our framerate to be in order to get a speed factor to pass to our the engine’s Update method. This will ultimately affect each object when we modify it’s speed later.

In our OnRender method we clear off the screen and make it completely red. Then we set the color of what we are about to draw. After that we draw text that shows the position of our cursor or our touch input in relation to our game.

Run it now and test it out.

Setup Complete

Now that we have a basic shell for our game we can start adding the various scenes and objects together to make our game.

Tutorial Part 4
Tutorial Part 6

Monkey-X Frameworks and Physics Modules

One of the useful ideas I picked up from reading a book on how to make games with PhaserJS, was to take a look at the various frameworks and modules that had been built already for Monkey-X.

I have been slowing myself down by trying to handle some of the specifics of the game directly instead of building on the work of others.

The thing I am looking for most is a physics frameworks. Nothing says edge case like handling collisions of various shapes.

Some GUI help would be nice too.

The Frameworks

I did some searching and there are probably others out there, but these were the easiest to find frameworks I came across and some of my notes on them.

  • Fling
    1. Free
    2. Physaxe implementation in Monkey
    3. No updates since 2011
    4. A few examples in Monkey-X forums
  • Monkey Box2D Implementation
    1. Free
    2. Last updated in 2013
    3. No real documentation
    4. A few forum posts on Monkey-X site with usage examples
  • Diddy
    1. Free
    2. Large number of examples in github
    3. Recent update by author
    4. Spotlight from Monkey-X main site
  • Ignition-X
    1. Paid with free trial
    2. Older framework which official site no longer directly links to.
    3. Still referenced from Monkey-X store page
  • Pyro
    1. Paid
    2. Successor to Ignition-X
    3. Looks professionally done.
    4. Various examples
    5. Scene Graph, Collision System (Box2D), Tile System
    6. Skinnable GUI System, and other useful features
  • Fantom X/Fantom Engine
    1. Free
    2. Creator wrote a book on how to make games with Monkey-X and Fantom Engine
    3. Fairly well documented with examples
    4. Recently updated
    5. Has Box2D physics implementation
    6. Has GUI helpers

Conclusion

Based on this research the choice is between Diddy, Pyro and Fantom X. I will be testing out the Fantom X engine for now and seeing how useful it can be, and depending on how that goes I will probably use it in the following parts of my making your first game with Monkey-X series.

There are 2 main reasons for this. First I will be using it for examples and for people just getting started into making games who may not want to invest too heavily financially to begin with or even don’t have the money for something like Pyro.

Second, for being a free framework Fantom X is well documented and the maintainer seems to keep it up to date.

Looking forward to evolving my game making skills.

Don’t Leave a Festering Pile

One of the most memorable statements from Clean Code was the author describing some of his own example code as a “festering pile.” And he doesn’t just use the term once, he uses it multiple times.

The most important statement however comes after he goes through how he cleans up his code and he is going over key points at the end of the chapter.

It is not enough for code to work. Code that works is often badly broken. Programmers who satisfy themselves with merely working code are behaving unprofessionally.
– Uncle Bob in Clean Code

Get It Working, Then Clean It Up

Don’t get me wrong, you should get your code working. If it does not work, it is completely useless.

But that is not where you stop.

When you stop here, it becomes difficult to add features to your program and makes it more likely that you will introduce errors later.

As a professional programmer and creator, cleaning up your code after you get it working is a must.

What’s That Smell?

As I am working on my current game, I started noticing that some of my own code was becoming a bit of its own smelly, festering pile.

Classes were getting a little clunky, functions where getting a little too long, and it was taking longer to make small changes.

Since I am trying to write the same logic in 2 different languages (Monkey-X for the client and Ruby for the server), having clean code was even more important to be able to replicate the logic in a second language.

And with the code getting a little cluttered, there started being some hard to figure out bugs where the client would show one thing, but the server would do another.

I finally got the code behaving the same and it took longer than it should have.

Programming Febreeze

Now it is time to get rid of some of these smells. The way to do that in programming is refactoring.

This is basically what Clean Code was all about. Changing your code to be more clear and designing the classes and methods to be easier to change (think DRY and SRP) have your code smelling like fresh linen.

That is what I am working on now with Drone Tournament. My original goal this year was to finish a game every 3 months, but I don’t want a half baked game. So I am taking the time to refactor the code and clean it up because I am a professional.

Be a Pro, Clean Your Code

How To Calculate If Line Segments Intersect The Easy Way

I am currently working away at Drone Tournament, Game #2 for 2016, and started implementing combat into the game. In order to make combat happen, each little drone unit in the game will be able to fire their weapon every so often, and if they hit an opponent it loses armor and can be destroyed.

The trick is how to figure out if we get a hit.

Previous Collision Detection

At the beginning of 2015 I made my first game Prism Ship with Monkey-X and it implements a little ship that shoots blocks. The collision detection there is not pretty but fairly simple because everything is kept square and straight.

Projectiles go straight up and the things they hit are coming straight down so no real fancy math is needed. I simply checked each of the corners of the projectile to see if they were inside the squares you are trying to hit.

A New Challenge

In Drone Tournament however, things can turn when they shoot which means that bullets go off at weird angles and their potential targets are not always moving directly towards them. Additionally I did not make the projectiles in this game as large as in Prism Ship. They are basically line segments.

It Has Been Solved

This problem is common enough that it has been solved before, and in a most elegant and simple manner. Here is some Monkey-X code that I derived from an implementation of the solution in Python. I will explain what is going on below. I even borrowed a picture that shows what is going on really well.


	Function LinesIntersect:Bool(pointA:Vec2D, pointB:Vec2D, pointC:Vec2D, pointD:Vec2D)

		Local abc:Bool = CounterClockwise(pointA, pointB, pointC)
		Local abd:Bool = CounterClockwise(pointA, pointB, pointD)
		Local cda:Bool = CounterClockwise(pointC, pointD, pointA)
		Local cdb:Bool = CounterClockwise(pointC, pointD, pointB)

		Return(( abc <> abd) And (cda <> cdb))
	End

        Function CounterClockwise:Bool(pointOne:Vec2D, pointTwo:Vec2D, pointThree:Vec2D)
	        Return ((pointThree.y - pointOne.y) * (pointTwo.x - pointOne.x) > 
                        (pointTwo.y - pointOne.y) * (pointThree.x - pointOne.x)) 
        End

For those of you not familiar with Visual Basic, "<>" is its way of writing "!=" (Not Equal)

Explanation

If you remember from your geometry class back in high school, line segments have a slope which just measures the change from the beginning point to the end. If you have three points A, B, and C, and the slope of the line from A to B is larger than the slope from A to C (meaning it changes more) then the points are in Clockwise (CW) order. If the slope from A to B is less than that of A to C then they are considered Counter Clockwise (CCW).

borrowed_diagram_ccw
Image borrowed from here (article 1 in reference below).

So we test the two points of our particle to see whether they are CW or CCW to each edge of the Drone hit box. If 1 point is CW and the other is CCW to an edge, then we know that the lines intersect because you have a point on either side of the edge of the hit box.

Special Case I am Ignoring

There is a special case where the 2 lines lay across one another called Collinear. I am ignoring this special case because for the purposes of the game it would not really be a solid hit and is not that important. If you would like to know how to handle it you can read more about this solution at the following articles.

References

  1. Line Section Intersection Algorithm
  2. How To Check If Two Line Segments Intersect?
  3. Stack Overflow: How Can I Check If Two Segments Intersect?

Moving Along A 2D Path

For game #2 of 2016, I wanted to use a movement system similar to one that can be found in Steam Birds, Critical Mass, and some other games. I am most of the way there and would like to talk about some of the different approaches and barriers I have run into so far.

Hermite Interpolation

Gonna start with the difficult sounding silly math that is not really what I needed and also not as complicated as it sounds. Especially since the code for it is out there and you can almost copy pasta it into whatever language you are working in.

In Monkey-X it looks something like this:


Function CubicHermite:FloatDeque (start_point:Float, end_point:Float, start_velocity:Float, end_velocity:Float)
	Local pathPoints:FloatDeque = New FloatDeque
	Local division:Float = 30.0
	
	For Local i:Int = 0 Until division
		Local t:Float = (Float(i)/division)
		Local t_square:Float = t * t
		Local t_cube:Float = t_square * t
		
		Local a:Float = 2*t_cube - 3*t_square + 1
		Local b:Float = -2*t_cube + 3*t_square
		Local c:Float = t_cube - 2*t_square + t
		Local d:Float = t_cube - t_square 
		
		Local point:Float = a * start_point + b * end_point + c * start_velocity + d * end_velocity
		pathPoints.PushLast(point)
		
	End
	Return pathPoints
End

Basically you use this method to find some number of points along the curvy path that you are trying to create. You need to know what direction and speed you are going to begin, the direction and speed you will be going when you are done, and what point in time you want to get on the line. Essentially if you wanted to move along the line at 30 frames per second you will need 30 points to render whatever you are moving at. You would loop through the function doing your interpolation 30 times where the point in time is 1/30 to 30/30. You push all of these points into some sort of ordered data structure, in my case a Deque.

Note: This particular implementation only finds 1 part of the coordinate. If you are in 2D you need to run it once for X and once for Y, and if you are in 3D you need to run it one more time for the Z coordinate.

The formula then creates a nice curvy path to go from the first point to the next but ended up being not exactly what I was going for.

Simple Steps Approach

The problem I was having getting my head around with the interpolation approach was how to properly put limits on the movement. Distance was not a problem, but I only want the units to be able to turn so far.

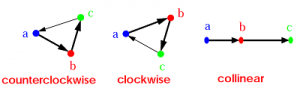
The solution I ended up going with was to give each unit a rotational angle limit. Then I went through the 30 step loop again and on each step I calculated the angle from where I was to where I was headed. If it was greater than my current heading, we add the rotation limit to our current heading. If less than, we subtract the rotation limit from our current heading. Then we move 1/30th of our speed in the new direction and repeat.


Method SetControl(click_x:Float, click_y:Float)

	Local goal_angle = ATan2((click_y - position.y), (click_x - position.x))
	Local start_angle = heading
	Local control_pos:Vec2D = New Vec2D(position.x, position.y)
	Points = New Deque
	
	For Local i:Int = 0 Until 30
		control_pos = NewPoint(control_pos, start_angle, goal_angle, maxRotation, maxVelocity/30.0)
		If (start_angle > goal_angle)
			start_angle = start_angle - maxRotation
		Else If (start_angle < goal_angle)
			start_angle = start_angle + maxRotation
		End
		goal_angle = ATan2((click_y - control_pos.y), (click_x - control_pos.x))
		Points.PushLast(control_pos)
	End
	control.position.Set(control_pos.x, control_pos.y)
End

Function NewPoint:Vec2D (start_point:Vec2D, start_angle:Float, goal_angle:Float, max_angle_change:Float, distance:Float)

	Local new_angle:Float
	If (start_angle > goal_angle)
		new_angle = start_angle - max_angle_change
	Else If (start_angle < goal_angle)
		new_angle = start_angle + max_angle_change
	End

	Return New Vec2D(start_point.x + distance * Cosr(new_angle * (PI/180)), start_point.y + distance * Sinr(new_angle * (PI/180)))

End

Doing this lets me intuitively limit the turning radius and maximum velocity of the units. It might not be the fancy way to do it or the most efficient. But it works. And that is all we are going for.

Note about Monkey-X Documentation for ATan2(x, y): the documentation reads that it gives the Arc Tangent of x / y in degrees. Traditionally these variable names are switched. If you are thinking in typical Cartesian coordinates you will want to pass you Y value in as the first parameter and X as the second. This caused me a bit of confusion.

p.s. This code was not cleaned up for this post and a lot of it was written between 10 P.M. and 1 A.M. The purpose was not to show of how code should look but rather sample implementations of useful functions.

Game 1 February 2016 Progress Update

Honestly, I am no where near where I thought I would be with game 1 at this point in the year. But that is why these kinds of post are important and why I scheduled them into my writing schedule.

Time seems to be flying by so fast these days, it is already over half way through February. I do not have a play testable version of my game yet. I have not yet made an MVP.

Part of the exercise with this first game is building and releasing an Android app. With that in mind I am trying to build it using MeteorJS (which cross compiles to Android) and at the same time using Meteor’s integration with AngularJS.

What Is Done

I have been working on a Meteor-Angular tutorial and have gotten through a good bit of it and learned a lot. Usually with things like this, I take a tutorial and kind of massage it into the app that I actually want to make. So right now I have a basic tutorial app that just needs some massaging.

I also have the basic set of choices and end goals for the game set down. I actually had to stop myself working on that so that I could begin making the minimum version of the game in order to test whether or not it will be fun.

What Needs to Be Done by End of March

Basically, I need to write a choice engine in Meteor-Angular and then fill in the story and the choices. Once that is done, building the actual Android app is as simple as running:
meteor add-platform android
and
meteor run android

I also need to setup a Digital Ocean server to host the game. Although technically it could be hosted for free at meteor.com, it would be really slow and take some time to load up.

Additionally, I need to play test the crap out of it to make sure it works and has at least some element of fun to it.

What Is Not Perfect Yet

I think I am making the mistake I made end of last year by switching languages/frameworks a little and trying to learn one and stick to a schedule. This remains to be seen.

Also I was planning on doing some sketches to bring some visualization into the game, but these might not get done in the interest of keeping a schedule. They might be added later. Or I might see about learning to utilize a service like Fiverr.

Time to Write Code

I have been focused on game design, writing, and psychology improvement lately but now it is time to take some action. It is time to make this game.

Get out there and make what you designed.

Game 1 of 2016 January Progress Report

So far I have done absolutely 0 programming on Game 1, and that is ok. This will definitely need to increase but it is impossible to actually start programming a game until it has been designed.

There is a design and I decided to start by working on the paper prototype.

Game 1 Paper Prototype

Given the text adventure style of the game, it is actually fairly easy to do a paper prototype since it is fairly similar to a “choose your own adventure” book. Play testing will be interesting to figure out since I plan on having some resources like ammunition for a weapon be part of the decision making process.

As I was making the notecards, I thought of a neat little idea I could use in the story where instead of just reading text, the player can sometimes be faced with some sort of interface with button and switches and levers that utilizes the phones natural tap and swipe interaction to make the game more fun and interesting.

I used a notebook to draw a little flowchart that includes the major decision points and then develop out the interactions that occur at these decision points and what the story will be like on 3×5 notecards since they are similar in size to a phone screen (which is the target platform). The goal is to get to a minimal story and start building on it.

I have been doing a little tangential programming, working through a tutorial on AngularJS and MeteorJS which is the current target technology for creating the game. If it looks like this will be too unwieldy then I may go back to vanilla MeteorJS. This is sort of an excuse to teach myself Angular to see what all the fuss is about.

We are coming up on the end of the first month of 2016 already so if you haven’t already started …

Go make games.

It’s Just Basic Geometry

This time the math was not as complicated, but still not the sort of thing the average person has to use on a daily basis.

For Infinite Zip, my current game project, I needed to figure out if the player is on the zip line or not. Currently, the game randomly generates a bunch of points and ties them together with lines.

I am working on putting “holes” in the line to give the player something they have to jump over but for now we are only concerned with keeping the player on the basic line.

What We Know

So we have a few bits of information that we know from the start.

We know where the player is.

From that we can figure out which two points on the randomly generated line that the player is between. This gives us a start and end points.

We also know the players velocity.

Using these few pieces of information, we can calculate if they are or are not currently above the zip line.

How to Calculate What We Need

What we are dealing with here is two right triangles with the same ratios but different lengths. This makes everything pretty easy and turns it into a simple algebra problem.

What we need to know is what point of the line we are comparing to the player’s height. To calculate this we simply multiply the distance from the player to one of the end points by the difference in height of the end points, then divide by the width between the two end points.

It looks something like:

Y1 / X1 = Y2 / X2

Where we know Y1, X1, and X2. So we find Y2 by changing the equation to be:

(X2 * Y1) / X1 = Y2

and that gives us the height of our line at our player’s current X position. So if the player’s Y is greater than the calculated Y, they are below the zip line and should probably be falling.

Wrap Up

Games, especially any type of games with action or real time, often involve physics and that means math.

Sometimes the math is pretty straight forward.

Until next week, keep getting better.

Looks like overtime for Game 4

As you may well be aware if you have been reading any of these posts, I and doing the #1GAM (1 Game A Month) challenge.

April has been a crazy month and it looks like I will not be able to finish the game by the 30th (but it might be close). Thankfully this challenge has no rules, only guidelines. And one of those guidelines is that you can take your game a few days into the next month to finish it.

More Video

I recorded another session programming. This one is about 3 times as long as the first and involves a lot more long periods where I am stuck trying to figure out typos, things that I forgot about the language, and reading something off screen to figure out my next step.

The main purpose of these videos is to give myself something to form a baseline to do a series of tutorials.

Right now, I have found a few important things to consider when doing a video.

You need a plan

Seriously, plan out exactly how far you want to get with each recording and exactly what you are going to do.

You need to edit

These videos are currently unedited for 2 reasons. First, I don’t currently have any video editing software set up, and second, they are for me to learn from so I don’t want to cut anything out.

Really though, if you are going to create a video course of any kind, editing will be crucial to make the videos as clear as possible.

SPEAK UP

Or at least get a good mike. I was using the default mike on my laptop and the sound quality is not great (except for when I click with the trackpad which comes through way too loud).

Clear speech will allow your viewer to better understand what is going on.

Less Video

For now, these first 2 videos will be it for game 4 as recording significantly slows down my progress.

I will attempt to finish up game 4 within the first week of May and then attempt to do a better job recording game 5 and managing my time so that it does not run into June.

Here is video 2

Warning: this one is about 45 min and the audio is terrible. Also I spend a few minutes too many remembering that sometimes methods need return types.

You can find video 2 here.

Keep getting better at what you do.