Monthly Archives: September 2016

Game Balance Concepts

In my search for articles to read about game design, I came across an excellent series that was done in a course. You can find it at gamebalanceconcepts.wordpress.com.

I have not finished yet (there are 10 lessons and each of them is a good long article) but have already found it to be valuable and would recommend checking it out. Here I will be discussing a few of the valuable ideas I learned just in the first 4 lessons.

Terms

The first lesson is mostly concerned with getting you familiar with certain vocabulary that is used when referring to different types of games. Determinism, solvability, intransitive, symmetry, and the meta game are a few of the terms discussed.

Near the end of the first lesson there is a section called “Game Balance for the Lazy.” In it the author gives a hypothetical example that describes an interesting method of having players balance a game for you. In the example it has the players bid on the stronger starting side in a game. The player who won the bid then loses the resources that they used to bid on it. This gives people who have played the game a way to tell you how unbalanced it is by the amount they bid and gives you an idea of how to change the power level to bring things into balance.

Numbers Are Related

In Lesson 2, there is a great discussion of the different numeric relationships and patterns you might find in a game or use in your own game design. There is discussion of linear relationships such as getting +1 armor is similar to adding 1 health, and triangular and exponential relationships such as the bonus cards in Risk where every time you trade in a set of cards you get an ever increasing number of soldiers (I forget the pattern but am pretty sure the number grows in an exponential pattern).

There is also a discussion about how various things in a game all relate to one number like the number of lives in Super Mario. If you die you lose a life so the number of enemies in the level might mean you are more likely to die. Also every 100 coins you get is an extra life, so the number of coins you collect can mean an extra life.

One Resource to Rule Them All

Lesson 3 sort of follows the number theme set in lesson 2 and revolves around having a single resource or number with which to calculate a power curve or cost curve on. The author uses the example of the TCG Magic the Gathering and how everything in the game is somehow tied into the resource of mana. He then breaks down a few cards and determines whether or not those cards are on curve, above the curve, or below it.

As someone who occasionally plays MTG and since I am trying to design a card game myself that has some similar properties, this was especially fascinating. I would encourage you to do a little exercise of your own with a game you enjoy that involves resource management and analyze item and/or unit power levels.

Highly Probable

Lesson 4 is a crash course in probability. Lots of games have probability involved and there are countless times I have heard lamentations from gamers over the RNG screwing them. In short, probability is often counter-intuitive.

This is how casinos and other gambling places make money. It is also where game designers can screw up and mess up game balance. Sid Meier talks about it in a talk he gave at GDC 2010 called Everything You Know Is Wrong where he talks about how players view percentages and numbers that you show them.

This is a great crash course for someone who has never looked into probability and statistics before and would recommend reading it.

More Chapters to Go

I plan on finishing reading through this course and would recommend you do the same. I have already learned a bunch of useful stuff and will sum up what more I learn in a later post. Until then, keep making progress.

Token Based Authentication Versus Session: A Simple Explanation

Recently I was tasked with implementing a token based authentication structure for an API. When I initially looked it up, using tokens seemed almost identical to using sessions the way it was described in several articles. It took me quite a bit of reading before I finally understood what was going on, and I never did find a satisfactory explanation of how tokens differ from sessions. So today, I am going to attempt to clear up these murky waters a bit.

Sessions, Your Old Friend

If you have done web programming for at least a little while, you have probably come across sessions. Sessions are what the server holds on to, which allows the user to keep using the site without signing in every time their browser makes a request to the server.

Think of it as a business like a gym that has restricted access. If the gym used sessions, they might make you pay (sign in with password) when you show up each time and put your name on a access sheet. If you left and came back, they would ask for your name then look up and check (think database) whether you are allowed access or not.

The members (users) need to know their name (session id), the gym (server) needs to hold onto information about whether or not its members have access (session). For our purposes this represents the browser cookie with the session id and the session on the server.

Tokens, New Kid in Town

Although I had used tokens before, I had never implemented them into anything so I did not now exactly how they worked. (The particular kind of token that I am working with is a JSON Web Token but that is not actually important.) Like sessions, tokens also allow you to access the server without signing in every time. Unlike them, the server does not have them. Your user does.

Ok back to our gym example. Say that you want to give people 24 hour access to your gym and don’t want to have employees working the front desk at 4 AM to give people access. You could install a card reader at the door and then give out keycards that your gym members could swipe or hold up to it that allows them access. Once they pay (sign in with password), you give them a card (token) that they can come back with and you don’t have to look up on the sheet (database) whether or not they have access.

In this case the gym members (users) have all the information about whether or not they have access in the form of their cards (tokens), and the gym (server) simply validates the card when the member wants access. As a bonus, the local pool (a different website) has a card reader and a program that allows anybody who is a gym member to go swimming there. Members simply need to bring their cards (tokens). This is like OAuth/OAuth2 and signing in to websites using Google/Facebook/Twitter.

A Model For Understanding

Hopefully this gym membership model helped you understand the difference between token based authentication and session based authentication. If you want to learn more about specific implementation details, checkout some of the links below. And if you like what you read, sign up for my email list.

Getting to Know TED and Mojo

*Disclaimer: This tutorial is assuming that you have some basic knowledge of computers, programming and programming lingo. If you do, but something is still unclear, shoot me an email and I will be happy to help you out.

If you followed the instructions in the previous part of the tutorial you should have Monkey-X installed and be able to open up the default IDE that comes with it, TED. Which should look something like this.

TED IDE

Today, we are going to go through a few handy things to know about using TED and some of the basic structure of a Monkey-X game and the files associated with it.

Create a File

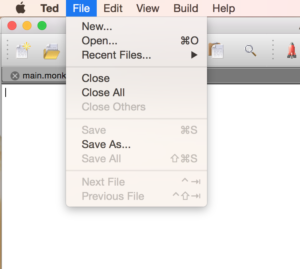
First thing we need to do is create a new file so we can start writing some code. We are going to create a file called main.monkey because it is going to hold our Main function. You can do create this file however you want, and to do it in TED you simply go to the “File” option on the menu and click “New”. You will want to put this file in a new folder by itself. We will use this as our project folder, I have called my folder “game_one”, and will use it in the following examples.

TED File Menu

Open Your Folder As a Project

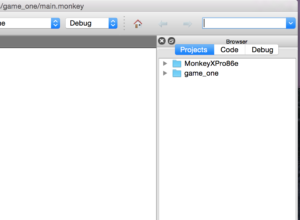
One of the handy things that TED allows you to do is open a Project view of the folder. This allows you to easily navigate and open files and folders as your game gets larger. You can do this by selecting the “Build” option from the main menu bar and clicking “Open Project”, then select the folder that you put your main.monkey file in.

TED Open Browser Window

When your games get more complex and you add multiple files, this view becomes very handy.

TED Project View

Mojo

The first thing we are going to do is add Mojo to the game. Mojo is an application framework provided with Monkey-X that gives you several useful tools for making games. It is specifically targeted at 2D games. Go ahead and add this to the top of your main.monkey file.


Import mojo

This will import all of Mojo’s components (graphic, audio, and app).

The Game

Now that we have mojo, we can create a class that is a Mojo app and will be what the rest of our game is built on. Lets do that now.


Import mojo

Class Game Extends App

End

Using Extends allows us to say that our Game is an App and it now has access to a lot of special functions and methods that Mojo gives us.

Quick note about the Monkey-X language. The End keyword is used to close Classes, Functions, Loops, Conditionals, and other code blocks. No need for ‘{ }’ everywhere in your code. Also lines do not use anything on the end to say they are done, so no ‘;’ are needed on the end of lines. There are a few other quirks about the language that it gets from Basic (from which it was derived) that we will discuss later.

Special Mojo Methods

The first special method that we will need to override that Mojo gives us is OnCreate. This method is called one time whenever you create a new instance of the Game class in your code. This is where you want to do things like load images and audio as well as set certain game values like screen width and height.


Import mojo

Class Game Extends App

  Method OnCreate()

  End

End

After OnCreate we have OnUpdate. The OnUpdate method is called a certain number of times per second (which you set in your OnCreate method). This is where your main game loop goes. This is where you will check for input and handle movement and changing game values. OnUpdate will only be called if you have set the update rate with a special method called SetUpdateRate. We call this in OnCreate and give it a number to tell it how many times per second to update. We will use 60 for now.


Import mojo

Class Game Extends App

  Method OnCreate()
    SetUpdateRate(60)
  End

  Method OnUpdate()

  End

End

Next is OnRender. This is where all of your drawing code will go. If you want to display something to the player, it should happen in this method. Mojo tries to call it immediately after every OnUpdate so the update rate that you set also applies to how many times you draw to the screen.


Import mojo

Class Game Extends App

  Method OnCreate()
    SetUpdateRate(60)
  End

  Method OnUpdate()

  End

  Method OnRender()

  End

End

Other Special Methods

There are several other special methods in Mojo (OnLoading, OnSuspend, OnResume, OnClose, OnBack) that we will discuss in a later step of the tutorial. For now it is just good to now about them. If you are curious about them now, you can go read about what they do in the Monkey-X Documentation.

Final Step

In order to have something that actually builds and runs (even though it only displays a blank screen) you will need to add a Main function creates a new instance of your Game class.


Import mojo

Class Game Extends App

  Method OnCreate()
    SetUpdateRate(60)
  End

  Method OnUpdate()

  End

  Method OnRender()

  End

End

Function Main()
  New Game()
End

Now if you build and run by hitting the little rocket ship with flames coming out the back (or by hitting the F5 key) TED should open your default web browser with an instance of the game running. Right now since we are not drawing anything in our OnRender function, it is just a blank screen. But it will soon get more interesting.

Tutorial Part 1
Tutorial Part 3

August 2016 End of Month Goal Review

And It is September, home stretch of the year.

Goals

  1. Write 3 Blog Posts Per Week and Publish 2 – Got the same number of posts in August as I did in July, 5. The writing goal was 12 and the publishing goals was 8. Still not hitting my writing goals, but I am pivoting a bit on my writing format. Additional goal is to create a series of posts that end up being a solid tutorial (and maybe even a book) on making games with Monkey-X.
  2. 1 Game Designed, Created, and Released Per Quarter – I got some good ideas for the card game from creating some mock cards and writing out factions and races that will exist in the game. Drone Tournament (Game #2 of 2016) programming is still progressing steadily. The final parts are straight uphill. Definitely interesting challenges with the simultaneous turns.
  3. 1 Book Read Every 2 Months on Game Design – Completely finished reading Clean Code and it has already had an impact on the way I am organizing and writing my code, for the better. New book I am reading is a book on making games with Phaser JS. I will be doing a separate post about the new book.
  4. 1 Article Read Or 1 Video Watched About Game Design/Creation Per Week – In August, I over corrected just a bit. I read dozens of articles on game design and creation. A majority were on a blog I stumbled upon by Ralph Koster. A goldmine of good stuff. Additionally he wrote a book called “The Theory of Fun” which I will probably be checking out later on.
  5. Get 100 People Reading Evolving Developer Per Month – Progress = 0%. When I get a few articles into the tutorial I will be posting it into the forums on the Monkey-X website.

What Went Right

I definitely hit my goal of reading 1 article on game design per week. Found a lot of great information on game design and balance. Big bonus, Monkey-X Pro dropped its price down to $40 (from $99) so I purchased it which will eventually allow me to build to mobile and desktop. Final big bonus was I got a logo created for the site on Fiverr which turned out looking great and was a great deal. Small bonus is that I have several cards designed for game #3 of 2016.

What Is Not Perfect Yet

Writing volume is still low. I have not gotten a consistent schedule yet. Ran into some difficult programming bits while working on Drone Tournament and it is not finished yet. Had to travel for a week in August and did not do as much programming and writing during the trip as I needed to.

Corrective Measures

The only one I can think of is currently is to be more consistent with my morning routine. Get up at a more consistent time and make sure that I do the most important things first. Additionally, I will be attempting to capitalize on my free time a bit more to focus on finishing Drone Trounament.

Read All the Articles.

Getting Started With Monkey-X

If you have been reading any of the previous posts in this blog, you know that I have been creating games over the last couple years using a programming language called Monkey-X. It is a nice straightforward language based on Basic. Today we will go through some of the strengths Monkey-X offers and how to get Monkey-X setup on your computer so you can start creating games with it too.

Why Use Monkey-X

One of the main reasons I use Monkey-X is that I have found that for some reason I am a little extra productive in it. I don’t know if it is the simple language syntax or the ease of creating a build of the game and testing it for fast feedback. It’s probably a combination of the two and a few other things.

Additionally there is a great little community built around what is referred to as the Blitz Basic family of programming languages (the language Monkey-X came from). Guides, how to’s, a forum, and at least 1 Youtube playlist to help you get started and help you when you get stuck.

This community has also developed plugins and libraries to help you take care of some of the more routine functions and tasks that you will be performing as you create games. We will discuss these later on.

One of the more powerful reasons I even looked into using Monkey-X at all is that it builds to tons of platforms. All the major desktops (Windows, OSX, Linux), HTML5 for web, mobile (Android and iOS), even XNA so it can run on an XBox, as well as PSM for the Playstation Vita.

The final reason it is good to get started making games with Monkey-X is the cost. It is completely free to download and make games for the HTML5 target which is perfect for a beginner. And when you are ready to upgrade to build to more platforms, the Pro version is fairly inexpensive (~$40 USD at the time of this writing). If you want a little more, there is a fancier IDE and some other addons you can purchase as well.

Installing Monkey-X

Monkey-X runs on pretty much any desktop OS. Whether you are using Windows, OSX, or Linux you should be able to install Monkey-X and start making games.

Installing Monkey-X On Windows

  1. Visit the Monkey-X website and create a free account. You will need this to get the download.
  2. Sign in and visit the Monkey-X download page and download the free version of Monkey-X (or the pro version if you have purchased it). Hint: the free download is at the bottom of the page.
  3. Unzip the downloaded folder and put the files wherever you want.
  4. (Optional) Right-click the Monkey-X executable file and create a shortcut to your desktop to make accessing it easier

Installing Monkey-X On OSX/Mac

  1. Visit the Monkey-X website and create a free account. You will need this to get the download.
  2. Sign in and visit the Monkey-X download page and download the free version of Monkey-X (or the pro version if you have purchased it). Hint: the free download is at the bottom of the page.
  3. When the file has finished downloading, open in Finder and drag it to the Application folder. NOTE: You may need to change your systems security settings to allow apps from anywhere to be installed in order for it to work.

Installing Monkey-X On Ubuntu

For now I am just going to leave a link to this post someone in the Monkey-X community created for installing on Linux. If I get enough requests, I will do a walkthrough myself on setting up Monkey-X on a fresh Ubuntu install. If you would like that, shoot me an email.

Where To Look If You Get Stuck

If you have any trouble a few good places to look for help are the Monkey-X forums and sites like Stack Overflow. Also, you can email me and I will try to help you get up and running with Monkey-X.

Tutorial Part 2