Category Archives: Tutorial

Shadow Casting for Field of View in 2D Games in Phaser JS

Kind of a long title, but that is exactly what this post is about. I will walk thru an implementation of a 2D shadow casting algorithm in JavaScript for a Phaser JS game.

What Is Shadow Casting For?

What is this useful for? Well in my case, I have a turn based tactics game where I want fog of war and limited visibility based on the terrain. The player’s field of view (or FoV) should only include squares that units that the player controls can see.

Some people also use this type of algorithm for determining which squares are “lit” in a dungeon by a light source.

How Does It Work?

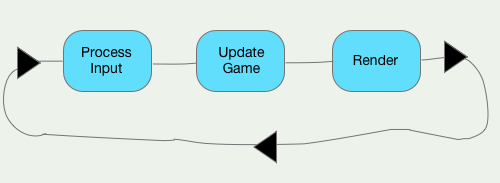
The basic idea is you cast a “ray” down a diagonal and then sweep it across to another diagonal. Anytime you hit something that is marked as a wall (anything you can’t see thru), you stop. That object then casts a shadow along the ray that hit its edge behind it, blocking the view.

There is a somewhat more thorough explanation for it at this website, which is where I adapted my code from (the code there is in python).

The Code

class FovShadow {
    constructor(two_d_map, tile_size, map_offset) {
        this.map_tiles = {}
        this.map = two_d_map
        this.tile_size = tile_size
        this.map_offset = map_offset
    }
}

As you can see this is the constructor of the class. It takes in a two dimensional array representing the map tiles, how many pixels wide a tile is and an offset from the edge of the game screen where the map starts. The last two values are important for determining which tile a unit is on when running the algorithm against its position. The map_tiles variable will hole which tiles are visible to the player.

getVisibleTiles(unit, vision_reset) {
        if(vision_reset) {
            this.map_tiles = {}
        }
        let origin = { x: Math.floor((unit.x - this.map_offset.x) / this.tile_size),  y: Math.floor((unit.y - this.map_offset.y) / this.tile_size) }
        this.markVisible({depth: 0, column: 0}, origin, 0)
        for(let i = 0; i < 4; i++) {
            let first_row = new ScanRow(1, -1, 1)
            this.scanRowForVisibleTiles(first_row, unit.sight_range, origin, i)
        }
    }

This is the function that is called whenever we need to update which tiles are visible. If we moved a unit, we will need to reset the vision.

We determine which tile the unit is on based on their x and y position in the game, the tile size and the offset of the map. Then we mark the tile they are standing on as visible. Finally we begin scanning for visible tiles in each direction (up, right, down, and left).

class ScanRow {
    constructor(depth, start_slope, end_slope) {
        this.depth = depth
        this.start_slope = start_slope
        this.end_slope = end_slope
    }

    getTiles() {
        let row_tiles = []
        let min_column = Math.floor((this.depth * this.start_slope) + 0.5)
        let max_column = Math.ceil((this.depth * this.end_slope) - 0.5)
        for(let i = min_column; i <= max_column; i++) {
            row_tiles.push({ depth: this.depth, column: i })
        }
        return row_tiles
    }

    nextRow() {
        return new ScanRow(this.depth + 1, this.start_slope, this.end_slope)
    }
}

export default ScanRow

We take a short break from the FovShadow class to define the supporting class used by the code that scans for visible tiles, the ScanRow class. A ScanRow represents a row or column of tiles. It is represented by 3 values.

The depth is how many rows or columns removed from our starting point we are. The start and end slopes represent the slope (think geometry slope or algebra slope, its math time) of the rays that mark the diagonals of our field of view between obstacles or the edges of the quadrant we are scanning.

If you can see past a tile, you would call “nextRow()” to recursively begin looking at the next row. Now back to our Shadow Casting class.

    scanRowForVisibleTiles(row, max_depth, origin, direction) {

        if(row.depth > max_depth) {
            return
        }
        let prev_tile = null
        let tiles = row.getTiles()
        for(let i = 0; i < tiles.length; i++) {
            let cur_tile = tiles[i]
            if(this.isWall(cur_tile, origin, direction) || this.isSymetric(row, cur_tile)) {
                this.markVisible(cur_tile, origin, direction)
            }
            if(prev_tile && this.isWall(prev_tile, origin, direction) && this.isFloor(cur_tile, origin, direction)) {
                row.start_slope = this.getSlope(cur_tile)
            }
            if(prev_tile && this.isFloor(prev_tile, origin, direction) && this.isWall(cur_tile, origin, direction)) {
                let next_row = row.nextRow()
                next_row.end_slope = this.getSlope(cur_tile)
                this.scanRowForVisibleTiles(next_row, max_depth, origin, direction)
            }
            prev_tile = cur_tile
        }
        if(this.isFloor(prev_tile, origin, direction)) {
            this.scanRowForVisibleTiles(row.nextRow(), max_depth, origin, direction)
        }
    }

This is our recursive function to go through rows and columns (all called “rows” here) and mark tiles that we can see. We only go as far as our unit can see (they have limited sight range), represented by “max_depth”.

For each tile in our ScanRow, we first check to see if the tile is a Wall, meaning we can’t see thru it. If it is, we mark it as visible. If this tile is a Floor tile and the previous tile we checked is a Wall tile, we need to reset our vision slope and go one step further away. Another way of saying this is, if the tile you are looking at is a Floor and the last tile you looked at is a Wall, look past the Wall. Check what is on the other side.

If the tile you are looking at now is a Wall and the previous tile was a Floor tile, we need to check the next row and limit it to the slope or angle from our origin to the Wall we hit.

If we finished scanning the row and the last tile we looked at was a Floor tile, look at the next row.

That is the basic logic of the Shadow Casting algorithm.

I will include the helper functions below in case you want to implement this yourself. As a note, this is all prototype code and was not written elegantly or efficiently.

    isWall(tile, origin, direction) {
        let coordinates = this.getMapXYCoordinates(tile, origin, direction)
        if(coordinates.y >= this.map.length || coordinates.y < 0) {
            return true
        }
        if(coordinates.x >= this.map[coordinates.y].length || coordinates.y < 0) {
            return true
        }
        return (this.map[coordinates.y][coordinates.x] === WALL || this.map[coordinates.y][coordinates.x] === DOOR_CLOSED)
    }

    isFloor(tile, origin, direction) {
        if(!tile) {
            return false
        }
        let coordinates = this.getMapXYCoordinates(tile, origin, direction)
        if(coordinates.y >= this.map.length || coordinates.y < 0) {
            return false
        }
        if(coordinates.x >= this.map[coordinates.y].length || coordinates.x < 0) {
            return false
        }
        return (this.map[coordinates.y][coordinates.x] !== WALL && this.map[coordinates.y][coordinates.x] !== DOOR_CLOSED)
    }

    isSymetric(row, tile) {
        return (tile.column >= row.depth * row.start_slope && 
            tile.column <= row.depth * row.end_slope)
    }

    markVisible(tile, origin, direction) {
        if(!tile) {
            return
        }
        let coordinates = this.getMapXYCoordinates(tile, origin, direction)
        if(coordinates.y >= this.map.length || coordinates.y < 0) {
            return
        }
        if(coordinates.x >= this.map[coordinates.y].length || coordinates.x < 0) {
            return
        }
        this.map_tiles[`${coordinates.x}_${coordinates.y}`] = { x: coordinates.x, y: coordinates.y, is_visible: true }
    }

    markAllHidden() {
        Object.keys(this.map_tiles).forEach(function(key) {
            this.map_tiles[key].is_visible = false
        }.bind(this))
    }

    getSlope(tile) {
        return new Fraction((2 * tile.column - 1), (2 * tile.depth))
    }

    getMapXYCoordinates(tile, origin, direction) {
        // UP
        if(direction === 0) {
            return { x: origin.x + tile.column, y: origin.y - tile.depth }
        }
        // RIGHT
        if(direction === 1) {
            return { x: origin.x + tile.depth, y: origin.y + tile.column }
        }
        // DOWN
        if(direction === 2) {
            return { x: origin.x + tile.column, y: origin.y + tile.depth }
        }
        // LEFT
        if(direction === 3) {
            return { x: origin.x - tile.depth, y: origin.y + tile.column }
        }

        return { x: 0, y: 0 }
    }

The getMapXYCoordinates helps translate from the ScanRow to the actual 2D map. The getSlope function returns a Fraction class value for a more accurate slope (rise over run or in this case column/row over depth). The isFloor and isWall is pretty self explanatory. However I did implement doors that close and change their values from “Floor” to “Wall” and vice versa.

The isSymetric function is of note. One of the properties of the shadow casting algorithm is that if tile A can see tile B, then tile B can see tile A. If the math doesn’t work out in one direction for some reason, but does in the other then the two tiles are visible to one another.

Wrap Up

I know the explanation is not all that detailed, this was more of a quick breakdown of the implementation in JavaScript for any other Phaser devs out there.

Again, for a thorough breakdown including some handy visuals, check out the post at albertford.com

Keep getting wiser, stronger, and better.

2D Pathfinding in Javascript for Phaser 3

Working on one of the subgame prototypes for a larger game idea and needed to implement pathfinding on a 2D map.


One of the most common algorithms for this kind of pathfinding is called A*  (read as A Star).  The precursor is doing just a Breadth First Search.  I was going to make a full A* implementation but the breadth first search was more than fast enough for my small, 2D maps. And as this is a prototype, going with good enough while I flesh out ideas.


The Algorithm

To begin we want 4 things: the map, your starting point, your target point, and some way to keep track of where you are going next and where you have been.


The explanation I was following referred to the places you have to visit next as the “frontier” and I liked that name so we will use it here.


Begin by putting your starting point in your frontier.
Then we loop over the frontier like this:

  • Get the next location from the frontier
  • If this location is our target point
    • We are done. Exit the loop.
  • If we haven’t visited this location before
    • add it to our visited list
    • get all of its neighbors (up, down, left, right)
    • add them to the frontier if they are not walls
    • mark this location as their parent or previous tile.

Once this loop is complete, because either we hit the target or can’t get to it.  Take the last tile we visited and build a path by backtracking thru the parent or previous tile property until we get to our starting point.

Really a fairly straightforward algorithm that was actually kinda fun to implement and then see working.

This is the rough code I used for the prototype:

class Pathfinder {

    // map is a 2D array of integers, where 0 is a wall and anything else is walkable
    constructor(map) {
        this.map = map
        this.map_width = this.map[0].length
        this.map_height = this.map.length
    }

    findPath(start, end) {
        start.parent = null
        let frontier = [start]
        let neighbors = []
        let visited = []
        let current_point = start
        while (frontier.length > 0 && (current_point.x !== end.x || current_point.y !== end.y)) {
            current_point = frontier.shift()
            if(Object.keys(visited).includes(`${current_point.x}_${current_point.y}`)) {
                continue
            }
                
            neighbors = this.getTileNeighbors(current_point)
            neighbors.forEach(function (n_tile) {
                if(!Object.keys(visited).includes(`${n_tile.x}_${n_tile.y}`)) {
                    frontier.push(n_tile)
                }
            })
            visited[`${current_point.x}_${current_point.y}`] = current_point
        }

        let path = []
        while(current_point.x !== start.x || current_point.y !== start.y) {
            path.unshift(current_point)
            if(current_point.parent == null) {
                break
            }
            current_point = current_point.parent
        }

        return path
    }

    getTileNeighbors(tile) {
        let neighbors = []

        if(tile.x > 0 && this.isFreeTile(tile.x - 1, tile.y)) {
            neighbors.push({ x: tile.x - 1, y: tile.y, parent: tile })
        }
        if(tile.y > 0 && this.isFreeTile(tile.x, tile.y - 1)) {
            neighbors.push({ x: tile.x, y: tile.y - 1, parent: tile })
        }

        if(tile.y < this.map_height - 1 && this.isFreeTile(tile.x, tile.y + 1)) {
            neighbors.push({ x: tile.x, y: tile.y + 1, parent: tile})
        }
        if(tile.x < this.map_width - 1 && this.isFreeTile(tile.x + 1, tile.y)) {
            neighbors.push({ x: tile.x + 1, y: tile.y, parent: tile})
        }

        return neighbors
    }

    isFreeTile(x, y) {
        if(this.map[y][x] === 0) {
            return false
        }
        return true
    }
}

To make this into a more efficient pathfinding algorithm like A* you would need to change the Frontier into something like a Priority Queue that sorts the next tile to check based on a heuristic like distance to target.

You can find another good article comparing Breadth First, A*, and Dijkstra algorithms here.

Keep getting wiser, stronger, and better.

First Monkey-X Game: Projectiles and Score

We have all sorts of enemies flying at our hero and if he hits them they disappear. Now we need to incentivize him to NOT run into all the bad guys.

Our next steps are to make enemies damage our hero when he runs into them, give him the ability to shoot the enemies before they reach him, and give the player points whenever they successfully destroy an enemy.

Health

Since all of our enemies and our player are Characters in our game, we can handle keeping track of their health in our Character class.

To do so we will add a health field and give each enemy and the player some starting health and a maximum amount of health.

Now we need to change our game creation code and our enemy generator to pass in health for our player and enemies.

Damage

Now that characters have health, we should give them the ability to take damage.

Let’s change the OnObjectCollisionMethod to cause the player and enemies to damage each other when they run into each other.

In our character class we are going to add a method that handles units taking damage. Then we will call it from the character Update method.

And in our OnUpdate method, we will make some changes to handle updating characters to damage them and destroy them.

Now when you run the game, when the player runs into an enemy it causes damage instead of outright destroying them. Enemies with more than 1 health won’t be destroyed. And after the player takes too much damage, they will no longer damage enemies. Eventually we will add a GAME OVER or lost life for this case but that will come later.

Projectiles

Now that we have characters taking damage, lets give our player the ability to shoot at enemies and destroy them. We will start by making a projectile class and a projectile type class. Create a new file called projectile.monkey that we can start making projectiles from. It will have a constructor and an update method.

and a file called projectile_type.monkey

Projectiles have a variety of attributes. First of all they have a box that can collide with enemies, and when we make enemies that shoot, with the player. Next they have power. This is done so that powerups can make the player’s projectiles stronger.

We also give the projectiles maximum speed, range, and acceleration. This is also for handling upgrades and how different weapons on different player ships or characters will work. We can have a short range, fast moving projectile. We can have a long range projectile that starts slow but speeds up over time which we handle with the Projectile’s Update method. Whatever we want.

The reason we separate the projectile type attributes out is so that we can store each character’s projectile type in their character class.

Firing

Now we want our player to be able to make some kind of projectile when the space bar is pressed. We are going to give the player character a type of projectile to fire and limit their fire rate. The idea is that whenever the fire key or button is pressed, we will true to the game engine and it will create a new projectile at the player’s location.

First we need to pass in a ProjectileType as part of the Character class constructor.

And modify the Character class to have a ProjectileType

Now we are going to add a projectile creation function for our game, and set up the SPACE bar to be our firing control.

You should be able to “fire” bullets now. Currently we are not restricting how fast you can fire, which means you can use bullets to draw a line on the screen. Our next step is to limit the players fire rate. We will do that by giving characters a last fired time as well as giving projectile types a rate of fire.

Start by updating the ProjectileType class.

Then in the Character class, lets add a method that determines whether or not a character can fire.

Finally, add the check for whether the player character can fire or not in our games OnUpdate method. Also we are going to make some small modifications to the CreateProjectile method

Your player’s character should now be firing little light blue bullets about every half second if they hold down the space bar.

Projectile Collision and Damage

Now that we can fire projectiles, we want them to actually hit the enemies and do damage to them. This means we need to modify our CustomEngine Class OnObjectCollision method to tell enemies to be damaged by projectiles and to set projectiles to destroyed when they hit enemies. While we do that, we will also refactor our other collision code to make it cleaner.

We also need to remove all projectiles that hit enemies from the game, so they don’t hit enemies twice. And since we are not currently calling the projectile’s Update method each loop, acceleration will not work yet. Let’s add that in as well as we loop over the projectiles.

When you run the game now, bullets that hit enemies should disappear and enemies that take enough damage should be destroyed (at this point red enemies take 1 damage, green take 2, and blue ones take 3).

Score

For the final part of this section, we are going to give the player points whenever he destroys an enemy. To do this we need to assign each enemy a point value, we don’t want those tougher enemies to be worth the same as the weak ones.

To do this, we are going to store a point value in the Character class. The player character won’t use it and that is just fine. We will also make a method for increasing the points earned. Then whenever an enemy with 0 health is destroyed we will give the player that many points. The reason we are checking the health is that soon we will be removing enemies that fly off the screen to keep game performance up.

Now we need to modify the Enemy and player creation code to include point values in the constructors.

Now lets add a check in OnUpdate when we destroy an Enemy to increase the player’s score if the enemy’s health is 0 or less.

Now whenever we destroy and enemy, our players score will get updated. But we can’t see what the score is right now. Our next step will be to draw the player’s score on the screen. We will do that my adding a text draw to our OnRender method to draw the player’s score in the upper left hand corner of the screen.

That wraps up projectiles and scoring for now. Our next step is to be able to actually end the game when the player takes too much damage and to add some other game states.

Tutorial Part 7

First Monkey-X Game: Enemies and Collision

Now that the player can move around the screen, let’s give him some enemies to avoid.

Start by adding a collection to hold our enemy characters.

Now we want to modify the Character class just a little so we can have enemy characters and all of them don’t move when the player touches the controls.

Since we are only going to create 1 player character and we are going to be creating multiple enemies, we are going to give the is_player variable a default of ‘False’ so we can make all our enemies by only passing the first parameter.

Now we need to go and change our player creation code to tell the game that it is a player

Make Some Enemies

Now it is time to make some enemies. We are going to start by making a little generator that creates enemies every 3 seconds or so in our OnUpdate method. We also need to initialize our enemies list.

Now when you run this, you should have some little yellow boxes floating across the middle of the screen every 3 seconds.

Randomize the Enemies

Enemies that always come straight down the middle of the screen every 3 seconds are not that exiting. Let’s spice it up and improve our enemy creator code.

We are going to do 4 things. First we want to randomize where the enemies start. Next we want to randomize how fast they are going. We also want to randomize how often they appear. Finally we want to randomize how big they are and what color they are.

Running into enemies

Now that we have some enemies flying around the screen, lets add some code that checks if we ran into one of them or not.

This adds the checks, but right now we don’t have a way to tell the engine to do anything about them.

What we want to do is extend the engine so we can override its OnObjectCollision method. To do this we are going to create a CustomEngine class that extends Fantom Engine. Create a new custom_engine.monkey file and put in the following code.

One of the ways of passing information back and forth with the engine is by setting Tags and Text on the object. In this case we are going to tell the engine that whenever a PLAYER object and an ENEMY object collided, mark the ENEMY object as DESTROYED and make sure it cannot collide with the PLAYER again.

Now we need to go back and add the text to the player and enemy boxes. Also, in our OnUpdate method, we will remove all the enemies that get destroyed.

Now when you run the game, every time your little character runs into one of the little enemy squares, the enemy should disappear.

Now the Game Truly Begins

With collision working, we can start adding projectiles for our hero to stop the enemies before they even touch his little box.

Tutorial Part 6
Tutorial Part 8

Basic Game Structure

This post is part of a series on beginning game creation with Monkey-X. You can find the previous article in the series here.

A Basic Game Loop

Most games follow a similar pattern of running through the game logic, drawing updated information to the display, then repeating until the game is over.

The special functions that we discussed in the last section handle this loop in Monkey-X, OnUpdate and OnRender. You can control how often they are called by setting the SetUpdateRate. Using SetUpdateRate(30) would update and draw your game 30 times per second. And SetUpdateRate(60) would update and draw your game 60 times per second or be 60 fps (frames per second).

** Note: the SetUpdateRate function does not guarantee that it will be able to run that fast. It all depends on the machine the game is running on, how complicated your game logic is, and how many things your are trying to draw to the screen each time.

game_loop

Game States

For most games, what is run during the update section of the loop and what is displayed is controlled by state.

When the game is in the MENU state, we draw the menu and watch for player input for which state to move to next. When the game is in the PLAY state, we draw the player’s character and the map, and whatever else and listen for input to move the player around, check for collisions or perform other game actions.

This is what we will use to manage what goes on each time Monkey-X calls OnUpdate and OnRender.

So let’s get you started making your first game.

Tutorial Part 2
Tutorial Part 4

Getting to Know TED and Mojo

*Disclaimer: This tutorial is assuming that you have some basic knowledge of computers, programming and programming lingo. If you do, but something is still unclear, shoot me an email and I will be happy to help you out.

If you followed the instructions in the previous part of the tutorial you should have Monkey-X installed and be able to open up the default IDE that comes with it, TED. Which should look something like this.

TED IDE

Today, we are going to go through a few handy things to know about using TED and some of the basic structure of a Monkey-X game and the files associated with it.

Create a File

First thing we need to do is create a new file so we can start writing some code. We are going to create a file called main.monkey because it is going to hold our Main function. You can do create this file however you want, and to do it in TED you simply go to the “File” option on the menu and click “New”. You will want to put this file in a new folder by itself. We will use this as our project folder, I have called my folder “game_one”, and will use it in the following examples.

TED File Menu

Open Your Folder As a Project

One of the handy things that TED allows you to do is open a Project view of the folder. This allows you to easily navigate and open files and folders as your game gets larger. You can do this by selecting the “Build” option from the main menu bar and clicking “Open Project”, then select the folder that you put your main.monkey file in.

TED Open Browser Window

When your games get more complex and you add multiple files, this view becomes very handy.

TED Project View

Mojo

The first thing we are going to do is add Mojo to the game. Mojo is an application framework provided with Monkey-X that gives you several useful tools for making games. It is specifically targeted at 2D games. Go ahead and add this to the top of your main.monkey file.


Import mojo

This will import all of Mojo’s components (graphic, audio, and app).

The Game

Now that we have mojo, we can create a class that is a Mojo app and will be what the rest of our game is built on. Lets do that now.


Import mojo

Class Game Extends App

End

Using Extends allows us to say that our Game is an App and it now has access to a lot of special functions and methods that Mojo gives us.

Quick note about the Monkey-X language. The End keyword is used to close Classes, Functions, Loops, Conditionals, and other code blocks. No need for ‘{ }’ everywhere in your code. Also lines do not use anything on the end to say they are done, so no ‘;’ are needed on the end of lines. There are a few other quirks about the language that it gets from Basic (from which it was derived) that we will discuss later.

Special Mojo Methods

The first special method that we will need to override that Mojo gives us is OnCreate. This method is called one time whenever you create a new instance of the Game class in your code. This is where you want to do things like load images and audio as well as set certain game values like screen width and height.


Import mojo

Class Game Extends App

  Method OnCreate()

  End

End

After OnCreate we have OnUpdate. The OnUpdate method is called a certain number of times per second (which you set in your OnCreate method). This is where your main game loop goes. This is where you will check for input and handle movement and changing game values. OnUpdate will only be called if you have set the update rate with a special method called SetUpdateRate. We call this in OnCreate and give it a number to tell it how many times per second to update. We will use 60 for now.


Import mojo

Class Game Extends App

  Method OnCreate()
    SetUpdateRate(60)
  End

  Method OnUpdate()

  End

End

Next is OnRender. This is where all of your drawing code will go. If you want to display something to the player, it should happen in this method. Mojo tries to call it immediately after every OnUpdate so the update rate that you set also applies to how many times you draw to the screen.


Import mojo

Class Game Extends App

  Method OnCreate()
    SetUpdateRate(60)
  End

  Method OnUpdate()

  End

  Method OnRender()

  End

End

Other Special Methods

There are several other special methods in Mojo (OnLoading, OnSuspend, OnResume, OnClose, OnBack) that we will discuss in a later step of the tutorial. For now it is just good to now about them. If you are curious about them now, you can go read about what they do in the Monkey-X Documentation.

Final Step

In order to have something that actually builds and runs (even though it only displays a blank screen) you will need to add a Main function creates a new instance of your Game class.


Import mojo

Class Game Extends App

  Method OnCreate()
    SetUpdateRate(60)
  End

  Method OnUpdate()

  End

  Method OnRender()

  End

End

Function Main()
  New Game()
End

Now if you build and run by hitting the little rocket ship with flames coming out the back (or by hitting the F5 key) TED should open your default web browser with an instance of the game running. Right now since we are not drawing anything in our OnRender function, it is just a blank screen. But it will soon get more interesting.

Tutorial Part 1
Tutorial Part 3

Getting Started With Monkey-X

If you have been reading any of the previous posts in this blog, you know that I have been creating games over the last couple years using a programming language called Monkey-X. It is a nice straightforward language based on Basic. Today we will go through some of the strengths Monkey-X offers and how to get Monkey-X setup on your computer so you can start creating games with it too.

Why Use Monkey-X

One of the main reasons I use Monkey-X is that I have found that for some reason I am a little extra productive in it. I don’t know if it is the simple language syntax or the ease of creating a build of the game and testing it for fast feedback. It’s probably a combination of the two and a few other things.

Additionally there is a great little community built around what is referred to as the Blitz Basic family of programming languages (the language Monkey-X came from). Guides, how to’s, a forum, and at least 1 Youtube playlist to help you get started and help you when you get stuck.

This community has also developed plugins and libraries to help you take care of some of the more routine functions and tasks that you will be performing as you create games. We will discuss these later on.

One of the more powerful reasons I even looked into using Monkey-X at all is that it builds to tons of platforms. All the major desktops (Windows, OSX, Linux), HTML5 for web, mobile (Android and iOS), even XNA so it can run on an XBox, as well as PSM for the Playstation Vita.

The final reason it is good to get started making games with Monkey-X is the cost. It is completely free to download and make games for the HTML5 target which is perfect for a beginner. And when you are ready to upgrade to build to more platforms, the Pro version is fairly inexpensive (~$40 USD at the time of this writing). If you want a little more, there is a fancier IDE and some other addons you can purchase as well.

Installing Monkey-X

Monkey-X runs on pretty much any desktop OS. Whether you are using Windows, OSX, or Linux you should be able to install Monkey-X and start making games.

Installing Monkey-X On Windows

  1. Visit the Monkey-X website and create a free account. You will need this to get the download.
  2. Sign in and visit the Monkey-X download page and download the free version of Monkey-X (or the pro version if you have purchased it). Hint: the free download is at the bottom of the page.
  3. Unzip the downloaded folder and put the files wherever you want.
  4. (Optional) Right-click the Monkey-X executable file and create a shortcut to your desktop to make accessing it easier

Installing Monkey-X On OSX/Mac

  1. Visit the Monkey-X website and create a free account. You will need this to get the download.
  2. Sign in and visit the Monkey-X download page and download the free version of Monkey-X (or the pro version if you have purchased it). Hint: the free download is at the bottom of the page.
  3. When the file has finished downloading, open in Finder and drag it to the Application folder. NOTE: You may need to change your systems security settings to allow apps from anywhere to be installed in order for it to work.

Installing Monkey-X On Ubuntu

For now I am just going to leave a link to this post someone in the Monkey-X community created for installing on Linux. If I get enough requests, I will do a walkthrough myself on setting up Monkey-X on a fresh Ubuntu install. If you would like that, shoot me an email.

Where To Look If You Get Stuck

If you have any trouble a few good places to look for help are the Monkey-X forums and sites like Stack Overflow. Also, you can email me and I will try to help you get up and running with Monkey-X.

Tutorial Part 2