Category Archives: Learning

Tactical RPG Movement in Godot 4

Recently started going through a nice little tutorial on gdquest.com that teaches grid based movement in Godot.

Only problem is, the code in the tutorial is currently for Godot 3. And there are quite a few differences between Godot 3 and Godot 4.

Some of it is just changing the names of some functions. Some of it is complete behavior change and requires changing the structure of the code.

Below are the scripts from the tutorial with the changes needed for Godot 4 up through step 3 “Creating the Unit” in the GDQuest tutorial. I will include highlights to the necessary changes and commentary to my own changes.

Grid class

# Represents a grid for a tactical game, size width and height and size of each cell in pixels
# helper functions for calculating coordinates
class_name Grid
extends Resource

# grid rows and columns

# first change here is the use of the @ symbol on export
# the decorators in Godot 4 use an @keyword vs 
# just a plain keyword in Godot 3
@export var size := Vector2(30, 30)
@export var cell_size := Vector2(80, 80)

var _half_cell_size = cell_size / 2

# get pixel position from grid coordinates
func calculate_map_position(grid_position: Vector2) -> Vector2:
	return grid_position * cell_size + _half_cell_size
	
# get grid coordinates from pixel position
func calculate_grid_coordinates(map_position: Vector2) -> Vector2:
	return (map_position / cell_size).floor()

# check that cursor or move stays inside grid boundaries

# I just renamed vars / rewrote this to be a little clearer about what it is doing
func is_within_bounds(cell_coordinates: Vector2) -> bool:
	var inside_x := cell_coordinates.x >= 0 and cell_coordinates.x < size.x
	var inside_y := cell_coordinates.y >= 0 and cell_coordinates.y < size.y
	return inside_x and inside_y

# Godot 4 was not really liking using clamp as the name here 
# since it is a built in func
# so just updated it to be gridclamp	
func gridclamp(grid_position: Vector2) -> Vector2:
	var clamped_position := grid_position
	clamped_position.x = clamp(clamped_position.x, 0, size.x - 1.0)
	clamped_position.y = clamp(clamped_position.y, 0, size.y - 1.0)
	return clamped_position
	
func as_index(cell: Vector2) -> int:
	return int(cell.x + size.x * cell.y)

Unit class

# again use of the @ symbol on the decorators
@tool
class_name Unit
extends Path2D

@export var grid: Resource = preload("res://resources/Grid.tres")
@export var move_range := 6

# setget no longer works in Godot 4
# there are a couple of new ways to create your getter and setter
# using a function inside of the set: block triggered an infinite loop
# so we write the setter code here
@export var skin: Texture :
	set(value):
		skin = value
		if not _sprite:
                        # yield has been replaced with await
                        # and we await the value on the self object
			await self.ready
		_sprite.texture = value
	get:
		return _sprite.texture
		
@export var skin_offset := Vector2.ZERO :
	set(value):
		skin_offset = value
		if not _sprite:
			await self.ready
		_sprite.position = value
	get:
		return _sprite.position

@export var move_speed := 600.0

var cell := Vector2.ZERO :
	set(value):
		cell = grid.gridclamp(value)
	get:
		return cell
	
var is_selected := false :
	set(value):
		is_selected = value
		if is_selected:
			_anim_player.play("selected")
		else:
			_anim_player.play("idle")
	get:
		return is_selected
	
var _is_walking := false :
	set(value):
		_is_walking = value
		set_process(_is_walking)
	get:
		return _is_walking
	
@onready var _sprite: Sprite2D = $PathFollow2D/Sprite
@onready var _anim_player: AnimationPlayer = $AnimationPlayer
@onready var _path_follow: PathFollow2D = $PathFollow2D

	
signal walk_finished

func _ready() -> void:
	set_process(false)
	
	self.cell = grid.calculate_grid_coordinates(position)
	position = grid.calculate_map_position(cell)
	
        # function renamed from .editor_hint
	if not Engine.is_editor_hint():
		curve = Curve2D.new()
		
	var points := [
		Vector2(2,2),
		Vector2(2,5),
		Vector2(8,5),
		Vector2(8,7),
	]
	walk_along(PackedVector2Array(points))
		
func _process(delta: float) -> void:
        # .offset has been renamed to .progress
	_path_follow.progress += move_speed * delta
	
        # .unit_offset is now .progress_ratio
	if _path_follow.progress_ratio >= 1.0:
		self._is_walking = false
		_path_follow.progress = 0.0
		position = grid.calculate_map_position(cell)
		curve.clear_points()
		emit_signal("walk_finished")
		
# PoolVector2Array is now PackedVector2Array
func walk_along(path: PackedVector2Array) -> void:
        # there is no path.empty() value
        # so we use not path.size() instead
	if not path.size():
		return
	
	curve.add_point(Vector2.ZERO)
	for point in path:
		curve.add_point(grid.calculate_map_position(point) - position)
		
	cell = path[-1]
	self._is_walking = true
		

I hope this helps you on your journey of making games.
Keep getting wiser, stronger, and better.
Balancing a Game with Complex Components

It is easy to want to add more and more complexity to game components.

But with each layer of complexity comes a multiplier of difficulty in balancing. Perfectly balanced game components are not necessarily that interesting, but completely unbalanced components can break your game.

An Example: Weapon Damage

Currently I am working on a ruleset for a table top game.

The theme of the game is tactical spaceship combat. Naturally, the ships have weapons and can attack each other. Each weapon has the following attributes:

  • Damage applied on hit
  • Range and possibly variable damage over range
  • Energy Cost to fire
  • Accuracy and possibly variable accuracy over range
  • Ammo or no ammo

First Level of Complexity: Damage and Cost Ratio

The simplest things to balance here would be to find a nice semi linear progression of damage and cost to fire.

Lets say we start with a core weapon, a laser that does 2 damage for every 1 energy. Now any weapon that does more than 2 damage per energy spent would be considered strong and any weapon that does less than that would be considered weak.

Ships that produce more energy would have an advantage to be able to fire their weapons more often.

Second Level of Complexity: Account for Accuracy

But these weapons have an accuracy value as well.

So the damage number is not the real damage number. We have an expected damage number that is the damage times the accuracy percentage.

If say, the accuracy of the laser from above was 75% then the expected damage per shot would be 1.5 damage to 1 energy spent.

We could use this to further balance weapons by bringing up the accuracy of low damage weapons and decreasing the accuracy of high damage weapons so their expected damage is closer to the baseline while still making them feel powerful or weak.

Third Level of Complexity: Ammo Count

Now we enter ammo into the equation.

The game is turn based with a max number of turns per match. Limited ammo would cap a weapons max damage it could apply over the course of the game.

Weapons that do not use ammo would theoretically be able to fire every turn. Their max damage would then be expected damage times the number of turns in the match. This could be adjusted based on if you reasonably expect an engagement in the first couple of turns.

If we have a 10 turn match, our baseline laser weapon that has an expected damage of 1.5 per energy spent would have an expected max damage of around 15 for a game.

To make a balanced high damage, low ammo weapon we would want to get the expected max damage to be roughly 15. An example weapon from the game would be a torpedo weapon that has 2 shots, an accuracy of 50% and does 15 damage per shot. Only being able to fire twice, on average 1 of the 2 shots will hit giving the weapon an expected max damage in line with the baseline weapon.

Greater Complexity: The Rest of the Game

We have an idea of just how the weapons relate to each other in relative power, but we have to balance them in relation to the rest of the game.

The ships have movement and energy generation, the weapons have various fields of fire and we did not even consider the range variable in the analysis above.

We did however simplify the damage, accuracy, and ammo into a single value that could be used to make balancing weapon power easier.

I hope you found this useful in bringing some balance to your own game.

Keep getting wiser, stronger, and better.

How to Split Audio Tracks and Increase Volume in ShotCut

I recently started making some let’s plays from some wise advice about monetizing your dopamine addiction.

As a big proponent of “do it poorly, then get better” I started just doing very, very basic videos. Cheap microphone, no transitions or graphics, just gameplay with some commentary. Well the audio was not great. In some videos you can’t hear me at all almost. Part of that is these are often done late at night or early in the morning and I don’t want to wake any one else in the house.

So time to start doing some minor video editing as part of “getting better.”

Step One: Switch OBS to record to multiple audio tracks

I made a major mistake when I first tried this.

I set my microphone to record on a different track than my game input. This is the right thing to do. However, I did not go into OBS’s recording settings and set the audio to advanced -> multi track recording.

Result was I have a 45 minute video with just gameplay sounds, none of my commentary was recorded.

Both steps are required to get multiple audio tracks in your recording.

Step Two: Choose a video editing software (or audio) that can do what you want

I knew about OpenShot as a free video editor so decided to give it a try.

It can almost do what I want, but not quite. While I was googling how to do things in OpenShot, I came across another opensource video editor called ShotCut that ended up being able to do exactly what I wanted.

Step Three: How to separate your audio tracks in ShotCut and increase the volume of the quiet one.

  1. Load your video into ShotCut
  2. Drag it down into the timeline
  3. Right click in the timeline and choose detach audio
  4. In the video part of the timeline, right click and select “Properties”
  5. On the audio tab, set the audio to track 1 (or whatever track you want)
  6. In the new audio only part of the timeline, right click and select “Properties”
  7. Set the audio to track 2 (or whichever track your second audio stream is coming in on
  8. To increase the volume of a given track, with the track selected click the Filters button at the top
  9. Add a “Volume/Gain” filter to the track
  10. Slide the volume adjust bar left for lower volume and right for higher volume as needed
  11. Voila!

Hope this helps

Keep getting wiser, stronger, and better.

Training Wheels for Game Design: Borrow What Works

Game design can be hard at the micro level.

How much xp should it take to go from level 1 to 2? How about from level 9 to 10? Should this weapon do 25 damage or 30? How far should this unit be able to move? These questions are even harder if this is your first time making a game.

These questions can often be answered thru a lot of playtesting, but there is a way to save time.

Borrow from other games that already work.

I am working on a collection of turn based games.

Once common concept across these games (since they are ultimately meant to be joined together) is the idea of characters that can gain experience and level up. Instead of trying to design this very common system from scratch, I am borrowing ideas from existing games that do things the way I already like. They already did a majority of the heavy lifting.

Now I just tweak values to my liking.

Keep getting wiser, stronger, and better.

Measuring Hexagons for 3D Printing

I have been watching a fair amount of tabletop gameplay recently and it made me want to do a few things.

First, design a tabletop game. Specifically tabletop versions of the turn based tactics video games I am working on. This would help me play test some of the game balance and mechanics without having to program them all into existence. (Explaining a rule to a computer can be very time consuming).

Second, it has made me want to fire up my 3D printer and make some simple models to move around for playtesting.

So What About Hexagons?

One of the things I am thinking about changing is from a standard grid to a hex grid for the “game board”.

I am 100% doing it for the tabletop version, although I like the grid version better right now for the video game. Why this matters is I am practicing modeling in Blender. I have done very very little of it so far but I am learning tons every day.

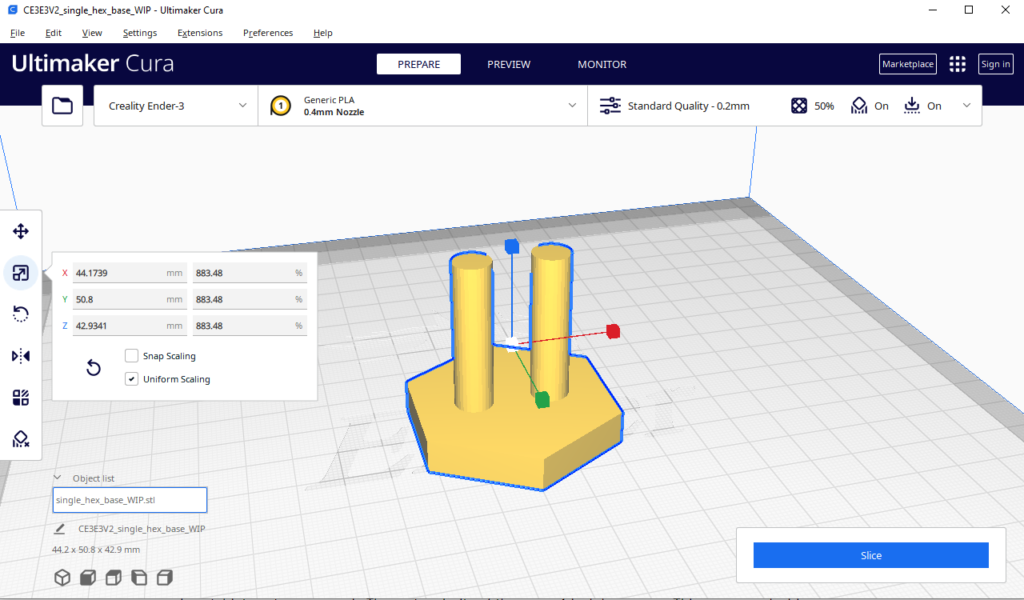
Right now I am making hexagon shaped bases for space ships to sit on (I may go into the specifics of how to do this in another post). Herein lies the problem. I need to scale them to the correct size in the slicer for the 3D printer.

The idea is to be able to play on a widely available play mats that you can find on Amazon or one of the various tabletop stores around. The vast majority of these use 1 inch hexagons. This means each side, face, edge, whatever you want to call it is 1 inch.

Now when you are scaling in the slicer for your 3D printer, you can’t choose to scale by the length of a face, you have to scale by the whole width and height. Thankfully, normal hexagons have a nice ratio of face to max width.

If your hexagon has 1 inch faces, then it should be 2 inches wide at the widest diameter (from a corner to the opposite corner). So now when you scale your model in your slicing software, you pick the dimension that will correlate to the wide diameter and set it to 2 inches (or 50.8 mm which is probably what it is measured in).

Now you have a properly sized hexagon that should fit nice and snug on a 1 inch hex grid map.\

Keep getting wiser, stronger, and better.

New Year New Skill

This post inspired by this Substack post by Mike Cernovich.

There is a powerful idea that you may or may not have heard of called the “Skill Stack.”

I first heard the term from Scott Adams’ book “How to Fail at Almost Everything and Still Win Big.” The idea is that you don’t have to be the best in the world at one skill to be successful. You should stack skills together so that you are the best in the world (or at least near the top) at the combination of skills.

Your New Year’s resolution should be to learn a new skill and add it to your stack.

Things You Should Be Good At

There is a list of things that nearly everyone will benefit from:

  • Energy Management
  • Sales
  • Risk Evaluation
  • Communication
  • Persistence
  • Building Skills
  • Prioritizing

Think of these as a foundation to build your other skills off of.

Find a Skill that Will Take You Towards Your Desired Future

Ideally you have some vision of the life you want to live.

Maybe it is a dream job. Or something you want to do everyday. Maybe it is a great work you have created (book, movie, game, app, etc).

Figure out what skills the future you who is doing that or has created that would have, then pick one and learn it this year.

Then stack those skills until you are the person that can get to your vision.

My Skill for 2023

Personally, I am going to try to become a better artist.

Specifically digital art. I have made a handful of game prototypes and am enjoying designing and building games. But my self created game art still looks pretty bland. And while many games have been successful with very basic art, good art does enhance the experience.

So look out for art progress posts this year.

Keep getting wiser, stronger, and better.

Colyseus: Multiplayer Game Server in Node JS

Sometimes you find something cool by accident.

This morning I stumbled across an interesting open source multiplayer server for Node JS called Colyseus. And I say stumbled because I wasn’t looking for something like this at all. I was researching a different problem entirely and it caught my eye.

Online multiplayer is a problem I have looked into before and this looks like a nice prepackaged solution.

How It Works

Colyseus is built on the idea that multiplayer games need an authoritative server.

All a game client should do, for a multiplayer game, is report the player input to the server and render the game state provided from the server back to the player. This can be a bit tricky over the internet with latency. Players can get frustrated because their input does not match what they expect from the games reaction.

Colyseus uses websockets and presents a set of lifecycle methods to plug your logic in and get started. It connects players to “rooms” that are game instances in memory. The players then interact with the room until the game is over at which point you can throw away the game state or store it in a database for later.

I will definitely be checking this out for some of my upcoming projects.

Learn More

You can learn more about this project by reading it’s documentation and checking out the source code.

There Is Something You Are Afraid to Do

Someone reading this is not taking a step in their life because they are afraid of change.

If you were to attempt the step and fail, you would be no worse off than you were before. You would be in exactly the same place. And you could try again.

Fear of change is holding you back.

Imagine what you are afraid of.

Take a minute and just imagine the worst that could happen if you made the change.

  • Is that really what would happen?
  • What is the most likely outcome?
  • What would the benefits be of succeeding?
  • How can you make sure the worst outcome doesn’t happen if you try?

Now that you have imagined it, it is not so scary.

Commit to the first step.

Set aside some time and take the step.

Take a vacation day if you have to (or a sick day if you must). This is a change you are making to better your life. It is worth one of your vacation days. If it isn’t, maybe it wasn’t that great of a change to begin with.

Build the momentum.

If it doesn’t work out, try again.

Wasn’t as scary as you imagined was it?

Things didn’t work out and your life is about the same. Except now you are more confident. You have learned some things. You are better prepared for your next attempt.

Go for it again.

How I Start Every Game I Make

After the basic design, I create a simple object that can appear on the screen.

This object will usually become the basis for the player character or a unit the player will control. After I draw it to the screen, I try to implement the basic movement controls.

These 2 simple steps help me build the momentum needed to actually make the game.

Few things stop people more than the empty project.

The hardest thing for most people is the first step.

It doesn’t matter who:

  • Blank pages for writers
  • Blank files for programmers
  • Empty screens for game developers.

Having a framework to follow that gets the first steps going easily is important to consistent results.

If you don’t have an idea, copy one to start.

For some people, they have trouble with the base idea or design.

There are a huge number of games out there (the same is true for programs and articles). If you don’t have an idea of what you want to make, start by cloning one of the classic simple games. Then add some sort of unique twist.

This is especially valuable if you are just staring making games.

Simplify, simplify, simplify.

One reason you might be having trouble starting is you are making the first step too complicated.

Notice my first step has no game logic in it. It is super simple. Draw something on the screen. Your first step and the one after it should ideally be simple enough to do in 15 minutes or less.

If you find yourself struggling, make the next step smaller.

The Hardest Psychological Problem in Trading

The hardest thing to get right in trading is letting your winners run and cutting your losers quickly.

Something about it goes contrary to our nature. The average person wants to take a profit quickly to make sure it doesn’t disappear. And they want to hold on to a loss hoping for it to come back.

In order to be profitable long term, you have to retrain your brain.

Cut losses quickly.

Before you enter a trade, have a clearly defined stop out.

Many traders get underwater in a trade and then freeze up. They can’t take any actions. Having a clear stop means if the trading vehicle you are using goes to that price, you will get out of the trade no matter what. This keeps your losses small. It keeps you in the game.

A clear plan will keep you from freezing and taking a larger loss than necessary.

Let winners run.

When a trade is going in your favor, don’t be too eager to take profits.

Have a clearly defined area that you expect the stock, option, etc to reach. Have a thesis as to why it will go there. Then let your thesis play out. And if it hits your goal, don’t sell the whole position. Keep a small part on to see where it will go.

If it doubles in value, sell half and ride the rest stress free.

Trade smaller size.

One reason traders get jumpy about their profits and freeze with their losses is they put on too big of a trade.

You have to build up your tolerance both emotionally and financially to put on larger and larger positions. Your risk should never be more than 1-2% of your account. And if you are feeling nervous about that amount, make the position even smaller.

You have to manage your emotions and your money when trading.