Category Archives: Monkey-X

First Monkey-X Game: Images and Theme

Games in general can get by with just basic shapes like squares, circles and triangles if the gameplay is good enough.

But we don’t want to just get by, so we are going to add images to our game that have a theme.

If you recall from earlier in the series, our theme is being underwater in a submarine fighting various kinds of biological and mechanical enemies.

We Need Art

The first thing we need is art.

There are a variety of ways to acquire game art. You can make your own, hire someone to draw you custom art, buy some already created art assets, or use some free art from a site like opengameart.org

Personally I like to draw and make little art assets. There are a lot of free tools that you can use and the images you make don’t have to be great, especially not for your first game.

What Will We Draw?

Let’s start by making a list of the objects in our game that we want to have art for.

  1. The Player
  2. 3 or more Enemy types
  3. 1 or more Bosses
  4. 1 or more Projectiles
  5. 1 or more Power Ups

For now we are going to start with the Player, some Enemies, some Projectiles, and a Boss. We will save the power ups and other images for later.

What Style Will We Use

One of the important things about your art is that is has a consistent style. Most of the time you don’t want to be mixing some 8 bit pixel art with cartoonish drawing style art.

You also want a style that lends itself to the theme and setting of your game. For example, you probably don’t want a cartoony and silly style for a horror game.

If you want you can pick a different style but for this I chose a simple flat basic shape style.

Adding the Images to the Game

Pack it Up

One of the ways to make your images more efficient for your game is to pack it into something called a sprite sheet. There is a free tool that will help with this called Texture Packer that works with FantomEngine.

You simply bring in the set of images that you want to turn into a sprite sheet and it puts them all together and allows you to export them into a single image. It then lets you save a file that describes that image so your game knows how to grab each one.

Fantom Engine only knows how to read the LibGDX and Sparrow data file formats for sprite sheets so make sure you pick one of those in the Texture Packer output file settings.

The Player

Let’s just start with the player and a single image and animation.

I created a simple set of 3 images to represent the player’s submarine. The only difference being the propeller so when we animate it, it will look like the propeller is spinning.

We are going to put it into our games ‘.data’ folder so we can load it later.

Loading the Images and Animation

Now that we have created an image, we need to load it into the game and associate it with the player.

What we are doing here is loading the image into memory, then creating an Animation object to replace our regular box that we had before. The Animation needs an image, it needs to know where in the image the animation starts, how big each frame is, and how many frames there are.

Everything else about the Fantom object remains the same so collision, movement, and everything else still works but now we have an animated little submarine instead of a box.

Using a Sprite Sheet

Now that we have a single image and animation working, we will see how to use a full sprite sheet.

I created an image for 3 different enemies, 2 different projectiles, the player, and a boss.

We then put all of the images into Texture Packer and publish the sprite sheet and the atlas mapping file. Remember to use the LibGDX or Sparrow formats for the atlas mapping file. Then we are going to put both into our games ‘.data’ folder.

Let’s start adding our new sprite atlas to the game and by getting our player’s animation from the new combined sprite sheet.

As you can see, this is not all that different from using an individual image for the animation, but it saves our game time and resources.

Fewer Enemy Types

Previously, we had all sorts of randomly sized enemies flying around the screen. Now since we have images or animations for 3 enemies, we will limit our enemy characters to being 1 of the 3 that we have images for. This is going to be a major overhaul of our enemy generator function.

First we need to pick our next enemy type at random. Then we will build the animation or regular image from our sprite sheet based on which enemy type it is.

Projectiles

The final 2 things that need to use our sprite atlas currently our the projectiles and the Boss.
Let’s start with projectiles.

And the Boss

Last but not least the Boss.

Now just by adding some images our game has a little underwater theme going on.

Guide to Building a Monkey-X Game to Android

Step 1: Import the project to Android Studio

You will need to import the project to Android Studio as a Eclipse project. File – New – Import Project and select the folder with your Monkey-X android build. This is usually ../appname/main.buildv86e/android_new although your main.build folder may be named differently depending on which version of Monkey you are compiling against.

Step 2: Rename the package

The default package name is “com.monkeycoder.monkeygame”. This must be renamed as that is already taken on the Play store.

You will need to rename this in the Android Manifest, the main Java file, the res – layout – main.xml file, and the gradle build script. In the Java file you will need to rename the package at the top as well as the ANDROID_APP_PACKAGE variable (constant?).

I also recommend renaming the application and activity labels in your AndroidManifest.xml file from “Monkey Game” to your games title.

Step 3: Create an Icon

You will need to bring in your own icon for the app. This needs to be brought into the “res” folder and then referenced from the AndroidManifest.xml file.

Simply do a File – New – Image Asset and select the file you want to import. Android studio will generate various resolution versions of it for you.

I believe you will want at least a 512×512 pixel image. It kills 2 birds with one stone because Android will use it for the icon and 512×512 is the resolution needed to upload your icon to the Play store page.

Step 4: Test it on an actual device

After doing these steps, sometimes you miss something and the app will crash. Make sure to test your Android Studio build on an actual device now.

Step 5: Create a Signed APK

You will need to create a Signed APK file to upload. Android Studio makes this pretty easy. If you don’t have a key or a keystore already, it will walk you through setting one up. Then use the key to create a Signed build of your game that will be used to publish.

Step 6: Fill out information on Google Play and Upload the Signed APK

You now need to go through all of the questions and info for the Google Play store. This includes uploading your icon as well as a feature image that at time of this writing is 1024×500 pixels. You can put whatever you want here but probably should make it related to your game. Additionally it asks for screenshots. Most phones can do this although it could be difficult with an action game, or you could do it with an emulator.

There is also an area to put a link to a youtube video if you want to cut a short promotional video for your game.

Other steps include filling out a content rating questionnaire, linking to a privacy policy, and setting up purchases and adds (to name a few).

Quick and Dirty

This is a brief overview of the whole process. Mostly just notes to myself with reminders about changing things in Android Studio for the next time I release a game like this.

Hope you find this helpful.

First Monkey-X Game: The Boss Shoots Back

The basic structure for our game is there, we need to start to make it more interesting now. Our Boss could use some work. All he does right now is move up and down.

Not exactly Boss like.

The Boss Shoots

Step 1 in making the game more interesting is having the Boss on every level actually shoot at the player.

This is actually pretty simple because of the work we did creating the character and projectile classes and their methods.

Boss Bullets Hurt

Now that the Boss is shooting, we need to make sure that projectiles that hit the player follow the same kind of rules that the player’s projectiles do. When they hit the player, they should damage the character and then disappear.

This means adding a little more logic to our CustomeEngine’s OnObjectCollision method.

Now when you play the game, if the player character gets hit by one of the Boss’ projectiles, it should get damaged and the projectile should disappear.

Extra Projectiles for the Boss

It seems like the Boss should be a little more powerful. Shooting one bullet at a time seems a little weak. So we are going to have our Boss shoot 3 bullets at once. That should make it feel a little more challenging.

To do this, we are going to slightly modify our CreateProjectile method to take a width and height offset from the character that is shooting. This will also come in handy later when we want to add powerups.

Your Boss should now be a worthy opponent firing 3 bullets at once.

Time for a Theme

All of our hard work is starting to pay off. We now have a framework for setting up levels with a Big Bad Boss at the end of each one that can move and shoot at the player.

Next we will start adding some images to the game to give it a theme.

First Monkey-X Game: Final Boss and Game State for Winning

The game is getting pretty playable, but like all good things it needs to come to an end.

If you remember from our little design exercise, we have a goal that will end the game. When we defeat the Big Bad Boss.

In this step, we will add the Boss into the game and create a Game Won state for when the player defeats the Boss.

Getting to the Big Bad Boss

The boss is going to be another character that we add to the game. We want him to be tougher than any of our enemies so far and we want him to shoot at the player to make it challenging.

Let’s start by creating the Boss character.

So now we have a field where we can put our Boss and we have a method that we can call to create him, but we don’t want to call it right away because we only want to have our Boss show up when we get far enough into the game.

So we will need 2 more things. First we need something to track whether or not it is time for the Boss to show up, and once this tracker is satisfied we don’t want to create another Boss.

Ok, at this point when you run your game, if you survive for 15 seconds or so you should get to a point where the small enemies stop getting created and you see a large purple shaded box representing the boss.

Boss Behavior

Now that we can get to the Boss, we want an EPIC BOSS FIGHT! Ok, maybe it won’t exactly be epic at first, but we can start by giving him some basic behavior. We also need to add the ability to shoot the Boss.

To start with we want to add some simple AI to the Boss’ movement. Nothing fancy, just moving the Boss up and down.

Now your Boss should go up and down the screen. Really, really simple pattern for now. We can get fancy and create more complicated logic for the movement later.

Damaging the Boss

Now that the Boss is moving, we need to be able to destroy it so we can win the game. This means we need to wire up the collision detection for our player’s projectiles and the Boss hit box. We also need to make sure the Boss takes damage when it gets hit.

Now projectiles will collide with the Boss but our current Character code won’t handle this correctly after the Boss gets hit. So we need to make a few tweaks to the Character class.

Now you will need to go into your main Game class and update the constructors for your Player and the Final Boss. The regular enemy constructor is fine since it just uses the default. There is also a check when firing projectiles that needs updating.

Now your projectiles should hit the Boss and damage it. However you should notice that once the Boss’ health drops to 0, the Boss is still there and the projectiles just fly past.

We still need to make the OnUpdate method a little smarter about what happens when the Final Boss is destroyed.

Destroying the Boss and Next Level

Destroying the Final Boss is simple enough. In the OnUpdate code, simply add a check to remove the Boss from the game when his health reaches 0. But what we really want to do is change scenes to a show that we beat the boss.

In order to give us some room to give the game more depth, we are not actually going to have the player win the game after beating the first boss. Instead we are going to have the game transition to a Next Level scene.

Now we have a scene we can transition to, lets transition to it when our Boss dies.

And we don’t want to get stuck there so lets add a method to allow the player to continue.

Now when you play the game, after you destroy the Final Boss, you should get to the Next Level scene. Then if you hit enter it should start play again but your score will remain the same.

Actually Winning

What we really want to do in this chapter is give the player the ability to beat the game. In order to do that we need to add 1 more scene, the Game Won scene.

If you have been following along, you have already gotten pretty familiar with adding scenes to the game by now, and could probably do this yourself. Just in case here is the code for the Game Won scene.

Now we need to be able to actually get to this scene. Defeating the Boss doesn’t get us there, it only gets us to the next level, and right now we have infinite levels.

First let’s put a way to track what level we are on and set a maximum number of level. Then we can use those 2 values to tell us when to end the game.

Now whenever we get to the Next Level, lets update our current level and see if it is the final level.

Now when the player beats the boss on the last level, they have beat the game.

In the next section we will make the Boss a little tougher and let him shoot back.

First Monkey-X Game: Restarting the Game

Now that the player can get to a game over state, we need to let them restart the game without having to refresh the web page.

Hit ENTER

We will add a new check for after the player has been destroyed for the ENTER key to be pressed to try again. Also we will add a message in the game over screen to tell players what they need to do.

Let’s start by adding the instructions to the Game Over screen on how to restart.

Now we want a way to reset the game whenever ENTER is pressed from the Game Over scene. We will do this by creating a small method in our game that goes through and deletes all of our enemies and bullets and recreates the Player.

You will notice that we have a new method here called CreatePlayer. Our next step is to refactor the code from our OnCreate method into this method so we can recreate our player when we reset the game.

The final step is to add the code to call the GameReset method when the ENTER key is pressed from the Game Over state. This will make its home in the Game’s OnUpdate method.

And now our player can easily start over when their little character gets destroyed.

Our next step will be creating a boss character and an end state to our game.

First Monkey-X Game: Player Destruction and Game State for Losing

Our player can fire projectiles and destroy enemies. He can run into enemies and take damage. But right now the player does not get destroyed.

In this part of the tutorial, we will move to a Game Over state whenever the player gets destroyed. This will cover some of the basics of FantomEngine’s layers and scenes.

Game Over State

Right now, we only have the default layer and scene which we are playing our game in.

In order to be able to move to a Game Over state, we need to create a new scene that the game can transition too.

Now we have a play scene that we will run the game in, and a game over scene that we will show when the player gets destroyed.

Right now the game over scene doesn’t have anything in it. In the game’s OnCreate method, we will build our game over scene by adding some text that says “GAME OVER”.

It is important to remember with FantomEngine that whatever layer is the current default layer will be the one that things get added to. This is why we need to change the default layer to the game over layer when adding the Text object and switch back when we are done.

NOTE: The font system is not particularly well documented for FantomEngine. It supports FontMachine and EZGui style fonts. You will need a PNG file and a TXT file describing the layout in your project_name.data folder for it to work. I was able to use a tool called Hiero to convert Google font VT323 to this format. There will be an appendix section covering this. There is a sample font in the examples that come with FantomEngine which you can use in the meantime. I will also try to make the converted font I did available.

Switching Scenes

Our final step will be to add a check to the OnUpdate method to switch the scenes if the player is destroyed.

And now we have a playable and basic version of our game where the player can move, shoot enemies, and be destroyed which ends the game.

First Monkey-X Game: Projectiles and Score

We have all sorts of enemies flying at our hero and if he hits them they disappear. Now we need to incentivize him to NOT run into all the bad guys.

Our next steps are to make enemies damage our hero when he runs into them, give him the ability to shoot the enemies before they reach him, and give the player points whenever they successfully destroy an enemy.

Health

Since all of our enemies and our player are Characters in our game, we can handle keeping track of their health in our Character class.

To do so we will add a health field and give each enemy and the player some starting health and a maximum amount of health.

Now we need to change our game creation code and our enemy generator to pass in health for our player and enemies.

Damage

Now that characters have health, we should give them the ability to take damage.

Let’s change the OnObjectCollisionMethod to cause the player and enemies to damage each other when they run into each other.

In our character class we are going to add a method that handles units taking damage. Then we will call it from the character Update method.

And in our OnUpdate method, we will make some changes to handle updating characters to damage them and destroy them.

Now when you run the game, when the player runs into an enemy it causes damage instead of outright destroying them. Enemies with more than 1 health won’t be destroyed. And after the player takes too much damage, they will no longer damage enemies. Eventually we will add a GAME OVER or lost life for this case but that will come later.

Projectiles

Now that we have characters taking damage, lets give our player the ability to shoot at enemies and destroy them. We will start by making a projectile class and a projectile type class. Create a new file called projectile.monkey that we can start making projectiles from. It will have a constructor and an update method.

and a file called projectile_type.monkey

Projectiles have a variety of attributes. First of all they have a box that can collide with enemies, and when we make enemies that shoot, with the player. Next they have power. This is done so that powerups can make the player’s projectiles stronger.

We also give the projectiles maximum speed, range, and acceleration. This is also for handling upgrades and how different weapons on different player ships or characters will work. We can have a short range, fast moving projectile. We can have a long range projectile that starts slow but speeds up over time which we handle with the Projectile’s Update method. Whatever we want.

The reason we separate the projectile type attributes out is so that we can store each character’s projectile type in their character class.

Firing

Now we want our player to be able to make some kind of projectile when the space bar is pressed. We are going to give the player character a type of projectile to fire and limit their fire rate. The idea is that whenever the fire key or button is pressed, we will true to the game engine and it will create a new projectile at the player’s location.

First we need to pass in a ProjectileType as part of the Character class constructor.

And modify the Character class to have a ProjectileType

Now we are going to add a projectile creation function for our game, and set up the SPACE bar to be our firing control.

You should be able to “fire” bullets now. Currently we are not restricting how fast you can fire, which means you can use bullets to draw a line on the screen. Our next step is to limit the players fire rate. We will do that by giving characters a last fired time as well as giving projectile types a rate of fire.

Start by updating the ProjectileType class.

Then in the Character class, lets add a method that determines whether or not a character can fire.

Finally, add the check for whether the player character can fire or not in our games OnUpdate method. Also we are going to make some small modifications to the CreateProjectile method

Your player’s character should now be firing little light blue bullets about every half second if they hold down the space bar.

Projectile Collision and Damage

Now that we can fire projectiles, we want them to actually hit the enemies and do damage to them. This means we need to modify our CustomEngine Class OnObjectCollision method to tell enemies to be damaged by projectiles and to set projectiles to destroyed when they hit enemies. While we do that, we will also refactor our other collision code to make it cleaner.

We also need to remove all projectiles that hit enemies from the game, so they don’t hit enemies twice. And since we are not currently calling the projectile’s Update method each loop, acceleration will not work yet. Let’s add that in as well as we loop over the projectiles.

When you run the game now, bullets that hit enemies should disappear and enemies that take enough damage should be destroyed (at this point red enemies take 1 damage, green take 2, and blue ones take 3).

Score

For the final part of this section, we are going to give the player points whenever he destroys an enemy. To do this we need to assign each enemy a point value, we don’t want those tougher enemies to be worth the same as the weak ones.

To do this, we are going to store a point value in the Character class. The player character won’t use it and that is just fine. We will also make a method for increasing the points earned. Then whenever an enemy with 0 health is destroyed we will give the player that many points. The reason we are checking the health is that soon we will be removing enemies that fly off the screen to keep game performance up.

Now we need to modify the Enemy and player creation code to include point values in the constructors.

Now lets add a check in OnUpdate when we destroy an Enemy to increase the player’s score if the enemy’s health is 0 or less.

Now whenever we destroy and enemy, our players score will get updated. But we can’t see what the score is right now. Our next step will be to draw the player’s score on the screen. We will do that my adding a text draw to our OnRender method to draw the player’s score in the upper left hand corner of the screen.

That wraps up projectiles and scoring for now. Our next step is to be able to actually end the game when the player takes too much damage and to add some other game states.

Tutorial Part 7

First Monkey-X Game: Enemies and Collision

Now that the player can move around the screen, let’s give him some enemies to avoid.

Start by adding a collection to hold our enemy characters.

Now we want to modify the Character class just a little so we can have enemy characters and all of them don’t move when the player touches the controls.

Since we are only going to create 1 player character and we are going to be creating multiple enemies, we are going to give the is_player variable a default of ‘False’ so we can make all our enemies by only passing the first parameter.

Now we need to go and change our player creation code to tell the game that it is a player

Make Some Enemies

Now it is time to make some enemies. We are going to start by making a little generator that creates enemies every 3 seconds or so in our OnUpdate method. We also need to initialize our enemies list.

Now when you run this, you should have some little yellow boxes floating across the middle of the screen every 3 seconds.

Randomize the Enemies

Enemies that always come straight down the middle of the screen every 3 seconds are not that exiting. Let’s spice it up and improve our enemy creator code.

We are going to do 4 things. First we want to randomize where the enemies start. Next we want to randomize how fast they are going. We also want to randomize how often they appear. Finally we want to randomize how big they are and what color they are.

Running into enemies

Now that we have some enemies flying around the screen, lets add some code that checks if we ran into one of them or not.

This adds the checks, but right now we don’t have a way to tell the engine to do anything about them.

What we want to do is extend the engine so we can override its OnObjectCollision method. To do this we are going to create a CustomEngine class that extends Fantom Engine. Create a new custom_engine.monkey file and put in the following code.

One of the ways of passing information back and forth with the engine is by setting Tags and Text on the object. In this case we are going to tell the engine that whenever a PLAYER object and an ENEMY object collided, mark the ENEMY object as DESTROYED and make sure it cannot collide with the PLAYER again.

Now we need to go back and add the text to the player and enemy boxes. Also, in our OnUpdate method, we will remove all the enemies that get destroyed.

Now when you run the game, every time your little character runs into one of the little enemy squares, the enemy should disappear.

Now the Game Truly Begins

With collision working, we can start adding projectiles for our hero to stop the enemies before they even touch his little box.

Tutorial Part 6
Tutorial Part 8

First Monkey-X Game: Creating the Player

One of the first things I like to do when making a game is to build the fundamental mechanics in first. In this case it will be the player’s character and the ability to move around the screen.

In order to keep the code clean, we will separate the character out into its own class.

Draw

We will start by adding the character to the game and drawing it in the form of a rectangle. To do this we need to give the Character class a ftObject representing a box. Then we will create a character in the game’s OnCreate method.

We also need to update the OnRender method to tell the engine to draw all of the objects

Now when you run the Main file you should get a black rectangle on a red background.

Pretty basic but that is what we are going for.

Movement

Now that we can see the player, let’s add some controls so they can move around the screen. We will put the handling of the controls in the Character class by giving it an Update method. This way we can keep the code clean. For now let’s use the arrow keys to move our player around.

Now all we need to do is call the character update method from our game’s OnUpdate method and we will have movement.

Run this and you should be able to move your little rectangle around with the arrow keys.

Boundaries

We don’t want the player to lose their character by it flying off the screen, so let’s prevent the player from being able to leave the viewable area.

We will do this by adding some additional checks in the Character class Update method.

Now when you run your code, you should be able to move the box around with the arrow keys but it should never leave the viewable area.

Our next steps will be to add enemies and the ability to shoot them.

Tutorial Part 5
Tutorial Part 7

Setup for Making Your First Game

Like most creative things, it takes a little setup before we can start actually making our game. A lot of this stuff you only half to do once, and future games are even easier to get started on.

If you have been following along, you already have Monkey-X installed and can open up the TED IDE to write some code. If not, go back to the first part of this tutorial and get it installed.

The Fantom X Module

For this first game we are going to use a Monkey module called Fantom X (previously Fantom Engine) to do some of the heavy lifting for things such as collision and user interface.

It includes access to Monkey’s Mojo framework and gives us a lot of nice tools.

Install the Module

Head over to fantomgl.com and under Fantom X, select download.

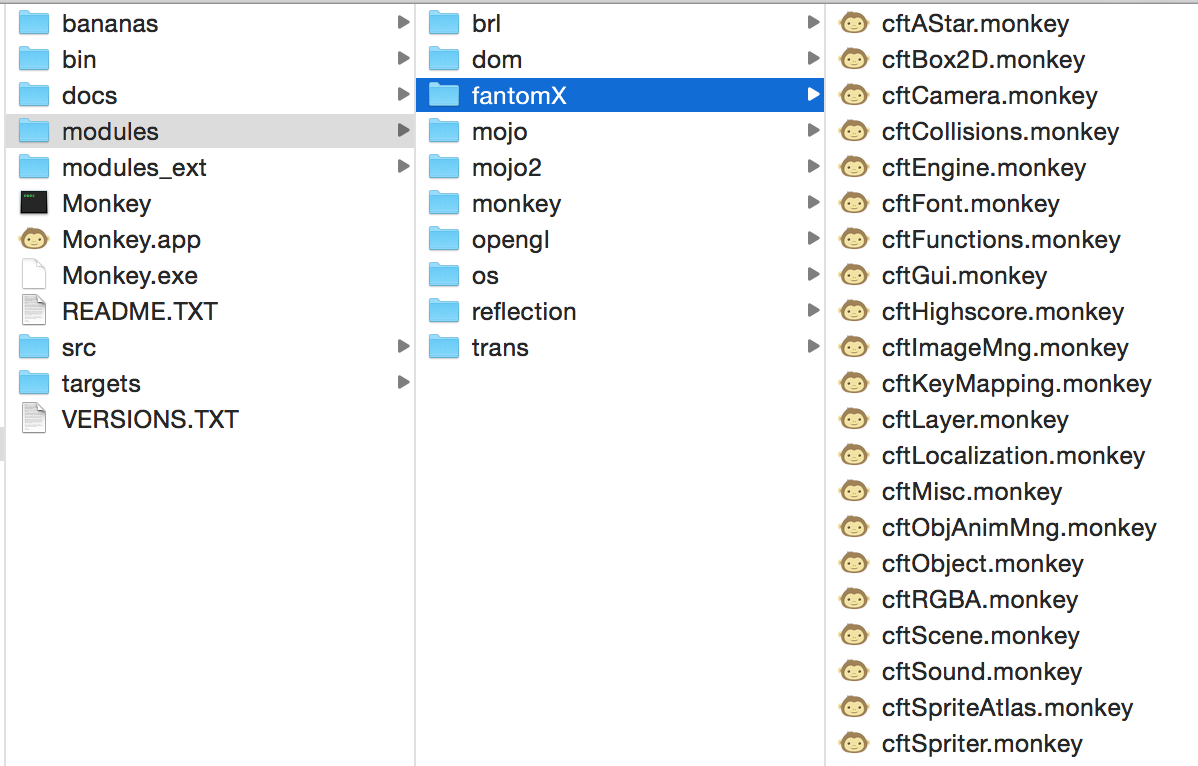
Once the zip file is downloaded, unzip the file and copy it to Monkey’s modules folder.

Monkey Modules Folder

Import Fantom X and Start Your Engine

Now that Monkey is installed and Fantom is installed, we need to bring the Fantom X module into our game file and create an instance of the engine. To do that we will import Fantom X, create our Game class, give it an engine object and start our OnCreate method.

This creates an instance of the Fantom engine that will be managing a lot of our game for us.

The Main function is what Monkey needs to have in the file that you build to run. In the Ted IDE you can click build and run and this should run without errors. All you will get is a black screen but that is alright for now.

Set the Scene

Fantom has Layers, Scenes and Objects. A Layer is a collection of Objects. A Scene is a collection of Layers. A game is a set of Scenes that are like the various states (menu, first level, etc) that the game goes through.

One of the things it needs to know when it starts up is which scene to start in. So we need to set the default scene in our OnCreate method.

Also the engine can operate with various Layers, allowing you to have a background and a foreground and to simulate height and depth for 2D games. While we set the default scene, we are going set the default layer as well.

Even if you are copying and pasting the code, it is a good idea to try to run it and make sure you don’t get any errors.

Add Update and Render Methods

The final part of our setup is going to be adding the OnUpdate and OnRender functions. We will go ahead and use the engine to draw some text in them just to make sure they are working.

Here we create our OnUpdate method and call the engine’s Update method. First we find out how long it has been since we last called this method with CalcDeltaTime. Then we divide that by what we expect our framerate to be in order to get a speed factor to pass to our the engine’s Update method. This will ultimately affect each object when we modify it’s speed later.

In our OnRender method we clear off the screen and make it completely red. Then we set the color of what we are about to draw. After that we draw text that shows the position of our cursor or our touch input in relation to our game.

Run it now and test it out.

Setup Complete

Now that we have a basic shell for our game we can start adding the various scenes and objects together to make our game.

Tutorial Part 4
Tutorial Part 6