Category Archives: Learning

Setup for Making Your First Game

Like most creative things, it takes a little setup before we can start actually making our game. A lot of this stuff you only half to do once, and future games are even easier to get started on.

If you have been following along, you already have Monkey-X installed and can open up the TED IDE to write some code. If not, go back to the first part of this tutorial and get it installed.

The Fantom X Module

For this first game we are going to use a Monkey module called Fantom X (previously Fantom Engine) to do some of the heavy lifting for things such as collision and user interface.

It includes access to Monkey’s Mojo framework and gives us a lot of nice tools.

Install the Module

Head over to fantomgl.com and under Fantom X, select download.

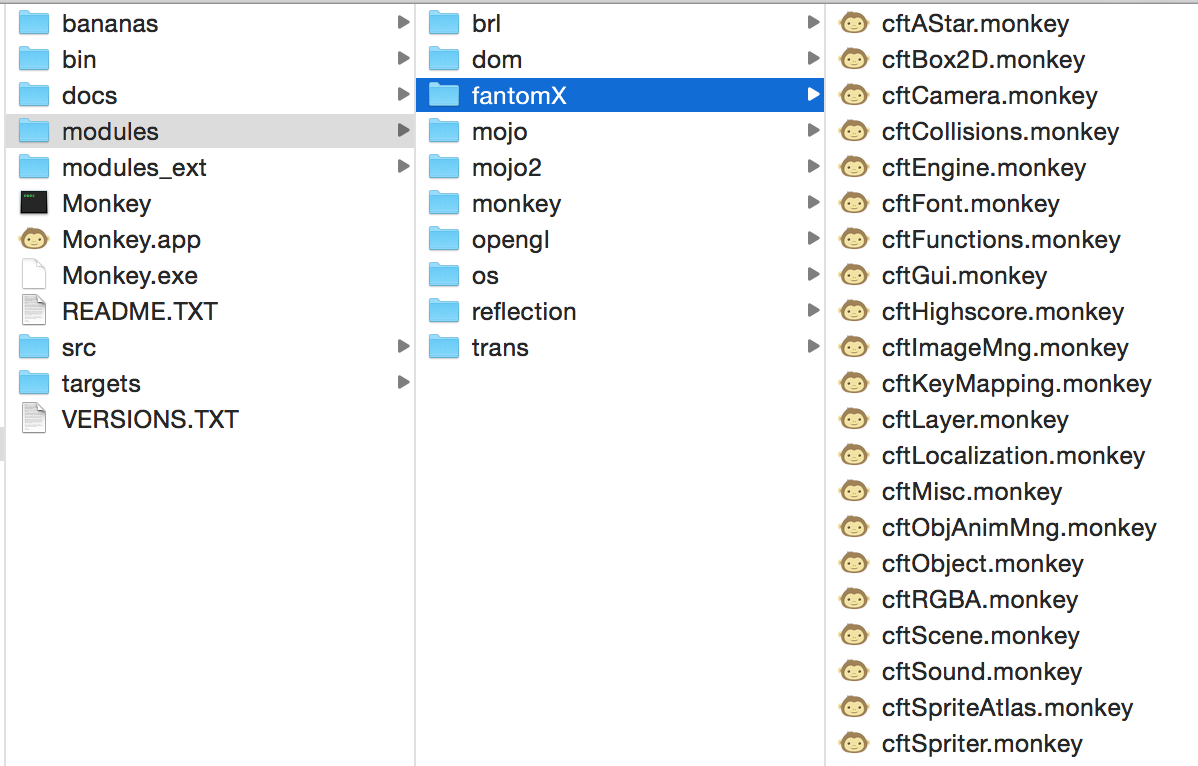
Once the zip file is downloaded, unzip the file and copy it to Monkey’s modules folder.

Monkey Modules Folder

Import Fantom X and Start Your Engine

Now that Monkey is installed and Fantom is installed, we need to bring the Fantom X module into our game file and create an instance of the engine. To do that we will import Fantom X, create our Game class, give it an engine object and start our OnCreate method.

This creates an instance of the Fantom engine that will be managing a lot of our game for us.

The Main function is what Monkey needs to have in the file that you build to run. In the Ted IDE you can click build and run and this should run without errors. All you will get is a black screen but that is alright for now.

Set the Scene

Fantom has Layers, Scenes and Objects. A Layer is a collection of Objects. A Scene is a collection of Layers. A game is a set of Scenes that are like the various states (menu, first level, etc) that the game goes through.

One of the things it needs to know when it starts up is which scene to start in. So we need to set the default scene in our OnCreate method.

Also the engine can operate with various Layers, allowing you to have a background and a foreground and to simulate height and depth for 2D games. While we set the default scene, we are going set the default layer as well.

Even if you are copying and pasting the code, it is a good idea to try to run it and make sure you don’t get any errors.

Add Update and Render Methods

The final part of our setup is going to be adding the OnUpdate and OnRender functions. We will go ahead and use the engine to draw some text in them just to make sure they are working.

Here we create our OnUpdate method and call the engine’s Update method. First we find out how long it has been since we last called this method with CalcDeltaTime. Then we divide that by what we expect our framerate to be in order to get a speed factor to pass to our the engine’s Update method. This will ultimately affect each object when we modify it’s speed later.

In our OnRender method we clear off the screen and make it completely red. Then we set the color of what we are about to draw. After that we draw text that shows the position of our cursor or our touch input in relation to our game.

Run it now and test it out.

Setup Complete

Now that we have a basic shell for our game we can start adding the various scenes and objects together to make our game.

Tutorial Part 4
Tutorial Part 6

Monkey-X Frameworks and Physics Modules

One of the useful ideas I picked up from reading a book on how to make games with PhaserJS, was to take a look at the various frameworks and modules that had been built already for Monkey-X.

I have been slowing myself down by trying to handle some of the specifics of the game directly instead of building on the work of others.

The thing I am looking for most is a physics frameworks. Nothing says edge case like handling collisions of various shapes.

Some GUI help would be nice too.

The Frameworks

I did some searching and there are probably others out there, but these were the easiest to find frameworks I came across and some of my notes on them.

  • Fling
    1. Free
    2. Physaxe implementation in Monkey
    3. No updates since 2011
    4. A few examples in Monkey-X forums
  • Monkey Box2D Implementation
    1. Free
    2. Last updated in 2013
    3. No real documentation
    4. A few forum posts on Monkey-X site with usage examples
  • Diddy
    1. Free
    2. Large number of examples in github
    3. Recent update by author
    4. Spotlight from Monkey-X main site
  • Ignition-X
    1. Paid with free trial
    2. Older framework which official site no longer directly links to.
    3. Still referenced from Monkey-X store page
  • Pyro
    1. Paid
    2. Successor to Ignition-X
    3. Looks professionally done.
    4. Various examples
    5. Scene Graph, Collision System (Box2D), Tile System
    6. Skinnable GUI System, and other useful features
  • Fantom X/Fantom Engine
    1. Free
    2. Creator wrote a book on how to make games with Monkey-X and Fantom Engine
    3. Fairly well documented with examples
    4. Recently updated
    5. Has Box2D physics implementation
    6. Has GUI helpers

Conclusion

Based on this research the choice is between Diddy, Pyro and Fantom X. I will be testing out the Fantom X engine for now and seeing how useful it can be, and depending on how that goes I will probably use it in the following parts of my making your first game with Monkey-X series.

There are 2 main reasons for this. First I will be using it for examples and for people just getting started into making games who may not want to invest too heavily financially to begin with or even don’t have the money for something like Pyro.

Second, for being a free framework Fantom X is well documented and the maintainer seems to keep it up to date.

Looking forward to evolving my game making skills.

A Simple Side Scroller Design

This post is part of a series on beginning game creation with Monkey-X. You can find the previous article in the series here.
——————-

For your first game with Monkey-X (maybe your first game ever) we are going to create a simple side scrolling shooter.

Whenever I am getting ready to make a new game, I usually start with a simple 10 point check list called 10 things every game needs. I borrowed it from a fellow name Mark Rosewater who does some game design on a game called Magic: The Gathering for Wizards of the Coast, and we are going to use it here.

This is not the only way to design games nor is it super thorough, but I have found it useful to go through this exercise when I am getting ready to make a new game.

1: A Game should have a Goal

Your game should have pretty much 1 major goal. This is often the way the player wins the game. Like Checkmate in Chess, or getting the enemy flag to your base in some Capture The Flag.

For our side scroller, the goal will be to beat the Big Bad Boss.

Simple goal, to the point.

2: A Game should have some Rules

Whether it is a classic board game like Chess or an FPS like CS:GO, games need rules so the player knows what they can and cannot do to achieve the goal.

In Chess the rules layout which pieces can go where. In computer games, the rules are usually built into the code of the game and manage things like keeping track of the score and keeping players from doing things they should not be able to.

For our game we will have simple rules.

  1. The player can move up and down, back and forth but cannot leave the screen.
  2. When the player or an enemy gets hit by a bullet, they lose armor.
  3. When the player or an enemy’s armor gets to 0 (or below), they are destroyed.
  4. If the player destroys the Big Bad Boss, they win the game.
  5. This is a simplified set of rules, but you get the idea.

    3: Players should be able to Interact

    If you do not have a way to interact with your opponent, you might as well be playing by yourself.

    This is usually more relevant in a multiplayer game, but we will pretend the computer is a player in this game.

    Our interaction mechanic is shooting and being able to destroy enemies.

    4: Players who are behind should be able to Catch Up

    There are few things worse than playing a game, falling behind and never having a chance to get back in it. Might as well give up at that point.

    A lot of sports games have this built in. When a team scores in Football or Basketball, the other team gets the ball and a chance to score.

    In video games this is often accomplished with powerups or extra lives that you can get.

    We will build in both powerups and extra life mechanics into our game.

    5: A game needs some Inertia to make sure it ends

    Games that never end make players get tired of them very quickly. The ideal length is just a little less than what the player wants to play.

    Regardless, you need something that pushes your game to end. Lots of games do this with a time limit. When the time runs out, the game is over.

    We will sort of do this, but manage it by having our player move forward in the side scroller at a constant speed, and when they reach the boss, they have will beat him or lose.

    6: Games need some element of Surprise

    If you always know what is going to happen next in a game, it quickly becomes boring. Adding a little unpredictability or hidden information can make a game more fun.

    For our side scroller, we will randomize the enemies and some of their movements to keep the player guessing.

    7: Players need to be able to use Strategy to be able to get better at the game

    If the game is completely random and no player skill is involved, players will see it as unfair and that there really is no point to play.

    You need to have some element that the players can control and master to help them win.

    For our side scroller it will be using their ability to dodge enemies and get kills. Maybe not the highest form of strategy, but not left up to chance.

    8: A game should be Fun

    You will notice that this is not number 1 in the list. Often the fun will come out of the other elements that make up your game and fun is hard to predict.

    Often you find a fun mechanic and build your game around that. Sometimes you borrow from ideas you already know are fun like side scrolling shooters.

    If you want to learn more on the subject of fun, I would suggest reading things like 8kindsoffun.com and theoryoffun.com.

    9: Games should have some Flavor

    Flavor here is meant to mean the setting or world, often referred to as the theme, that the game takes place in. Is your flavor a galaxy far, far away or maybe in the Caribbean on a pirate ship in the 1700’s?

    For our shooter, the player will be captain of a submarine fighting through undersea machines and beasts.

    10: A game should have a Hook

    Last but not least, people need a reason to play your game. We call this a Hook.

    You may have a great game, but if you can’t convince people to play it then it won’t matter.

    Our hook will simply be, “Save the planet from the alien invasion”

    Design Done

    Going through some sort of process like this every time you make a game will be really helpful.

    You don’t have to go through these 10 steps and even if you do, your game does not need all 10. I have simply found this a helpful exercise for designing games and would recommend it to you as well.

    Now to the hard part. Making the game.

    Tutorial Part 3
    Tutorial Part 5

How to Get SVG Images to Cooperate

Recently I was converting a mocked up webpage to an actual webpage and was using the <svg> element to handle some image resources. If you don’t know what SVG is, it stands for Scalable Vector Graphics. Its all in the name.

This element has not been common in most sites I have come across but is pretty powerful for handling the scaling of images and maintaining their resolution.

However, it is a little tricky and I could not find documentation that clearly explained how to work with them effectively so I will attempt to do that here.

The Image Tag

This is specifically about the <image> element inside of the <svg> element.

There are several tutorials on how to use svg to draw what you want in your webpage but none sufficiently explained how to handle an svg image that was already created.

Adding the image to the page is easy enough, just put it in an image element inside an svg element.

Sizing On The Page

Since the <image> element is contained within the <svg> element, to determine how large the area it will display in on the page, you set the width and height attributes of the <svg>:


<svg xmlns="http://www.w3.org/2000/svg" width="150" height="150">
</svg>

Using the Viewbox

<svg> has an attribute called the viewbox. This is like a little window that you can set for which part of the image you want to see.

It gets set to a string of 4 numbers separated by spaces, like “0 0 300 150” or something like that.


<svg xmlns="http://www.w3.org/2000/svg" width="150" height="150" viewbox="0 0 300 150">
</svg>

The first number is the x offset of the viewbox which controls where we start viewing the image from the left hand side.

The second number is the y offset of the viewbox which controls where we start viewing the image from the top.

Both of these can be negative, which moves the viewbox off the image.

The third number is the width of the viewbox. If your image is 300px wide and your viewbox width is only 100, then you will only see about 1/3 of the image horizontally when you display it.

The fourth number is the height of the viewbox. It behaves just like the width. If your image is 300px high, and your viewbox height is 150, you will only see about 1/2 of the image vertically.

I would recommend that you play around with these values on JSFiddle to get a solid understanding of what is happening. On this particular fiddle I put the Mozilla Developer Network example of an svg image.

Image Element Width and Height

The width and height attributes of the image element are where you start seeing why svg’s are useful. You can scale the image pretty much as large as you want or as small as you want while still maintaining resolution.


<svg xmlns="http://www.w3.org/2000/svg" width="150" height="150" viewbox="0 0 300 150">
  <image xlink:href="some_svg_image.svg" width="25" height="25" />
</svg>

This is great for logos and icons, especially when viewing on mobile devices compared to desktops. It allows you to reduce the number of viewable assets you have to make.

Note About Browser Compatibility

One of the reasons that I even did this post was because of the various behaviors across browsers. Initially I was not messing around with viewboxes and the various x and y attributes, but when I started testing my work in different browsers, I found that if some of these values are not set, certain browsers render the images differently.

If you want consistent display across browsers you should make sure to set all of these attributes correctly.

Additional Resources

Although not exactly what I was looking for, the following still have many useful details about working with SVG images in html.

September 2016 End of Month Goal Review

The weather is changing, the goals are not.

Goals

  1. Write 3 Blog Posts Per Week and Publish 2 – Again I only got out 5 posts. This is the third month in a row at this rate. The writing goal was 12 and the publishing goals was 8. It is obvious to me I have not been keeping to my schedule. Time to draw it up again and stick to it.
  2. 1 Game Designed, Created, and Released Per Quarter – Drone Tournament (Game #2 of 2016) programming is nearing the glorious day of launch. These last few weeks the server and client sync bugs were worked out and some serious refactoring work has been done. I might even finish it before the end of the year. No work was done on Game #3.
  3. 1 Book Read Every 2 Months on Game Design – Read several more chapters in the book on creating games with PhaserJS. Learned about some new technologies I had not heard about and some resources that will be valuable in making games in any language. Will be adding these to the resource page soon. Also had some good ideas about using a Monkey-X physics engine just from reading this book. Well worth the investment.
  4. 1 Article Read Or 1 Video Watched About Game Design/Creation Per Week – I found a series on game balance that has some long, supremely valuable articles on the basics of designing games. Some really excellent material and would highly recommend the read.
  5. Get 100 People Reading Evolving Developer Per Month – Progress = 100%. Wow. Went from 0 readers last month to just over 100 people getting their eyes on the blog this month. How you ask? Well I did something absolutely crazy. I shared a couple posts. The first one I shared on Hacker News and in a programming Facebook group I am a part of. This alone got just over 100 unique viewers. The second was not quite as popular and I only shared it through Hacker News but still showed a small spike in traffic. So getting 100 viewers was slightly easier than I thought. Now we have to figure out how to get them to come every week.

What Went Right

Finally made progress on the viewership goal. In fact hit it for September. And it was all accomplished from taking a single simple action. Why didn’t I do this before? Also the game is working. Core game mechanics are finished and refactoring has begun. Slow steady progress marching forward. Additionally, getting great ideas from the book I am reading and the articles that I have found.

What Is Not Perfect Yet

Writing volume is still lower than intended. This is partially to do with assigning more of my time pie to getting Drone Tournament finished. Also, did let the amount and number of articles I read / videos watch of game design drop a bit. Main issue is the writing volume though.

Corrective Measures

It all comes down to routine. Must not let the routine get so easily interrupted. The writing must go on, both in code and in articles. Additionally, I am revisiting my article writing schedule and planning out which articles need to be written on which days.

First time to hit 100 viewers in a month, not much but it is progress.

Don’t Leave a Festering Pile

One of the most memorable statements from Clean Code was the author describing some of his own example code as a “festering pile.” And he doesn’t just use the term once, he uses it multiple times.

The most important statement however comes after he goes through how he cleans up his code and he is going over key points at the end of the chapter.

It is not enough for code to work. Code that works is often badly broken. Programmers who satisfy themselves with merely working code are behaving unprofessionally.
– Uncle Bob in Clean Code

Get It Working, Then Clean It Up

Don’t get me wrong, you should get your code working. If it does not work, it is completely useless.

But that is not where you stop.

When you stop here, it becomes difficult to add features to your program and makes it more likely that you will introduce errors later.

As a professional programmer and creator, cleaning up your code after you get it working is a must.

What’s That Smell?

As I am working on my current game, I started noticing that some of my own code was becoming a bit of its own smelly, festering pile.

Classes were getting a little clunky, functions where getting a little too long, and it was taking longer to make small changes.

Since I am trying to write the same logic in 2 different languages (Monkey-X for the client and Ruby for the server), having clean code was even more important to be able to replicate the logic in a second language.

And with the code getting a little cluttered, there started being some hard to figure out bugs where the client would show one thing, but the server would do another.

I finally got the code behaving the same and it took longer than it should have.

Programming Febreeze

Now it is time to get rid of some of these smells. The way to do that in programming is refactoring.

This is basically what Clean Code was all about. Changing your code to be more clear and designing the classes and methods to be easier to change (think DRY and SRP) have your code smelling like fresh linen.

That is what I am working on now with Drone Tournament. My original goal this year was to finish a game every 3 months, but I don’t want a half baked game. So I am taking the time to refactor the code and clean it up because I am a professional.

Be a Pro, Clean Your Code

Ruby Mod Operator Does Not Behave As Expected

I am writing the multiplayer server for my current game in Ruby using Sinatra. Since it is turn based and not particularly performance heavy, this is not a problem. One of the cardinal rules of making a multiplayer game is don’t trust the client.

This means I needed to write the game logic for the game on the server.

Modulo

Part of the game logic involves taking an angle and a position and calculating a new position and angle based of a units performance stats. In order to simplify the math, I wanted to keep all the angles positive.

So if the angle is negative, I Mod it by 360 and then add 360.

If the angle is positive, I just Mod it by 360.

But then I change it either adding a units turn rate to it or subtracting the turn rate from it.

The client (written in Monkey-X) was working 100% as expected. But the server was giving me some weird results.

Negative Numbers Behave Differently

I have always understood Mod, often the % operator in language, to return the remainder from a division operation. And that is what it is supposed to do. In Monkey-X that is exactly what it does (incidentally it is the word ‘Mod’ in Monkey-X). And in Ruby, all of my positive angles where behaving as expected.

But for negative numbers in Ruby, something like:

-21 % 5

is not going to return -1, it returns 4 (go ahead and try it in irb).

How Do You Get The Remainder?

Funny enough, in Ruby you need to use the .remainder function on a numeric type to get a consistent result. So:


num = -21
result = num.remainder(5)

and result will equal -1 as expected.

TL:DR

In Ruby if you want the remainder of a number, use the .remainder method instead of the % operator, especially if you are going to hit negative numbers.

Game Balance Concepts

In my search for articles to read about game design, I came across an excellent series that was done in a course. You can find it at gamebalanceconcepts.wordpress.com.

I have not finished yet (there are 10 lessons and each of them is a good long article) but have already found it to be valuable and would recommend checking it out. Here I will be discussing a few of the valuable ideas I learned just in the first 4 lessons.

Terms

The first lesson is mostly concerned with getting you familiar with certain vocabulary that is used when referring to different types of games. Determinism, solvability, intransitive, symmetry, and the meta game are a few of the terms discussed.

Near the end of the first lesson there is a section called “Game Balance for the Lazy.” In it the author gives a hypothetical example that describes an interesting method of having players balance a game for you. In the example it has the players bid on the stronger starting side in a game. The player who won the bid then loses the resources that they used to bid on it. This gives people who have played the game a way to tell you how unbalanced it is by the amount they bid and gives you an idea of how to change the power level to bring things into balance.

Numbers Are Related

In Lesson 2, there is a great discussion of the different numeric relationships and patterns you might find in a game or use in your own game design. There is discussion of linear relationships such as getting +1 armor is similar to adding 1 health, and triangular and exponential relationships such as the bonus cards in Risk where every time you trade in a set of cards you get an ever increasing number of soldiers (I forget the pattern but am pretty sure the number grows in an exponential pattern).

There is also a discussion about how various things in a game all relate to one number like the number of lives in Super Mario. If you die you lose a life so the number of enemies in the level might mean you are more likely to die. Also every 100 coins you get is an extra life, so the number of coins you collect can mean an extra life.

One Resource to Rule Them All

Lesson 3 sort of follows the number theme set in lesson 2 and revolves around having a single resource or number with which to calculate a power curve or cost curve on. The author uses the example of the TCG Magic the Gathering and how everything in the game is somehow tied into the resource of mana. He then breaks down a few cards and determines whether or not those cards are on curve, above the curve, or below it.

As someone who occasionally plays MTG and since I am trying to design a card game myself that has some similar properties, this was especially fascinating. I would encourage you to do a little exercise of your own with a game you enjoy that involves resource management and analyze item and/or unit power levels.

Highly Probable

Lesson 4 is a crash course in probability. Lots of games have probability involved and there are countless times I have heard lamentations from gamers over the RNG screwing them. In short, probability is often counter-intuitive.

This is how casinos and other gambling places make money. It is also where game designers can screw up and mess up game balance. Sid Meier talks about it in a talk he gave at GDC 2010 called Everything You Know Is Wrong where he talks about how players view percentages and numbers that you show them.

This is a great crash course for someone who has never looked into probability and statistics before and would recommend reading it.

More Chapters to Go

I plan on finishing reading through this course and would recommend you do the same. I have already learned a bunch of useful stuff and will sum up what more I learn in a later post. Until then, keep making progress.

Token Based Authentication Versus Session: A Simple Explanation

Recently I was tasked with implementing a token based authentication structure for an API. When I initially looked it up, using tokens seemed almost identical to using sessions the way it was described in several articles. It took me quite a bit of reading before I finally understood what was going on, and I never did find a satisfactory explanation of how tokens differ from sessions. So today, I am going to attempt to clear up these murky waters a bit.

Sessions, Your Old Friend

If you have done web programming for at least a little while, you have probably come across sessions. Sessions are what the server holds on to, which allows the user to keep using the site without signing in every time their browser makes a request to the server.

Think of it as a business like a gym that has restricted access. If the gym used sessions, they might make you pay (sign in with password) when you show up each time and put your name on a access sheet. If you left and came back, they would ask for your name then look up and check (think database) whether you are allowed access or not.

The members (users) need to know their name (session id), the gym (server) needs to hold onto information about whether or not its members have access (session). For our purposes this represents the browser cookie with the session id and the session on the server.

Tokens, New Kid in Town

Although I had used tokens before, I had never implemented them into anything so I did not now exactly how they worked. (The particular kind of token that I am working with is a JSON Web Token but that is not actually important.) Like sessions, tokens also allow you to access the server without signing in every time. Unlike them, the server does not have them. Your user does.

Ok back to our gym example. Say that you want to give people 24 hour access to your gym and don’t want to have employees working the front desk at 4 AM to give people access. You could install a card reader at the door and then give out keycards that your gym members could swipe or hold up to it that allows them access. Once they pay (sign in with password), you give them a card (token) that they can come back with and you don’t have to look up on the sheet (database) whether or not they have access.

In this case the gym members (users) have all the information about whether or not they have access in the form of their cards (tokens), and the gym (server) simply validates the card when the member wants access. As a bonus, the local pool (a different website) has a card reader and a program that allows anybody who is a gym member to go swimming there. Members simply need to bring their cards (tokens). This is like OAuth/OAuth2 and signing in to websites using Google/Facebook/Twitter.

A Model For Understanding

Hopefully this gym membership model helped you understand the difference between token based authentication and session based authentication. If you want to learn more about specific implementation details, checkout some of the links below. And if you like what you read, sign up for my email list.

Fear

As I sit to write this post, I feel small twinges of exactly what I am writing about. Fear that it is pointless to write this and that it is a waste of time. But it needs to be written because Fear is exactly what will keep you from making a great game or doing anything great.

Another Name

Another name for Fear that has been given is the Resistance. Most of the people I have heard use this term reference a book called The War of Art by Steven Pressfield. I have written a little about this Resistance before, but I think it is such a major factor in holding people back, myself included, that it needs to be readdressed occasionally.

Common Fears

In one of the classic books on success titled Think and Grow Rich, the author list 6 categories of fear that most fears can be grouped under.

  1. Fear of Poverty
  2. Fear of Criticism
  3. Fear of Ill Health
  4. Fear of Loss of Love
  5. Fear of Old Age
  6. Fear of Death

Today we will look at the fears of poverty and criticism because they seem to be the most likely culprits in keeping creative people from doing great things.

Poverty

Fear of poverty is characterized by things that keep you poor such as worry, doubt, indecision, and procrastination. It makes you overcautious and unwilling to take the risks which you need to take to become richer. And often the risks are not really risky at all. It turns out it is usually more risky to keep the status quo than to make the changes necessary to achieve success.

Criticism

For writing and making games especially this is a big one. I think it is the one that keeps me from wanting to hit the publish button every time I write a post and that keeps me from wanting to show someone a rough version of a game.

You are not likely to become poor from writing for free on the Internet or from showing people the games you are making. However, you are likely to receive some criticism, especially if you have any sort of audience. It is impossible to make everybody happy. But often the criticism comes from people whose opinion of us does not matter. As far as games are concerned, criticism is exactly what we need. We need fresh eyes to take a critical look at our games and we need the criticism and insight that they offer.

There is a fairly well known quote from Theodore Roosevelt that says

It is not the critic who counts; not the man who points out how the strong man stumbles, or where the doer of deeds could have done them better. The credit belongs to the man who is actually in the arena, whose face is marred by dust and sweat and blood; who strives valiantly; who errs, who comes short again and again, because there is no effort without error and shortcoming; but who does actually strive to do the deeds; who knows great enthusiasms, the great devotions; who spends himself in a worthy cause; who at the best knows in the end the triumph of high achievement, and who at the worst, if he fails, at least fails while daring greatly, so that his place shall never be with those cold and timid souls who neither know victory nor defeat.

What Do We Do?

There are a couple of ways to get past the fears. One is to talk about them, they hate that. The part of your brain that likes to bring up fears does not like you to look at them directly and consider the worst outcomes and the likely outcomes.

Another way is to ask good questions. What is the likely outcome of performing this action? What is the worst outcome? Who might criticize me and do I care that they do? Who am I helping by doing this? Start asking yourself questions about why you don’t want to do something.

A final way of getting past fear is just make what you want to do a must and turn it into a habit. Every day you will do this thing. It helps to make it the first thing you do when you get up.

I hope this help you get past some of your fears that are preventing you from writing that blog post or showing someone the game your are working on.