
There is a fantastic single player / cooperative campaign for the Star Wars X-Wing Miniatures came called Heroes of the Arturi Cluster or HotAC for short. The original HotAC has the players as Rebel pilots vs the Empire.
Then there is Flight Group Alpha (FGA) which has missions based on the old TIE Fighter game. In that you fly for the Empire.
But I have not come across an easily found campaign for the Scum and Villany faction. I did stumble onto a PDF inside of a Table Top Simulator Mod for HotAC that had the beginnings of how you would play a Scum campaign called “Villians of the Arturi Cluster” written by the creator of the FGA campaign but it was unfinished.
There were pilot cards and a couple of different angles suggested on how to play it but no campaign actually created.
This is my attempt to write a Scum faction campaign that hopefully others will enjoy.
WARNING: This is a living document and the campaign has not yet been fully playtested or balanced. You can send any playtest notes you have to travis at evolvingdevloper.com
Acknowledgements
Many of the missions, mechanics and gameplay elements where originally developed for the above mentioned Heroes of the Arturi Cluster Co-op Campaign by Josh Derksen, and have been updated from X-Wing version 1.0 to 2.0 and beyond by Shaun Tiernan with help from others. This campaign utilizes the terrain and components developed for HotAC very heavily.
Additional gameplay elements and mission structures from Flight Group Alpha and Villians of the Outer Rim by Claes Sorensson who was also inspired by Heroes of the Arturi Cluster.
Some of the Pirate flavor such as the Pirates Code, the PB-950 Patrol Boat, and some mission themes were inspired by the old West End Games Pirates and Privateers RPG guide.
The costs and upgrade charts originally based off of the excellent X2PO guide to points costs with my own customizations. Version 2.0 points worked better for a “Credit” based rewards system.
The custom ship and upgrade cards as well as maneuver cards for ships that did not have them from HotAC were created using the excellent site infinitearenas. Many thanks to JimBob there for responding quickly to fix a few bugs and add features that helped in creating custom components. Go support him there if you enjoy the EU ships and custom upgrades.
A more easily navigated version of the rules and charts can be found at
https://codetravis.github.io/plotac_rules
It may not be fully up to date with this document yet as adjustments are typically done here first.
Table of Contents
- Pirates Code
- Custom Rules
- Optional Ships from the EU
- Optional Custom Upgrades
- Starting Resources
- Pilots and Careers
- Credits
- Experience / XP
- Factions
- Threat Level and Determining Enemy Forces
- The Campaign
- Intro Mission
- Mining Guild Arc
- Acts of Piracy Arc
- Illicit Activity Arc
- Rivals Arc
- Lost Loot Arc
- Bonus Missions
- Shadowport Search
- New Rides
- Optional Campaign Wrap Up – Pirate Hunter
- Repairing the Patrol Boat
- Salvage the Battlefield
- Ship, Modification, and Ability Cost Tables
Premise
You are trying to setup shop as pirates in the Arturi Cluster. You have gathered a group of eager but inexperienced pilots and some ships from a local scrapyard. Time to start making some credits.
This campaign can be played solo or with an individual flying each ship or a group of ships. It can accommodate up to 6 players.
Authors Note: This campaign is designed to be somewhat challenging. You are likely to lose pilots and ships early on when the equipment is poor and the skills low.
Pirate’s Code
- Every crew member shall have a vote when a Company decision needs to be made.
- An equal share of all treasure to each combatant of a raid with an additional share being set aside for the Company.
- One half of the Company’s share will be allotted for supplies, base maintenance, ground crew.
- The other half of the Company’s share will be used for maintaining a transport and boarding vessel along with a boarding party. If the share is not split evenly the larger half shall be allotted to base maintenance.
- No gambling or illicit substances while on duty. (Off duty is your business)
- Vacuum suits and weapons are to be maintained and serviceable at all times.
- Desertion of your comrades during a raid while still in an undamaged ship shall be punishable by fine or demotion at the vote of fellow raiders.
- No retirement or disbanding until the Company has shared out a minimum amount of credits. (amount to be determined by a vote of the crew)
- No fighting during raids or on base. Personal disputes are to be settled by a duel at an agreed upon time at a neutral location.
Custom Rules
Ion Weapons and Ionization
Ion weapons are a pirates best friend. There is a lot more money to be made in capturing ships and seizing their cargo than blowing them up. Also the more destructive you are, the more likely opponents will fight to the death.
Disabling Ships with Ion Cannons
In PLotAC, ships can be permanently disabled with Ion weapons if the final point of damage is done with an Ion weapon OR if the ship is Ionized and has MORE Ion tokens than it has remaining Hull points.
For example a Large base ship with 1 Hull and 2 Ion Tokens is not permanently disabled as it needs 3 Ion Tokens to be ionized. A small base ship with 1 Hull and 1 Ion token is not permanently disabled as 1 Ion token is not MORE than 1 Hull.
Ion weapons only start applying Ion Tokens when all shields are down on the target. As long as the target has shields, for each ion token they would receive, remove one shield instead.
This can be read as: If a ship receives Ion tokens from an attack or device explosion, for each ion token, if there is an active shield, the ship must lose 1 shield to remove the ion token. When there are no shields, ion tokens are applied as normal.
A ship can become Ionized with shields up from other affects, such as Ion Clouds or Feedback Array. If a ship becomes Ionized (1 Ion Token for small base, 2 for medium, 3 for large), it loses all remaining shields at the start of the next turn.
Ion disabled ships can be captured and added to your hangar if you completed the mission successfully under the following conditions:
- The Mission is in Friendly territory
- The Mission is in Neutral territory, there are no enemy ships remaining on the board, and you have completed the primary objective
You cannot capture ships in hostile territory. The territory of the mission may change depending on the objectives. The territory check happens after the mission is over.
If a player ship is permanently ionized, it can be recovered intact under the same conditions as capturing an enemy ship.
Ion tokens work as normal otherwise. For example, a small ship with 2 or more hull and an Ion token must still make an Ion maneuver and can only take the focus action, then clears the Ion token.
Ionization and Emplacements
Under normal HotAC rules, emplacements cannot receive Ion Tokens. However in PLotAC there are custom rules regarding emplacements and ionization.
- An emplacement requires 2 Ion Tokens to be ionized.
- Emplacements clear all Ion Tokens at the beginning of the turn.
- Turrets that are Ionized may not attack or rotate.
- Shield Generators that are Ionized do not provide their defense die bonus.
- Command Center, Wing Command, Jamming Array, Sensor Array emplacements do not provide any bonuses or perform any actions when ionized.
- Fuel Tanks are volatile and for each Ion Token they receive roll an attack die. On a crit, the Fuel in the Fuel Tank combusts from the Ionization and the Fuel Tank is destroyed. Follow normal Fuel Tank destruction rules.
- Cargo Containers take damage from Ion weapons as normal and do not receive Ion Tokens
Ship Limitations
The pirates may only bring 1 Large base ship on each mission. This is in addition to the Patrol Boat on missions where it accompanies you. There are no restrictions on small and medium base ships.
In addition to the ships that they are flying, the player pilots may have 1 ship per pilot stored in the base hangar. If you are to exceed that number in some way, either through purchase or capturing a prize, you must choose to sell some number of ships so that you don’t exceed 1 extra per pilot.
Upgrades
Generic crew members may be hired with credits like any other upgrade and stay as a permanent upgrade until the ship is shot down. Crew may be transferred between ships at no cost.
Scum Crew may be hired for a single mission with credits by any pilot. After the mission is over, you lose that upgrade but it can be repurchased. If a Scum Crew is equipped and your ship is disabled in hostile territory or destroyed in any territory, that Crew is lost and is removed from the upgrade table. The same is true for Named Astromech upgrades.
The Organizer and Cyborg careers may also hire Scum Crew upgrades permanently using XP. Cyborg is limited to Droid Scum Crew (see upgrade cost chart for reference). The same rules apply for removing them from the upgrade table no matter how they are hired.
All ship upgrades are paid for with Credits. You cannot spend XP to pay for ship upgrades. Charts listing their cost in thousands of credits can be found in the appropriate section of the document.
If you wish to move upgrades other than Crew or Astromech from one ship to another, you must pay half of the upgrade cost rounded up (for example a 3 cost upgrade would cost 2 to move to another ship).
Docking Rules
To dock a ship to another ship or game object, the ship that wants to dock must have part of its base touching the other ship or object at the end of a move (bumping). Then if the mission allows it may perform the Dock Action.
To perform the Dock Action, move the docking ship so that one side of it is completely touching the docking target on the side that the collision / bump happened. Try to do this in a logical way for the direction of the maneuver.
A Docked ship may repair Critical Hits, take the Rotate Turret action and make turret attacks if it has an equipped Gunner, and the Coordinate or Jam actions if it has any equipped Crew provided they are on its action bar while docked (unless ionized). While docked, a ship clears Ion and Stress tokens each turn as if it had taken an Ion maneuver.
All ships treat docked ships as enemy ships for the purposes of collision. They do not roll for damage and may take the Red Focus action.
Campaign Ships from the EU and Junkyard Builds
Pirates and civilian merchants rarely have access to top of the line fighters. Making do with older models and ships cobbled together from whatever parts are lying around. Local system patrols also have ships used for fighting off pirates and capturing smugglers.
All of these ships can be fairly easily proxied and all share dials with an existing ship.
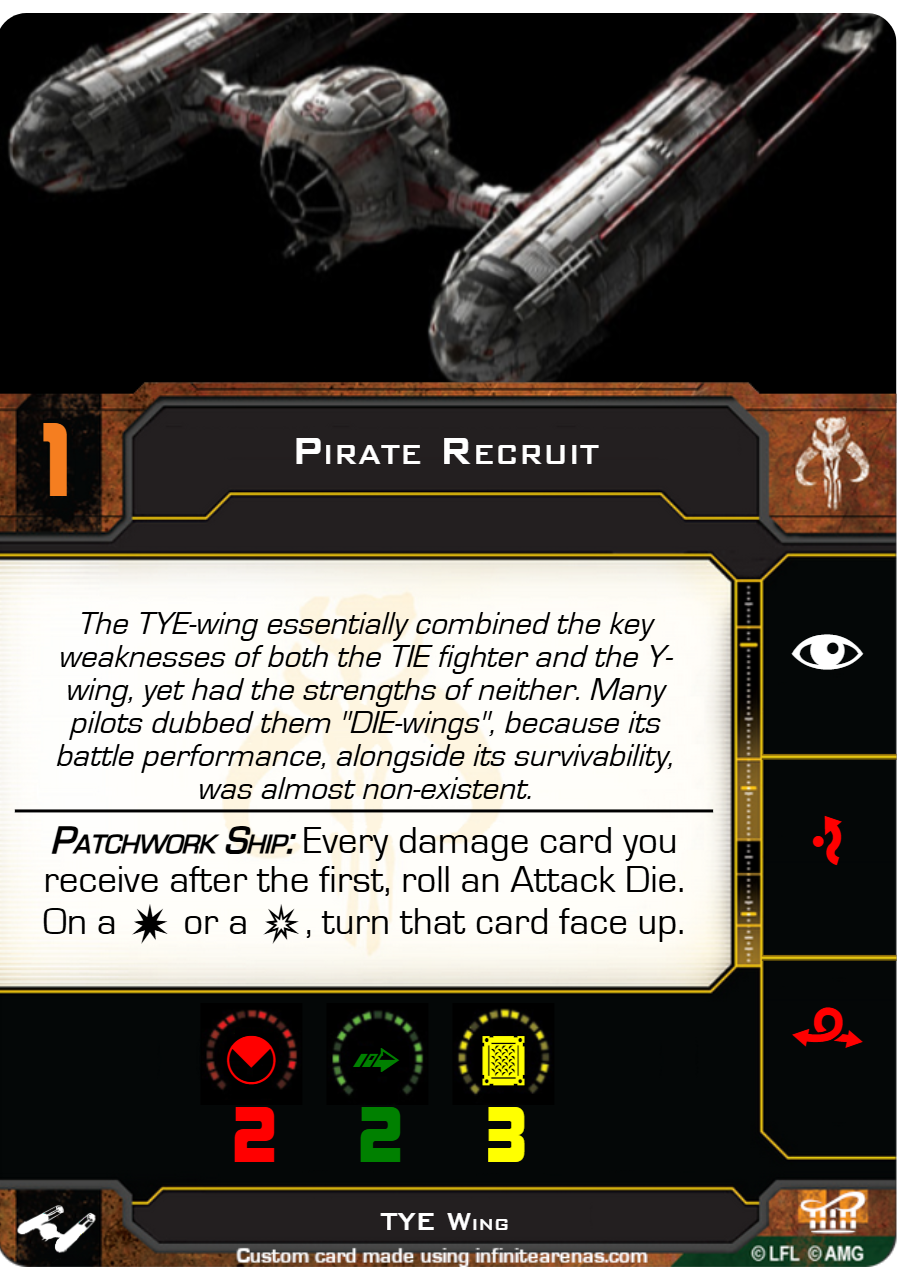
TYE-Wing
The TYE-Wing is a combination of a TIE Fighter cockpit and sensor package and Y-Wing weapons and engines. The other thing it combines is their weaknesses. Slow as a Y-Wing with the low survivability of the TIE. The only good thing about the TYE-Wing is that it is cheap. While usually good enough to deal with most civilian ships, it falls short when facing front line fighters.
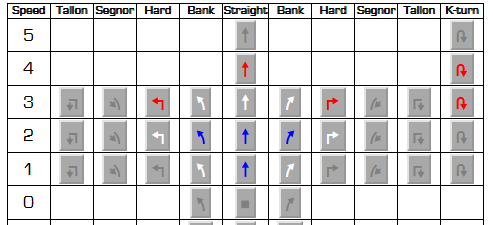
The TYE-Wing uses the same maneuver dial as a Y-Wing with the addition of the 3-K maneuver.
You can find a 3D model suitable for casual X-Wing play on Thingiverse and also check out the sources and vendors listed on xwhub.com under the 3d model section. Alternatively it can be kit bashed from TIE Fighter and Y-Wing parts.
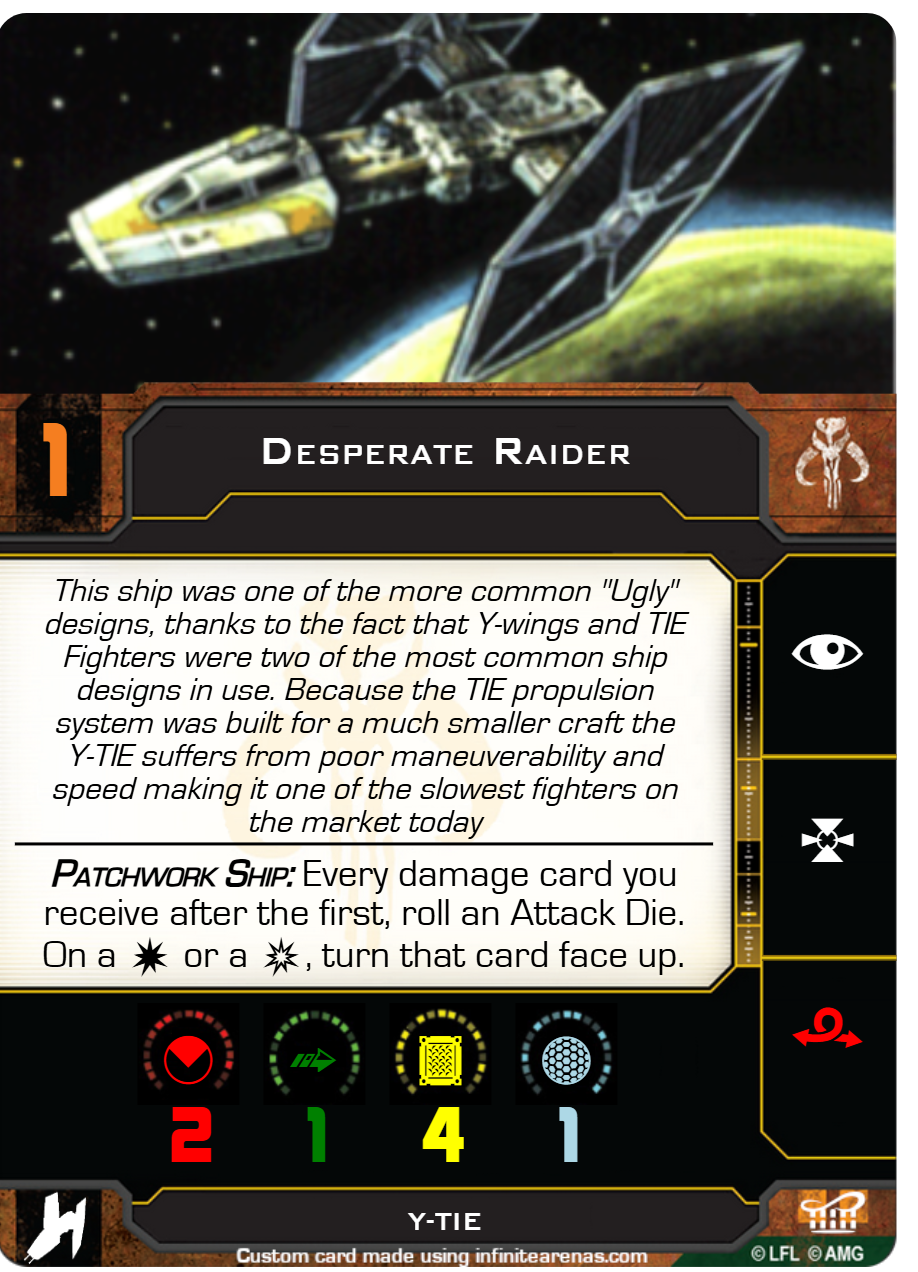
Y-TIE
The Y-TIE combines the engines and solar panels of the TIE with the fuselage and cockpit of the Y-Wing. The missile tubes and bomb bay have been removed to make space for the TIE engines and additional wiring. This combo leaves it underpowered and one of the slowest fighters around.
It retains a little of the Y-Wings ruggedness and can still be deadly with the added firepower of a turret. Y-TIEs work best in packs and are easy pickings when caught out alone.
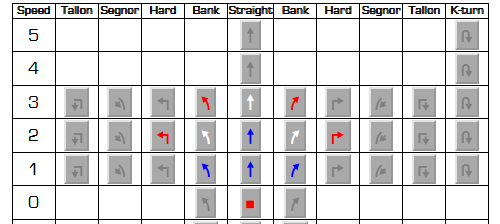
The Y-TIE uses the same dial as the T4-a Lambda Shuttle.
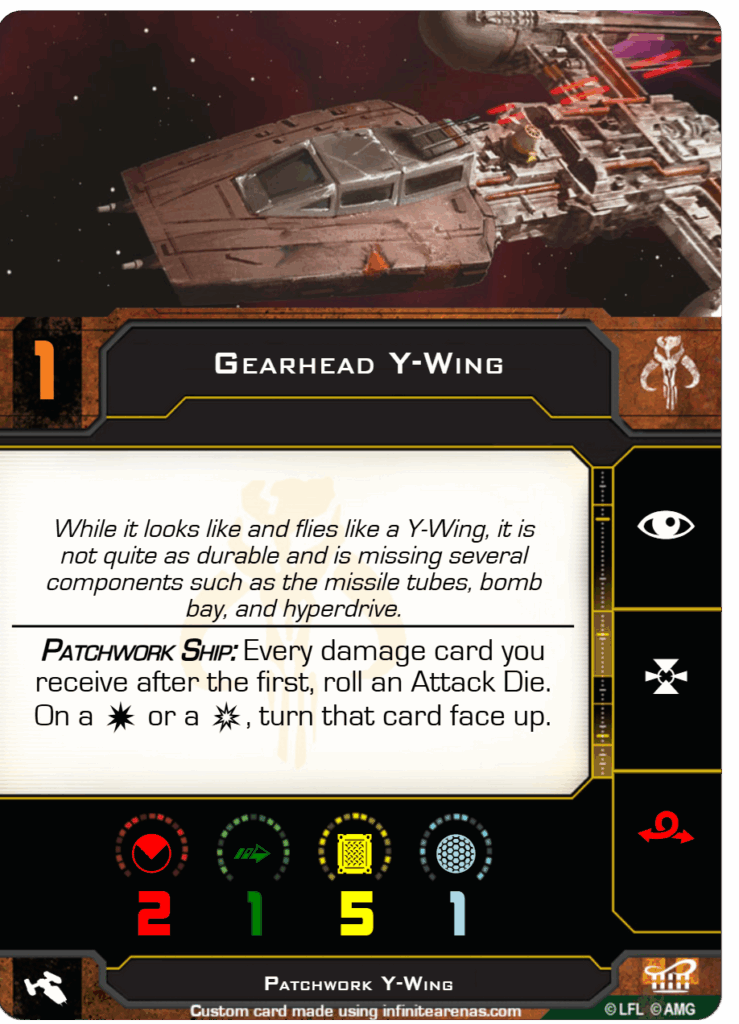
Patchwork Y-Wing
The Gearhead can choose to convert a Y-TIE into a Patchwork Y-Wing if they wish. It looks and flies like a Y-Wing but is still missing key systems such as the bomb bay, missile tubes, and hyperdrive. It also keeps the Patchwork Ship hazard.
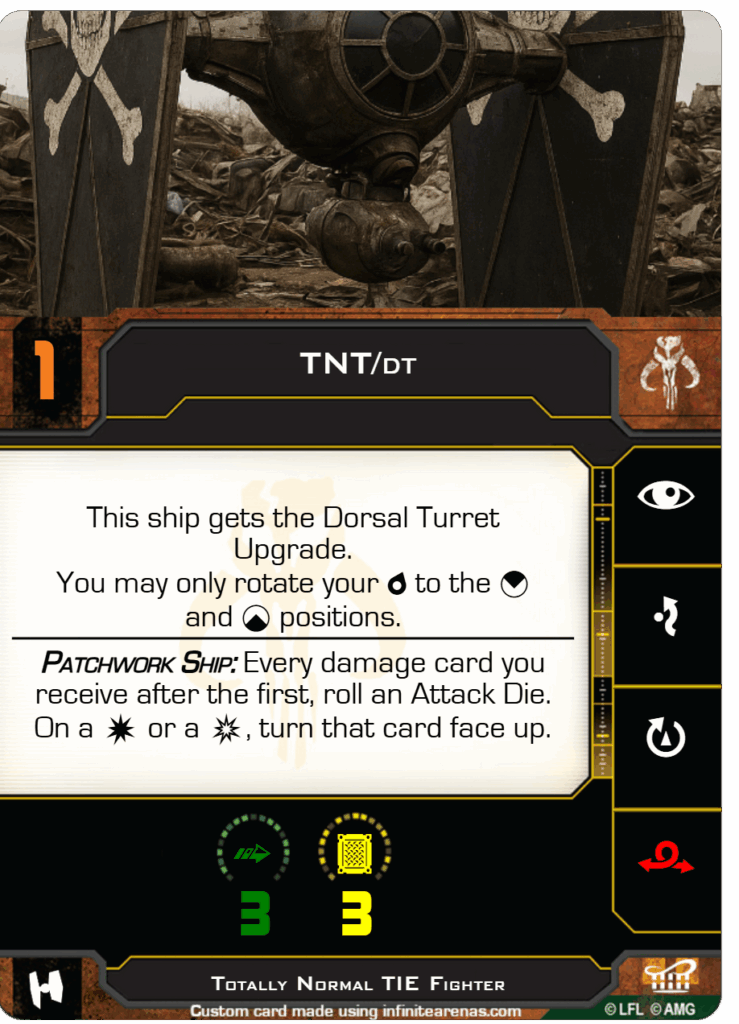
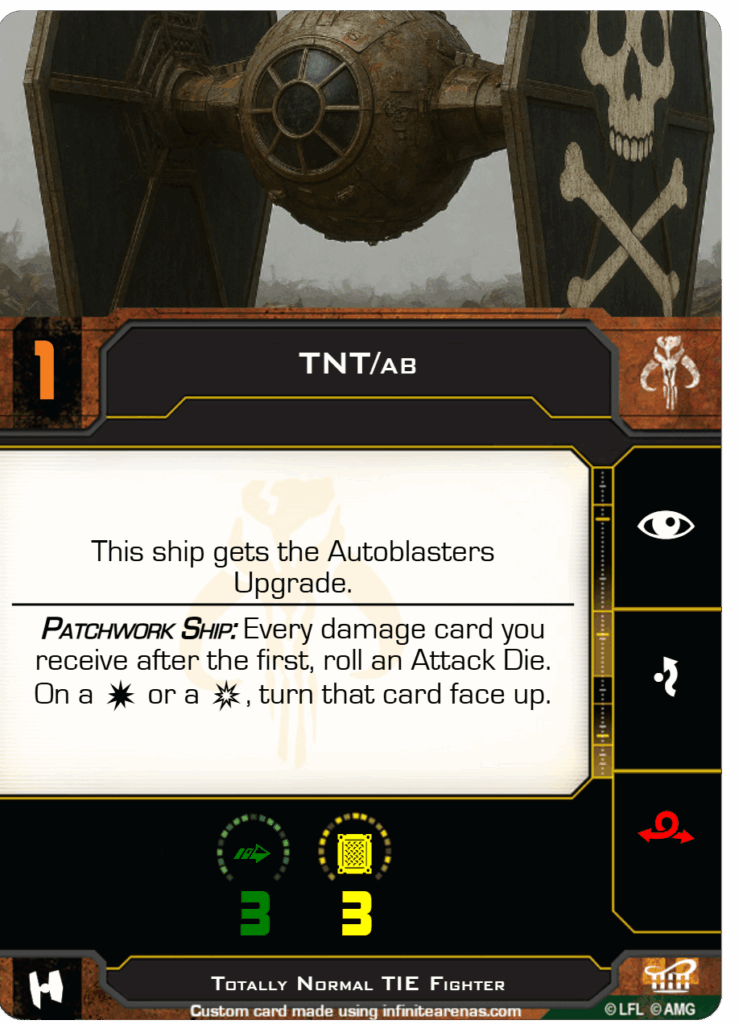
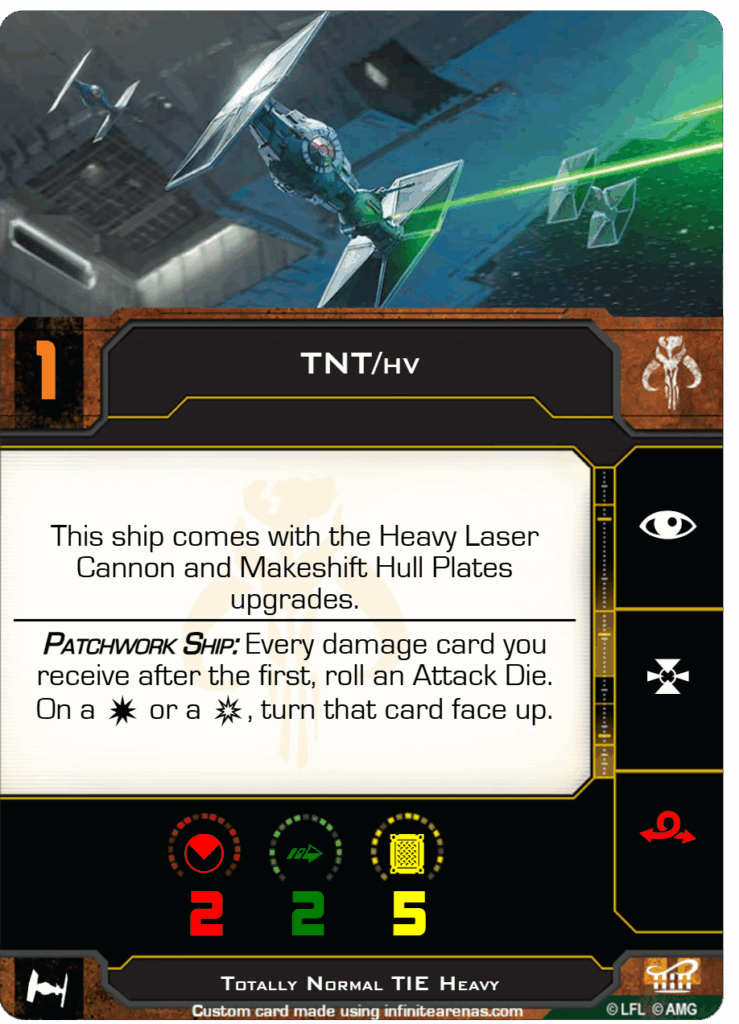
Totally Normal TIEs (TNTs)
Totally Normal TIEs (or TNTs for short and because of their tendency to get blown up) are patched together TIE Fighters with various components from whatever was in the junkyard at the time. They look like normal TIEs (from a distance) but often have slightly worse flight performance and totally different weapon systems.
All variants fly using the Mining Guild TIE (Modified TIE/ln) Dial, except the TNT/hv which uses the TIE Brute (TIE/rb Heavy) dial.
Here are the TNT variants available in Pirate Lords of the Arturi Cluser:
TNT/dt
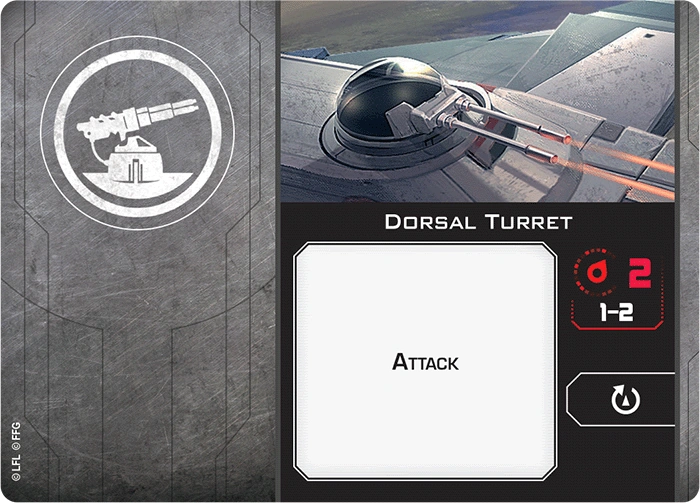
The usual TIE fighter weapons system has been replaced with a Dorsal Turret under the cockpit. The extra field of fire offers some versatility but has a more limited range. It can only fire in the forward and rear arcs due to the TIE solar panels.
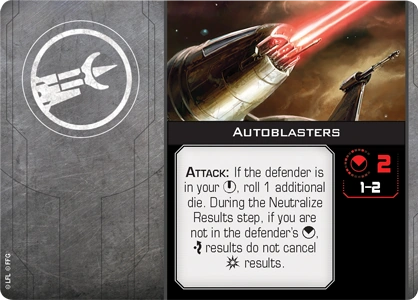
TNT/ab
The TIE lasers have been replaced by a set of Autoblasters. Their range is limited but they give a skillful pilot an extra punch.
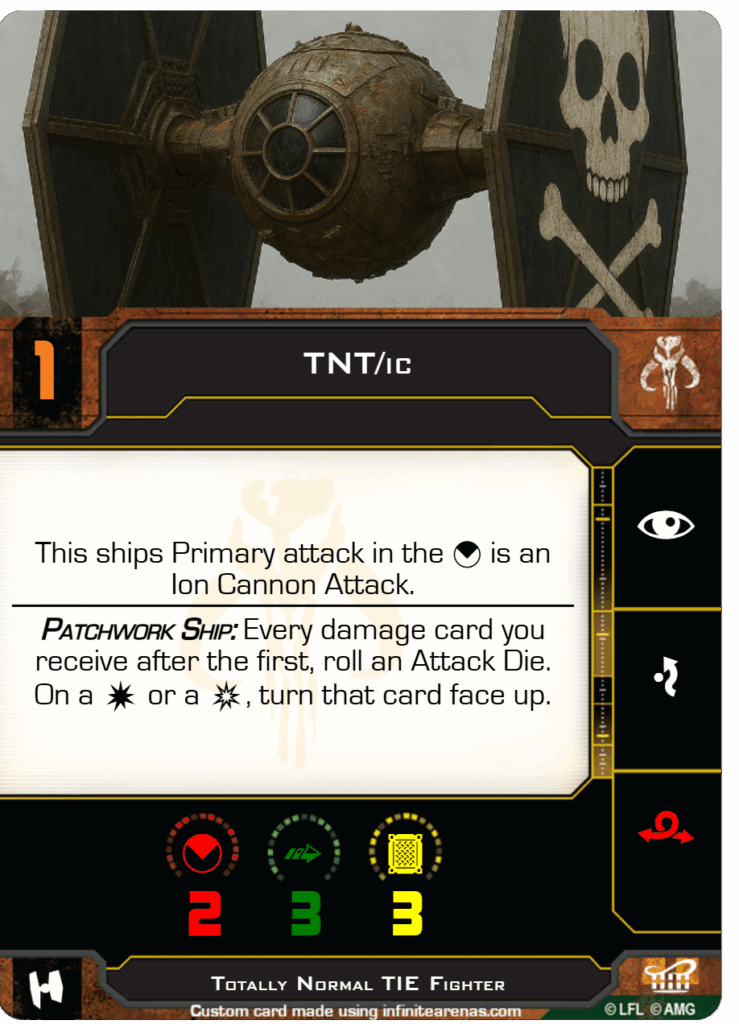
TNT/ic
This variant replaces the normal lasers with an Ion Cannon.
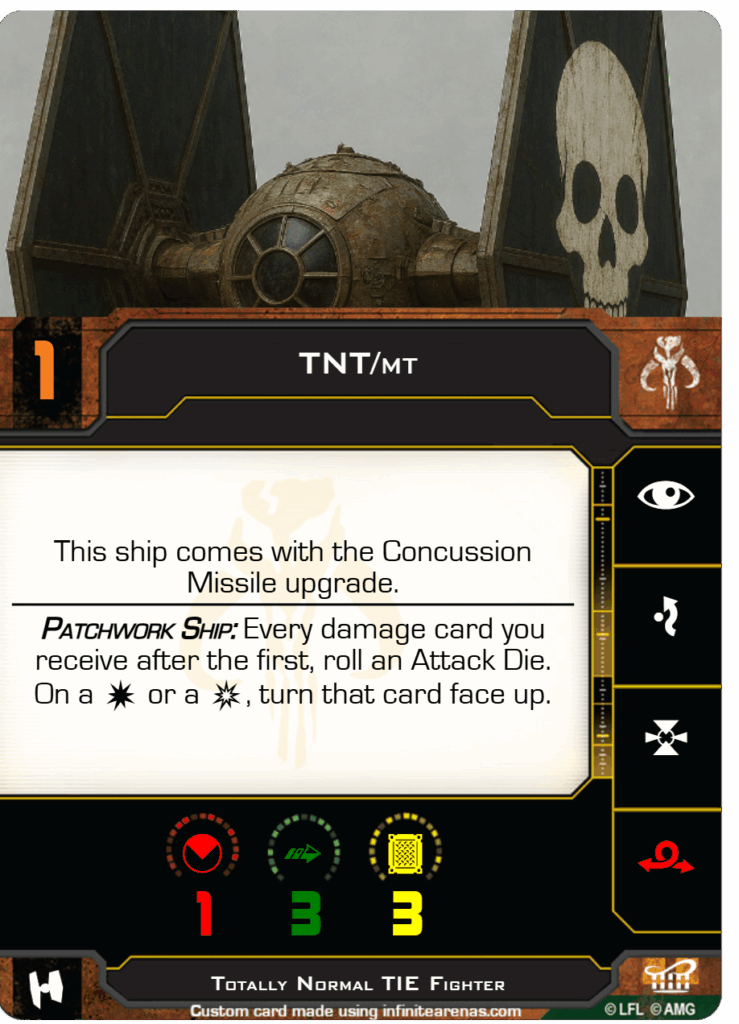
TNT/mt
You could only find one working laser but there was the carcass of a Z-95 with a working missile tube. Luckily the targeting computer was working as well.

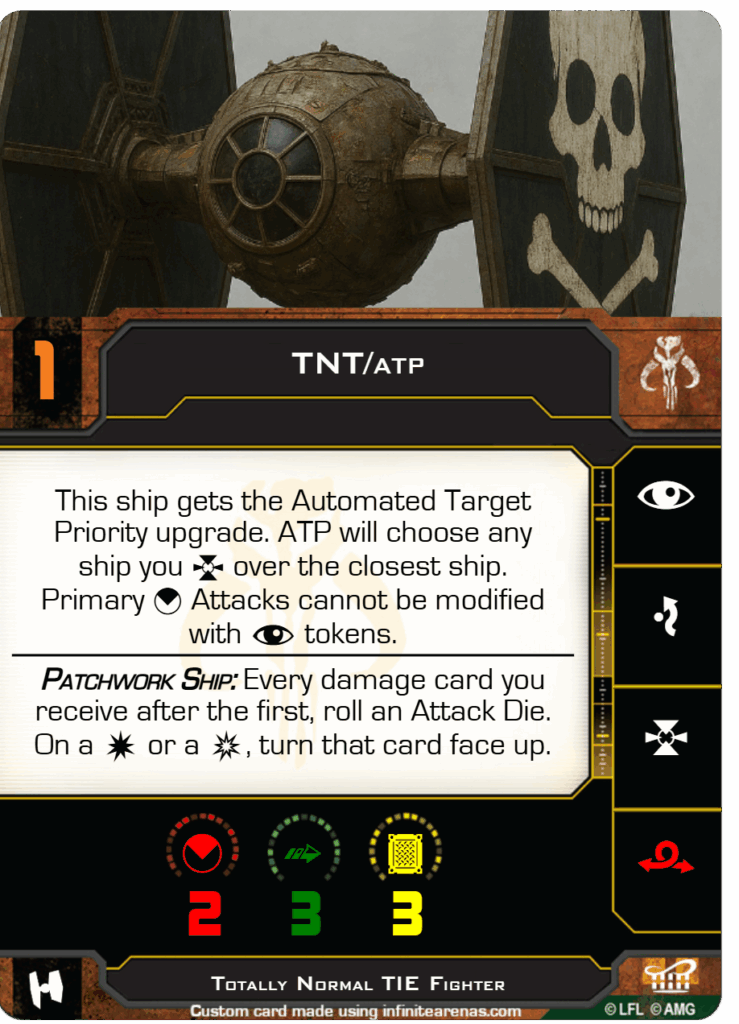
TNT/apt
You could not find a standard fire control system that would work with this TIE. Fortunately there was an automated system on an old droid ship that integrated just fine. Integrated with a targeting computer it almost works like a normal FCS.
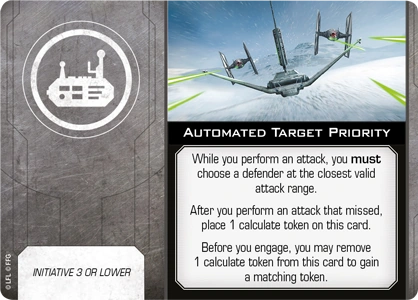
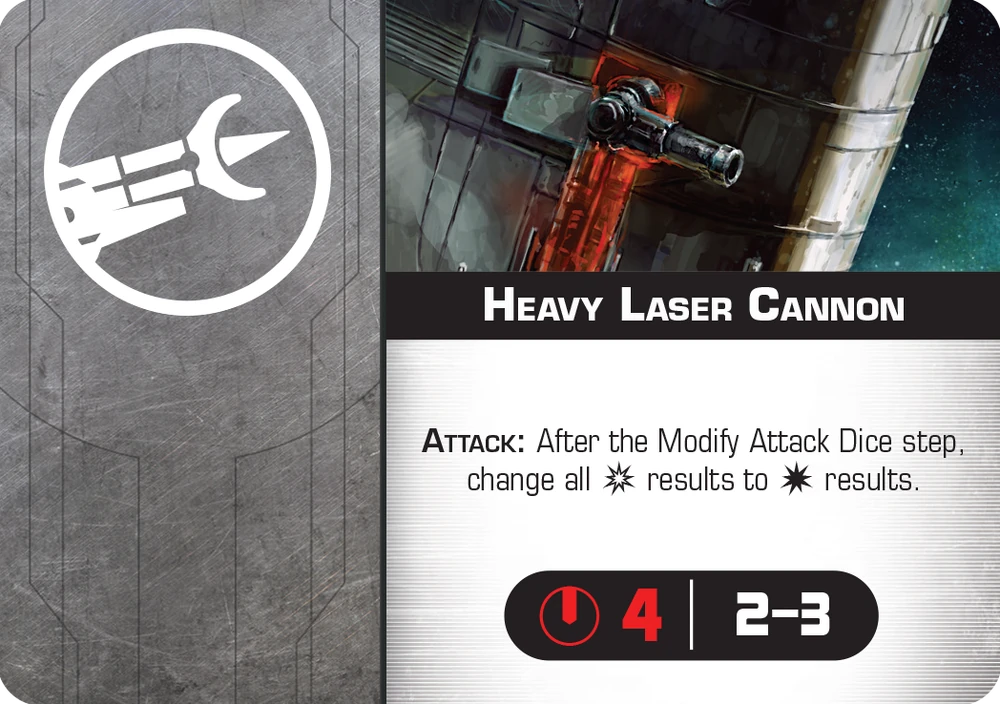
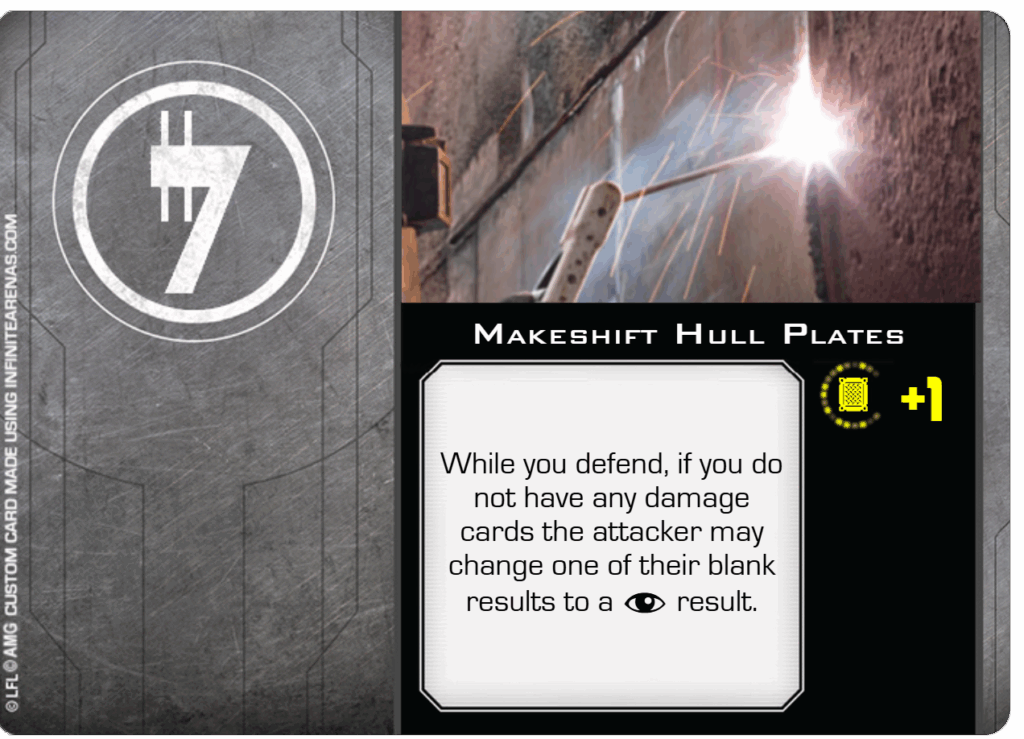
TNT/hv
You have to be pretty far away to mistake this for a normal TIE. It is much larger and a bit less symmetrical. It trades maneuverability for durability and mounts a Heavy Laser Cannon for extra firepower. The TNT/hv Heavy is a Medium Base ship.
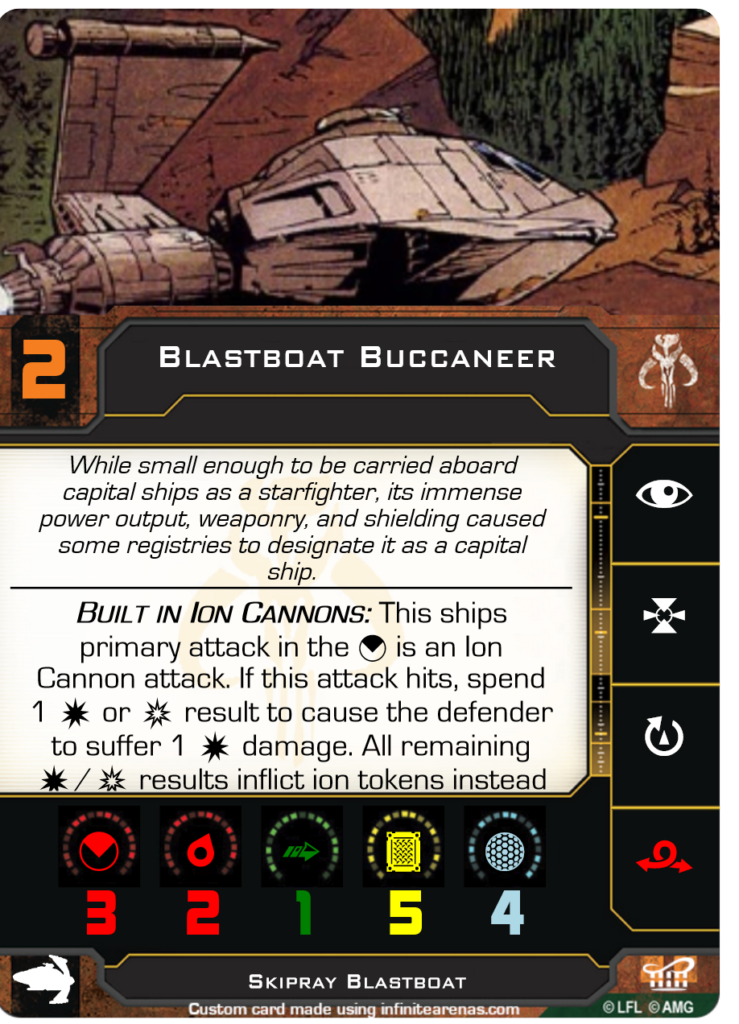
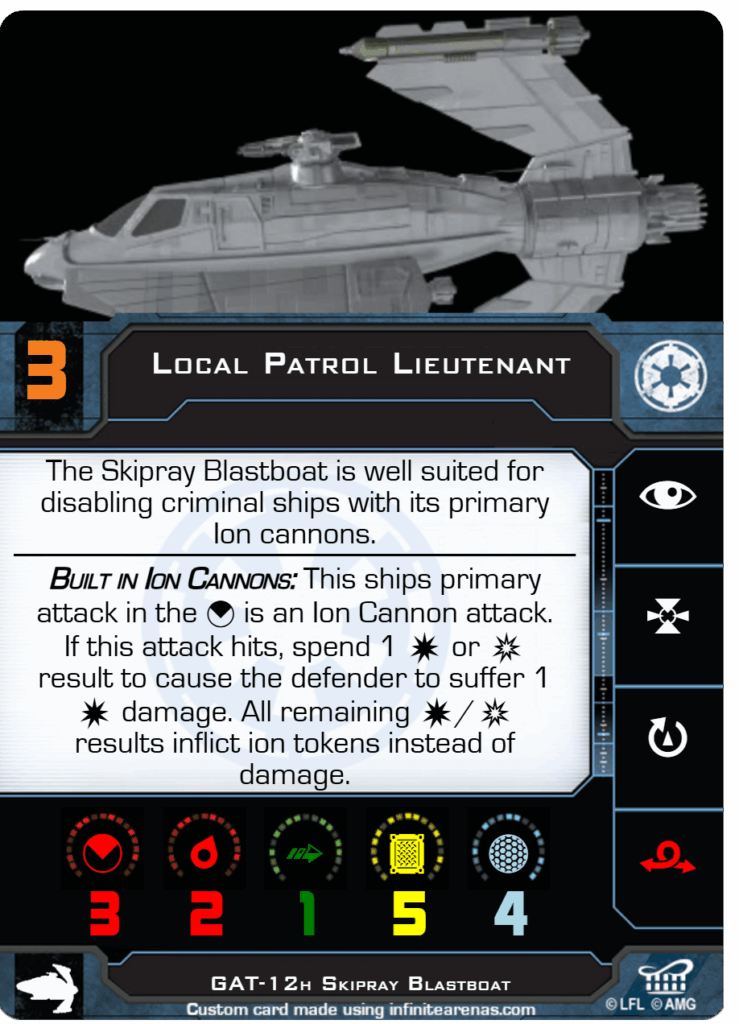
GAT-12h Skipray Blastboat
A favorite of local patrols and pirates alike, the Skipray Blastboat is well suited for disabling enemy ships with its primary Ion cannons. Strong shields and a laser turret help it deal with more maneuverable fighters. It can also be armed with either missiles or torpedoes as the mission profile demands.
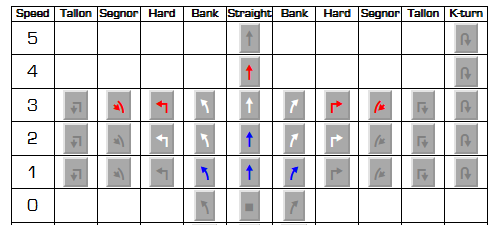
The Skipray Blastboat uses the same dial as the Scurrg H-6 Bomber.
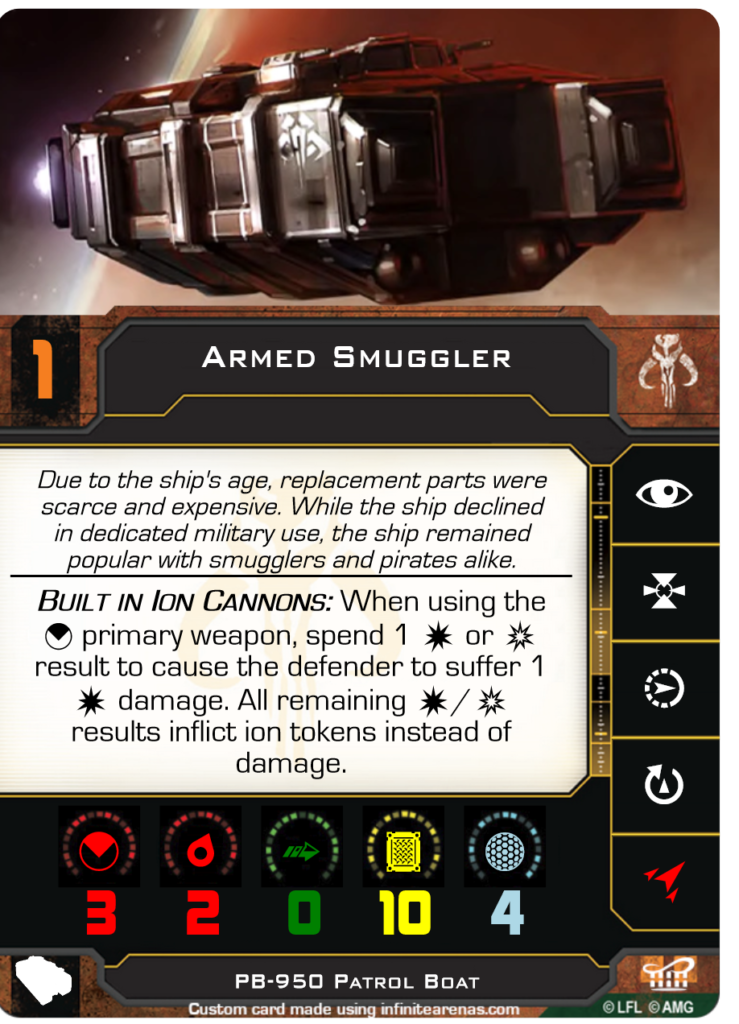
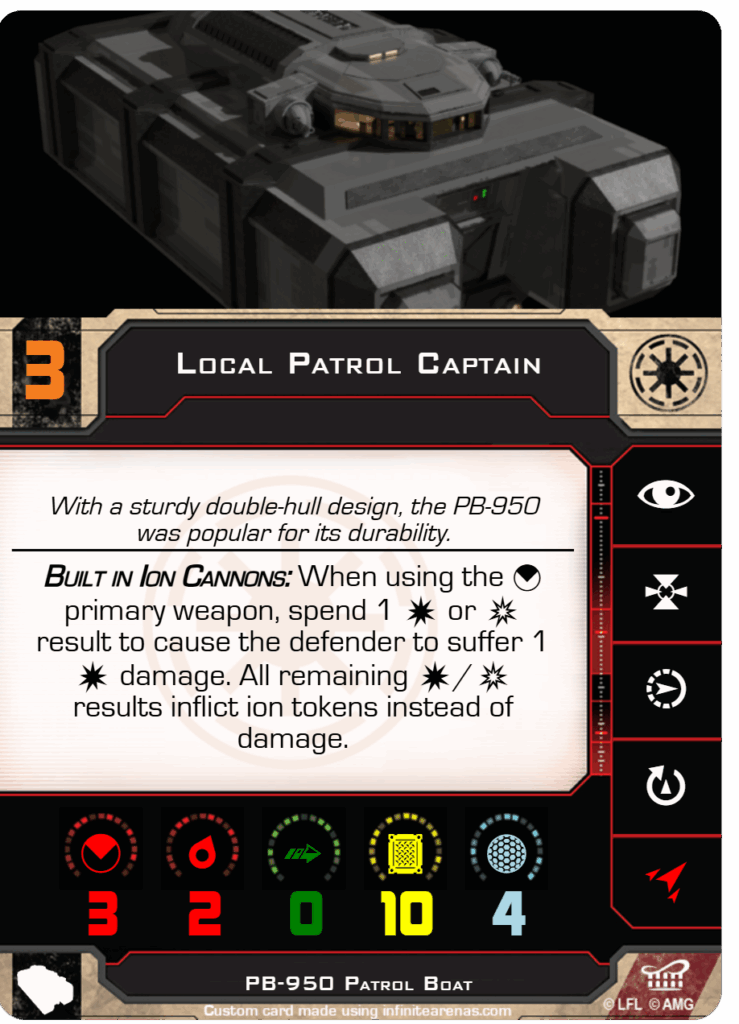
PB-950 Patrol Boat
Due to its age, it is difficult to get stock replacement parts for the PB-950. However smugglers, local patrols and pirates will keep them going as long as possible due to their reliability and ruggedness. Primary ion cannons are useful for disabling opponents while a turret is used to defend against smaller craft.
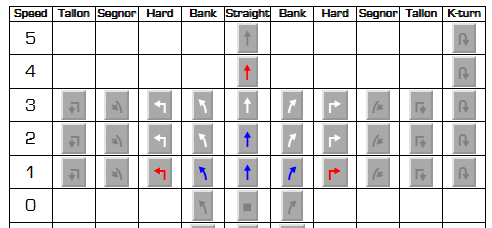
The Patrol Boat uses the same dial as the YT-49 Decimator.
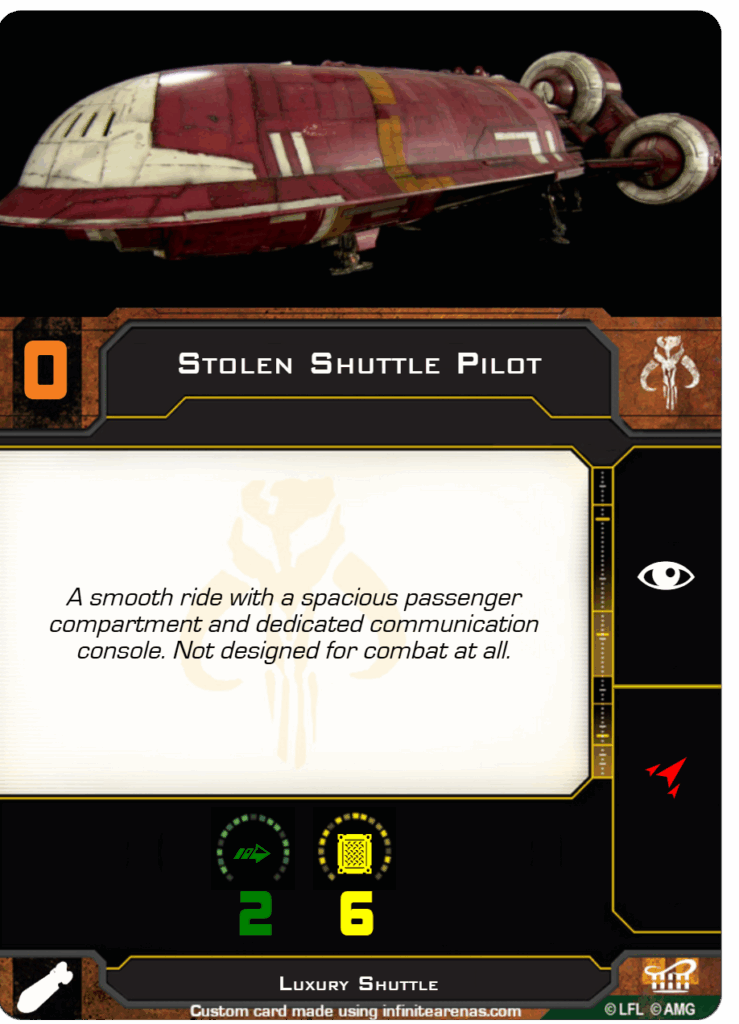
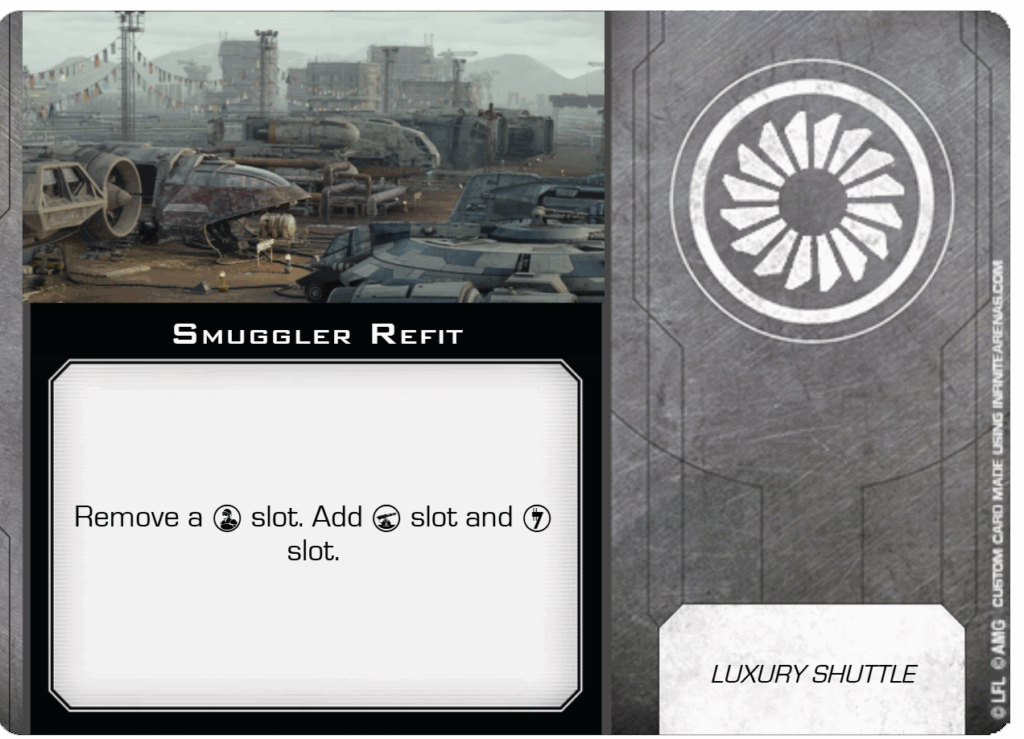
Luxury Shuttle
The CSS-1 Corellian Star Shuttle is a luxurious passenger craft with comfortable passenger quarters. It offers a smooth but slow ride. Where a weapons control panel might be on a military ship, there is something labeled “Entertainment System”. Occasionally smugglers will use one with a hidden cargo compartment in one of the passenger areas.

Optional Custom Upgrades
Sometimes you have to wire in systems to things they weren’t meant to or just slap some metal plates to the outside of a ship were they don’t belong to add some survivability. On that note there are a handful of new upgrades available in the PLotAC campaign. Mostly meant as inexpensive junkyard and jury-rigged upgrades.
You can find their cost in the upgrades cost table section.
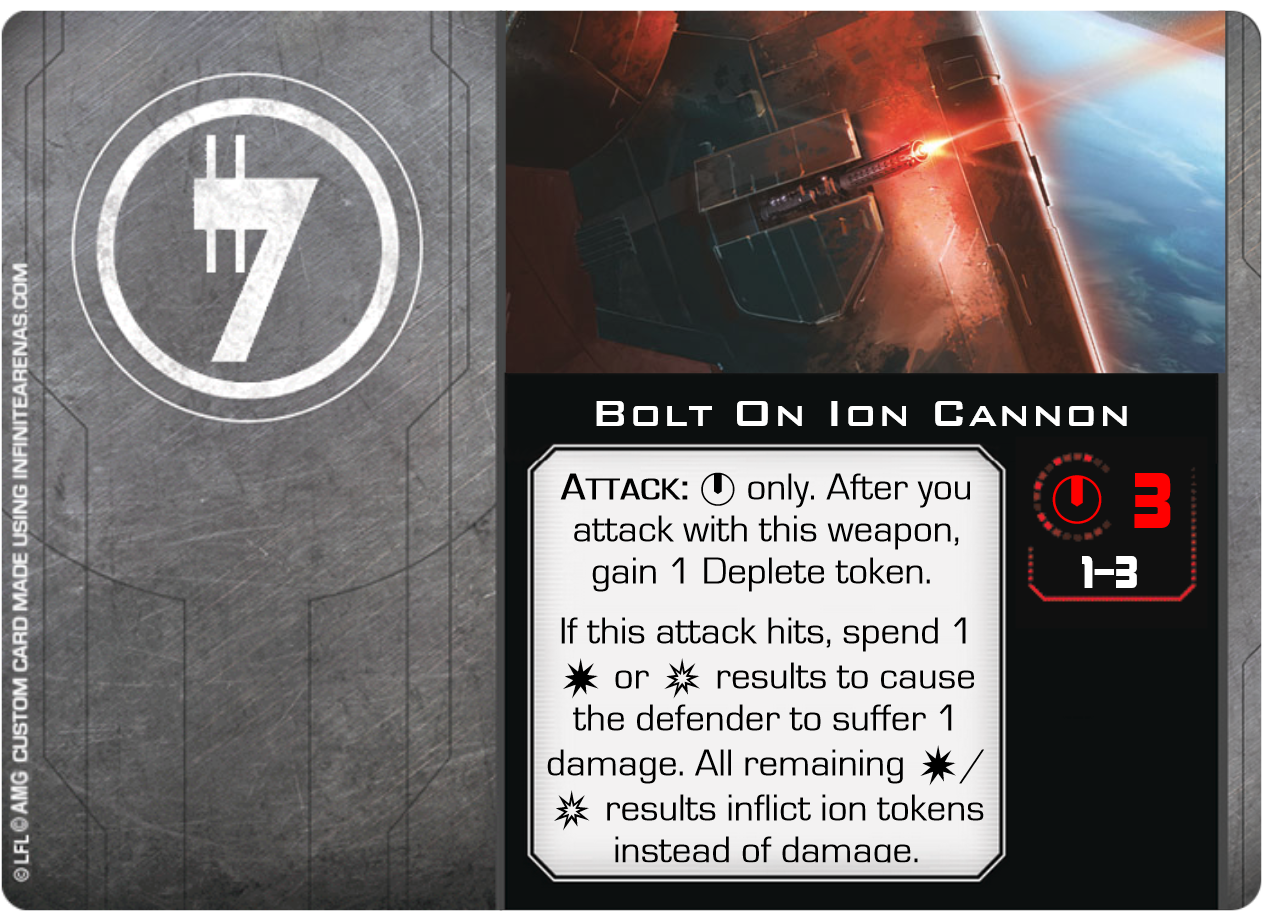
Bolt on Ion Cannon
The ship doesn’t really have the power relays setup for this and it isn’t exactly connected to the ships targeting system but you have yourself an Ion Cannon. Note: It cannot be used for range 0 attacks.
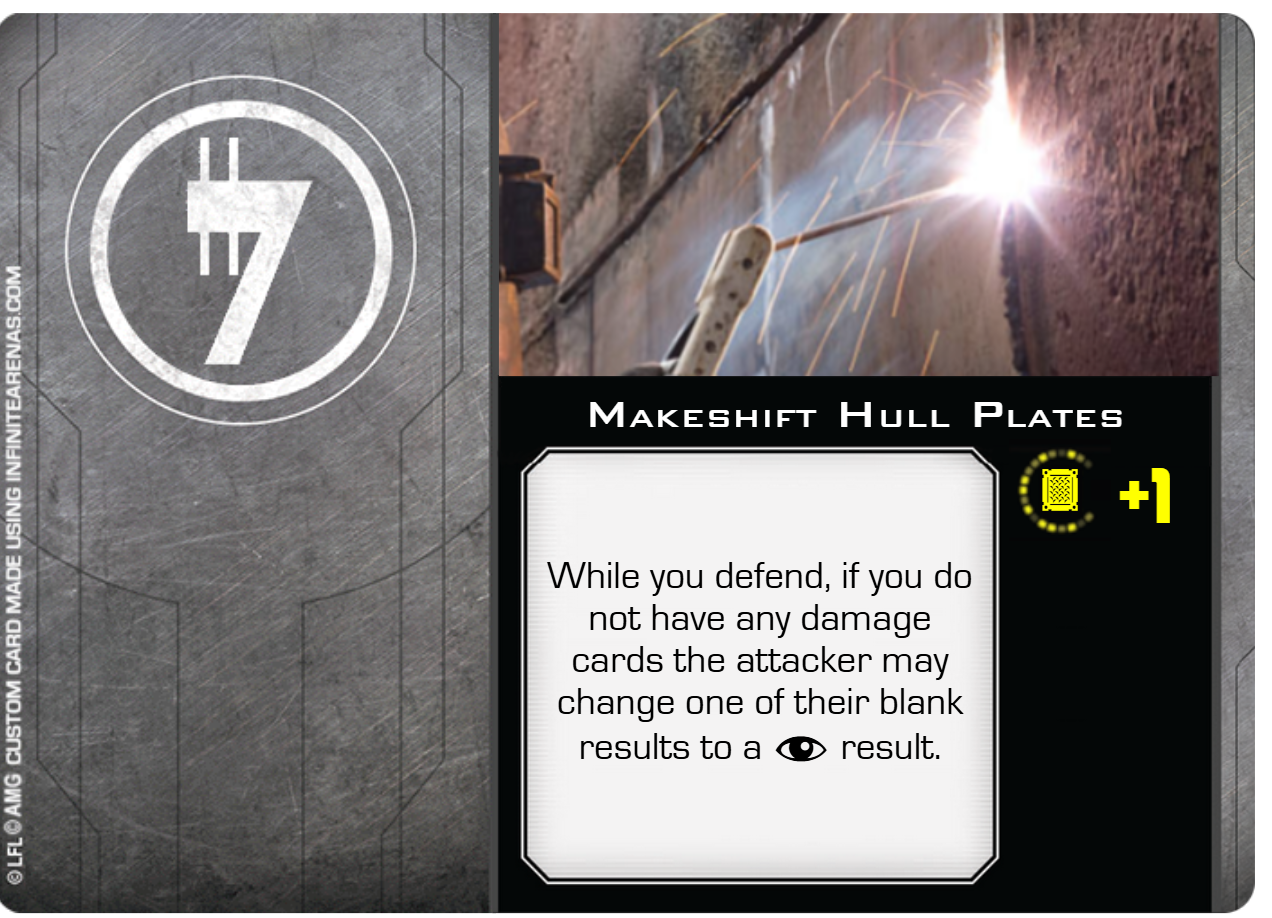
Makeshift Hull Plates
It might stop one more laser bolt but its gonna make you an easier target.
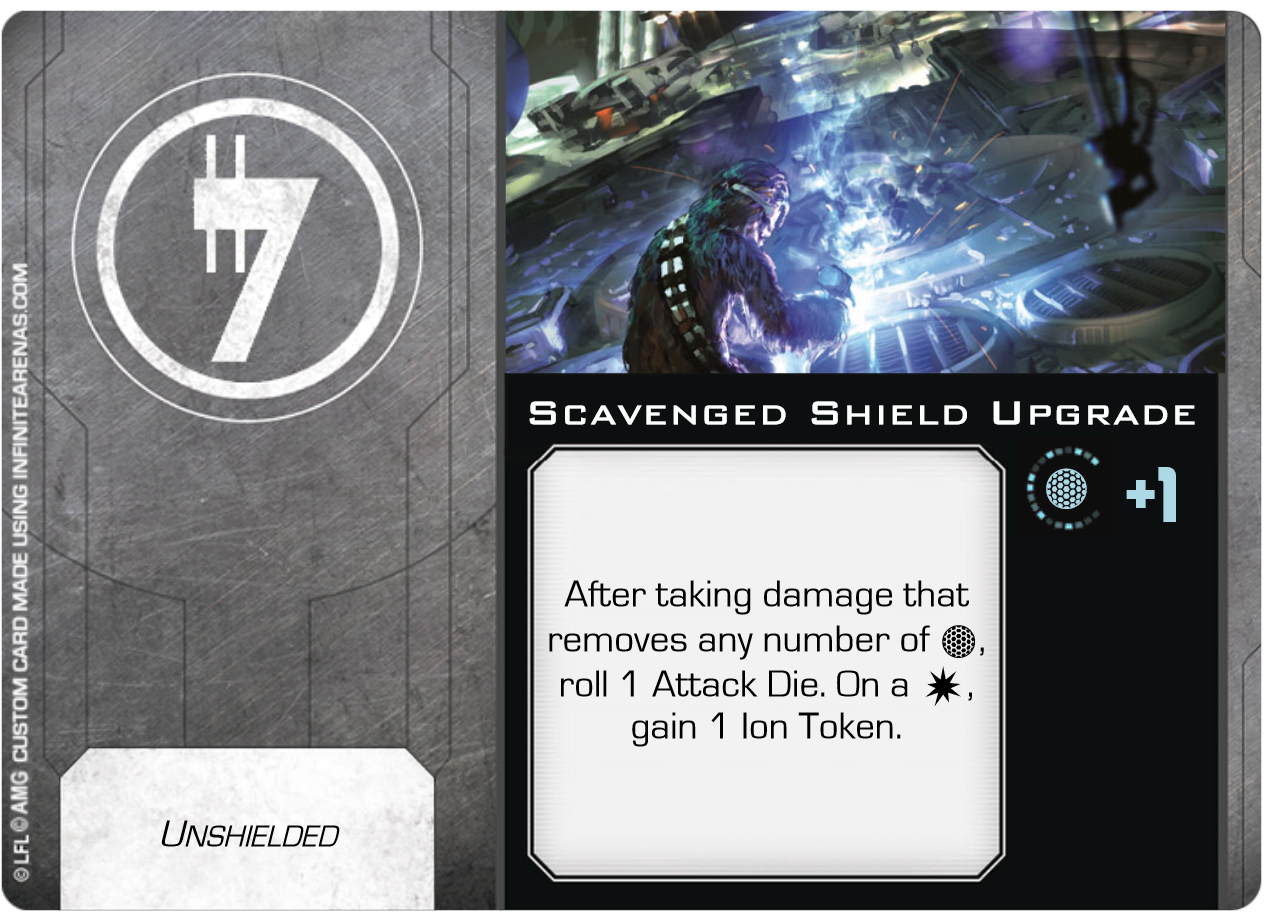
Scavenged Shield Generator
You may get some feedback when you take a hit, but the shielding may just save your life. Note: Can only be added to an unshielded ship.
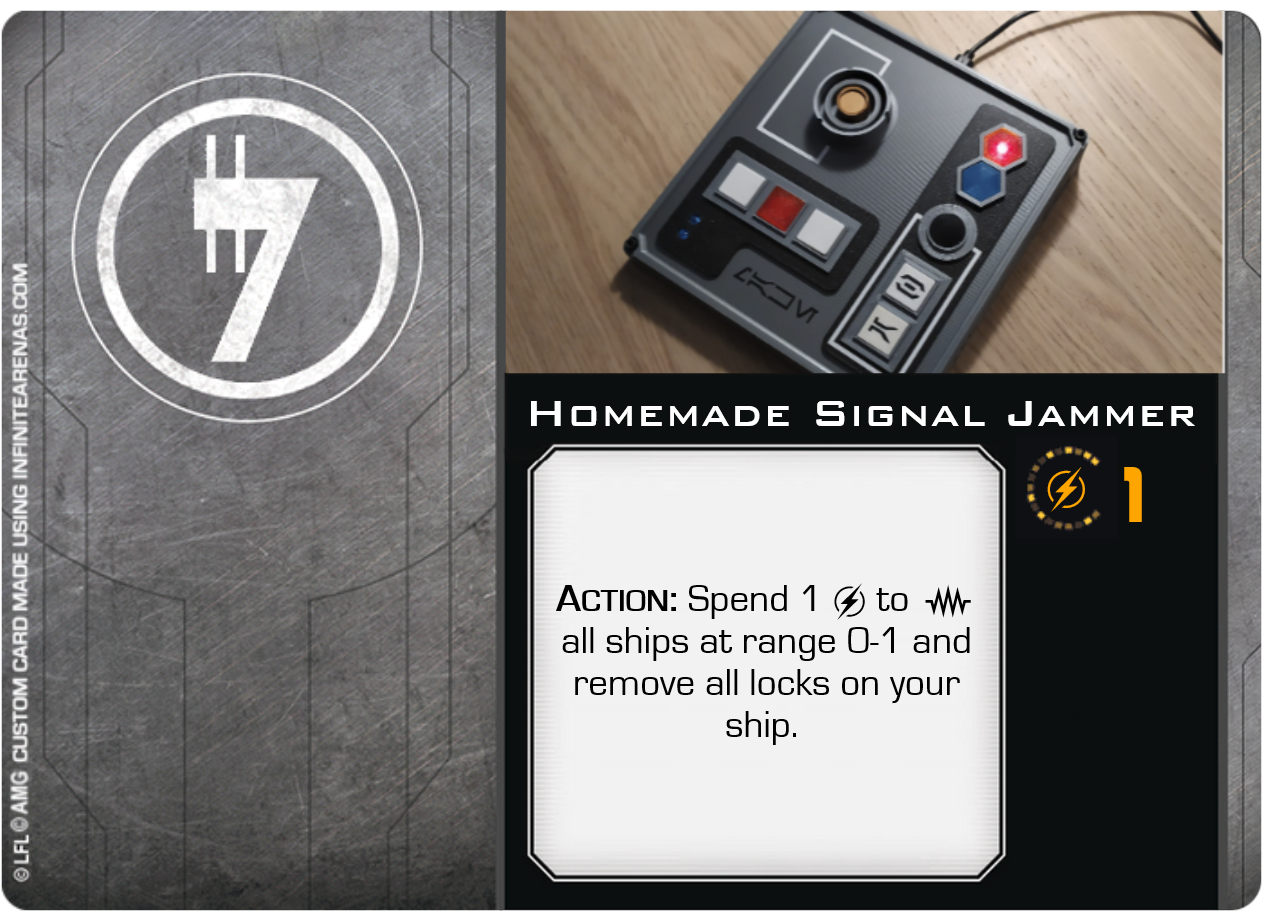
Homemade Signal Jammer
The battery burns out after a single use and the signal is not directed. Extremely useful for tight spots.
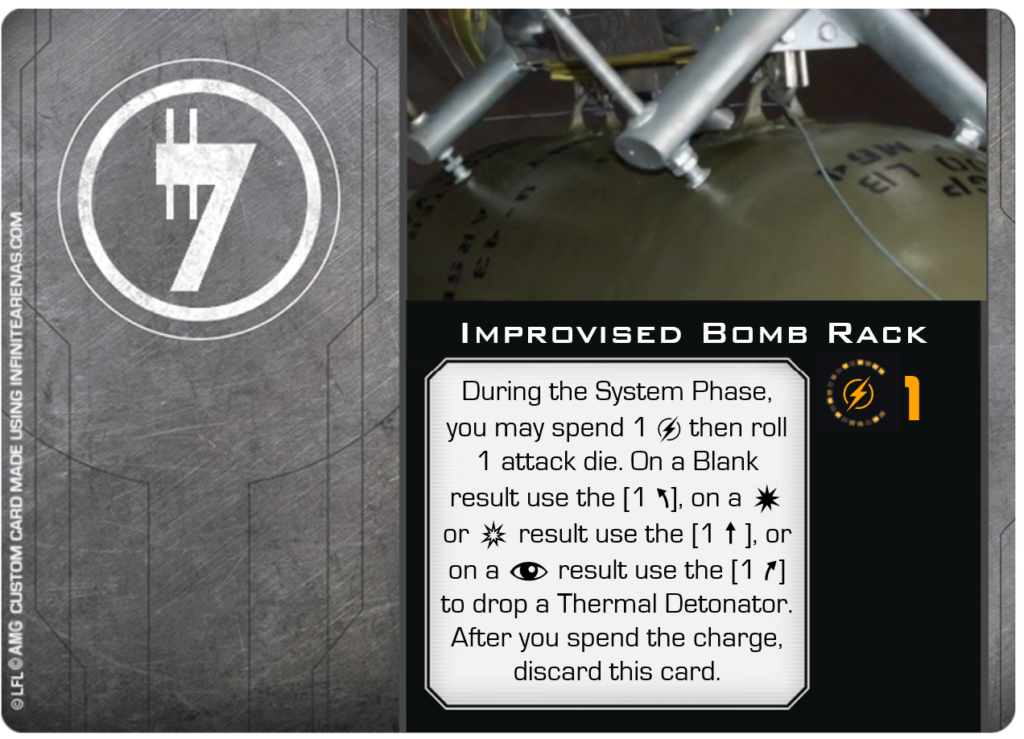
Improvised Bomb Rack
There is no telling where the bomb will end up after you drop it, but you have successfully turned your ship into a bomber.
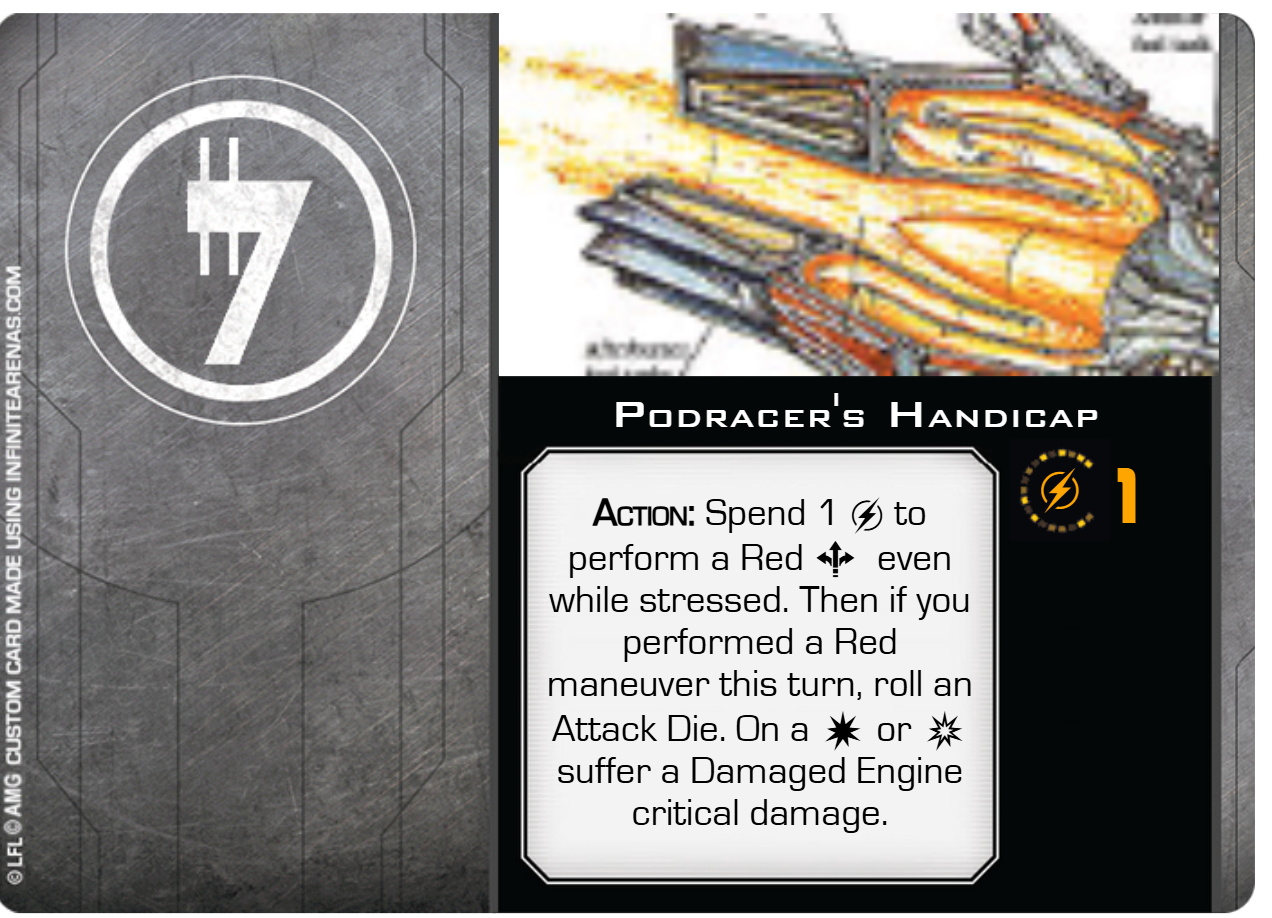
Podracer’s Handicap
You learned how to set this up from some Podracing mechanics with questionable morals. Only enough juice for one burn, but sometimes that’s all you need. It may cause you to evacuate your exhaust manifold, if you know what I mean.
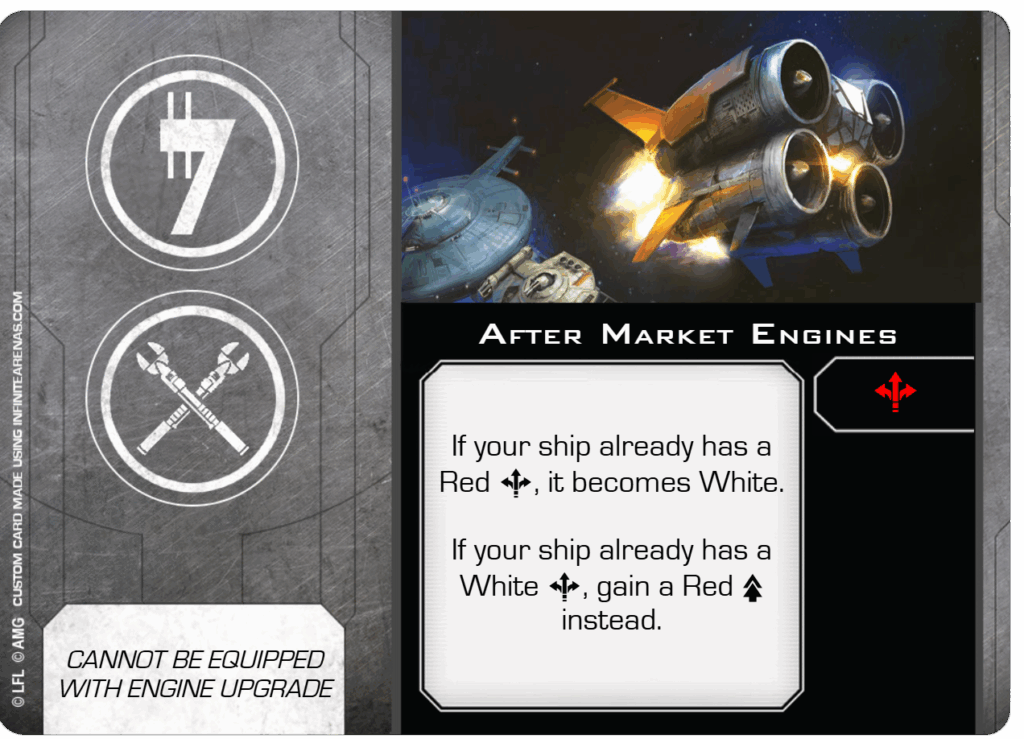
After Market Engines
A favorite move of smugglers and pirates alike is taking an engine meant for a large ship and installing it into a smaller ship. It takes a lot of space but speed is invaluable when running from the law.
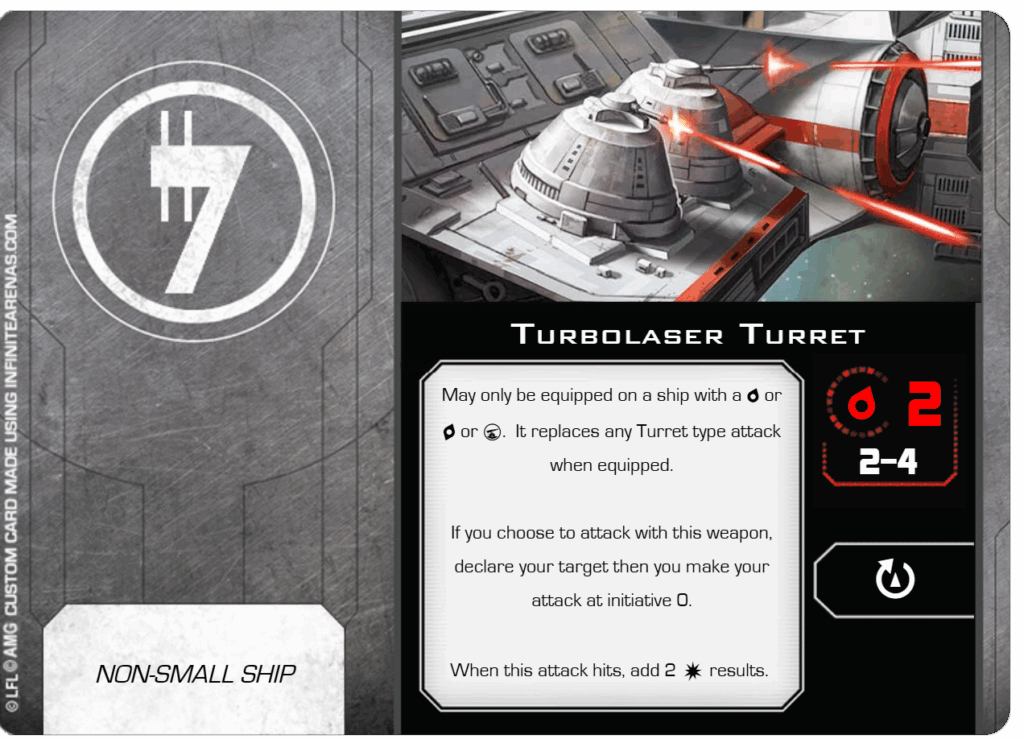
Turbolaser Turret
Pirates and bounty hunters often install overpowered guns on their ships to deal with larger threats. While effective against freighters and small capital ships, they are poorly suited for tracking fast moving fighters. But when they hit, they can be devastating. Requires extra space for the upgraded power supply needed to charge it. They definitely aren’t legal.
The upgrade restrictions essentially limit this to the following ships: Customized YT-1300, JumpMaster 5k, Lancer Pursuit Craft, YT-2400, Skipray Blastboat, and PB-950 Patrol Boat. The Scurrg H-6 and Decimator can also take it once you unlock an Illicit slot in a Career tree (Most careers at rank 8, Gearhead at rank 6).
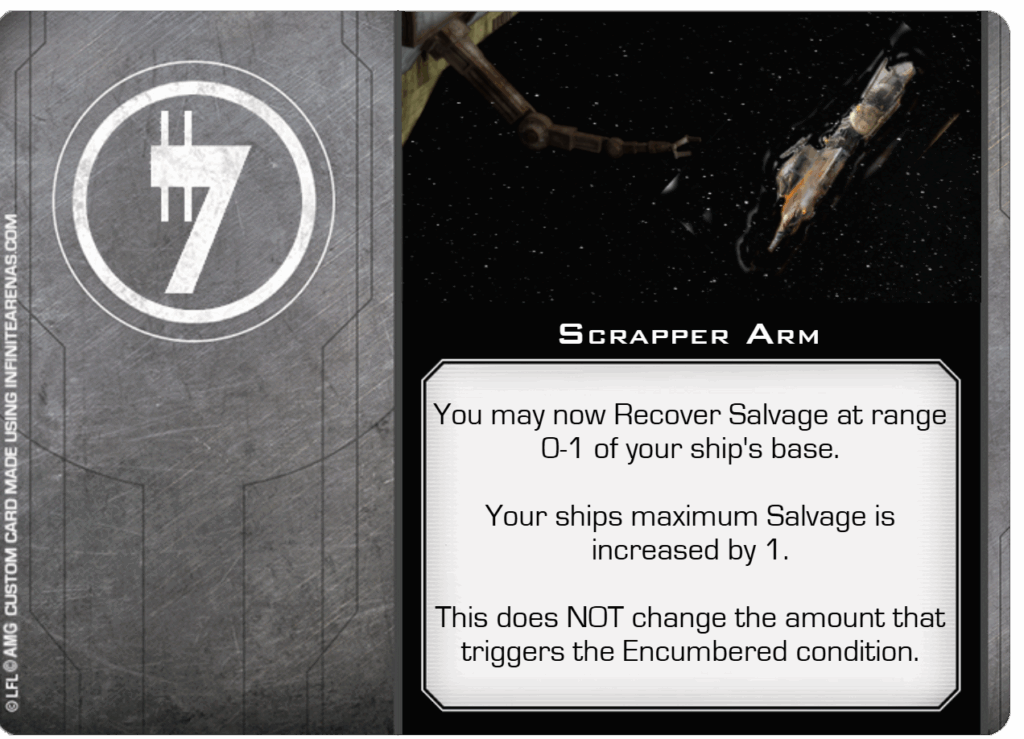
Scrapper Arm
Used for picking over debris fields and orbital junkyards, a Scrapper Arm is a handy tool for those who wish to gather salvageable components in space.
Starting Resources
- Company Credits: $5k (for use in Repairing the Patrol Boat)
- 3-6 Pilots with 0 XP and 0 Credits each. Initiative 1
- 1 Starting ship per pilot based on their Career
- 1 PB-950 Patrol Boat needing major repairs (will come on some missions)
If you don’t want to use the custom ships, start the Campaign with the New Rides mission to have the player steal ships from the Local Patrol. To Proxy the TYE Wing, you can use a Y-Wing as they share a dial and only allow for 3 Hull hits.
| Number of Players | Reccommended # of pilots per player | Optional # of pilots per player |
| 1 | 3 | 4, 5, or 6 |
| 2 | 2 | 3 |
| 3 | 1 | 2 |
| 4 | 1 | – |
| 5 | 1 | – |
| 6 | 1 | – |
Pilot Careers
Each Pirate pilot can follow 1 of 8 Career Paths starting at rank 1. At each Rank the pilot gets access to upgrades and abilities based on their Career. If your pilot dies, feel free to try a different career path with the next one.
You can find which pilot ability is available to which Career path in the Pilot Ability tables.
Organizer
The Organizer is all about coordinating the efforts of the team, moving resources where they are needed and bringing in skilled crew. You may only have 1 Organizer on your team. They are the only pilot who may hire and use all non-generic crew with XP instead of Credits, Scum Crew hires this way are treated as permanent upgrades (see Crew Upgrade cost table for Crew notes). You can still temp hire Scum crew for using credits.
The Organizer may share their permanently hired crew upgrades with any other pilot or the Patrol Boat.
A pilot on the Organizer path gets a red Coordinate action at rank 2, a white Coordinate action at rank 3, a red linked Coordinate at rank 4, and a white linked Coordinate at rank 7. It is possible to link these Coordinate Actions to any Action available for the ship type including mission actions.
Organizers get a 1k discount for every Crew slot on a ship. (i.e. 1k discount for Escape craft, 2k discount for ST-70 Assault Ship)
At rank 5, and 7 the Organizer gains an extra Crew Slot. You may bring along extra crew equal to the number of crew slots you have unlocked on any ship you fly that already had an existing Crew slot.
At ranks 3 and 8 the Organizer gains access to Organizer Pilot Abilities.
- Initiative 1. Escape Craft with Novice Technician Crew
- Add a Modification slot, Increase Initiative to 2. Gain the Red Coordinate Action.
- Upgrade the Red Coordinate to a White Coordinate Action and add 1 Organizer Pilot Ability slot. Increase Initiative to 3
- Add a Modification slot, Gain the linked Red Coordinate Action. Increase Initiative to 4
- Gain the Cutthroat Talent, Add a Scum Crew hire slot. Increase Initiative to 5
- Add a Modification or Sensor slot. Increase Initiative to 6
- Gain the linked White Coordinate Action, Add a Scum Crew hire slot.
- Add one Elite Talent or 1 Organizer Pilot Ability slot, add 1 Illicit slot
Professional
The Professional is an ace pilot of remarkable skill. Most are former bounty hunters, assassins, or mercenaries. They know just where to put their shots and where to position their ship for the most deadly attacks. The Professional has access to the most Elite Talent slots.
Each Professional pilot should choose their Former Profession. They get XP gain bonuses and starting upgrades / talents based on their choice:
- Bounty Hunter: The Bounty Hunter always has the Tracking Fob Illicit Upgrade. This does not use an upgrade slot on any of their ships. When a Bounty Hunter disables a ship with Ion damage, they gain 1 XP directly (does not pool with group XP). When the crew captures an Ionized ship at the end of a mission, add 1k credits x the ship’s threat level to the reward pool. The Bounty Hunger gets a 2k Credit discount on the following ships: G-1A Starfighter, JumpMaster 5K, ST-70 Assault Ship, YV-666, and Firespray Patrol Craft.
- Assassin: The Assassin has the Lone Wolf Elite Talent. When an Assassin destroys a ship, if its threat level was equal to theirs, the Assassin gains 1 XP directly (not pooled). If the threat level was greater, gain 2 XP instead. The Assasin gets a 2k Credit discount on the following ships: Z-95, Rogue-class Fighter, Starviper, Lancer Pursuit Craft.
- Mercenary: The Mercenary has a custom Talent called Survivor: When defending, if the attacker has lower initiative than yours, you may reroll 1 defense dice. The Mercenary has, when an attack you make (or device you drop) does more than 1 damage to an enemy ship, gain 1 XP directly (not pooled). The Mercenary also gets a 2k Credit discount on the following ships: Z-95, Y-Wing, M3-A, Khiraxz, Fang, Kimogila. And a 10k Credit discount on all Fell Off a Freighter Military Surplus dealer ships.
The Professional gets access to the Professional Pilot Abilities and to Elite Talents. At rank 2 you you may spend 2xp to gain the Expert Handling Talent (this is a slightly enhanced version, see talent table). You are able to choose one Professional Pilot Ability or Elite Talent at ranks 3 and 7. At rank 5 you get one of each.
- Initiative 2. TYE-Wing with Bolt On Ion Cannon
- Add a Modification slot, Expert Handling Talent slot (check Elite Talent table for ability).
- Add an Elite Talent or Professional Pilot Ability. Increase Initiative to 3
- Add a Modification slot. Increase Initiative to 4
- Gain the Cutthroat Talent, Add and Elite Talent and a Professional Pilot Ability slot. Increase Initiative to 5.
- Add a Modification or Sensor slot. Increase Initiative to 6
- Add an Elite Talent or Professional Pilot Ability slot
- Add an Illicit or Tech slot
Gambler
The Gambler is ready to try their luck and uses some unorthodox maneuvers. They are ready to take risks and pull stunts.
A Friendly Game of Sabaac:
The Gambler likes to wager. After each mission, if you have the credits, you may wager up to your rank in thousands of credits in a game of chance with the ground crew.
This default and simplest way to do this is, Roll an Attack Die:
- Know When to Fold ‘Em
- On a Blank: Lose all wagered credits.
- On a Eye: Lose half of all wagered credits, rounded up.
- Know When to Hold ‘Em
- On a Hit: Gain credits equal to the amount wagered.
- On a Crit: Gain credits equal to 2.5x the amount wagered, rounded up.
You may discuss an alternative method with your GM. Other examples of ways to do this are: Play a hand of Blackjack/21, Play a couple hands of poker using 1K credit chips, Play an actual game of Sabaac.
The Gambler gets access to the Gambler Pilot Abilities and to Elite Talents. You are able to choose one Gambler Pilot Ability or Elite Talent at slots 3 and 6. At rank 5 you get an additional Gambler Pilot Ability.
- Initiative 1. TYE-Wing with Scavenged Shield Generator
- Add a Modification slot, Increase Initiative to 2
- Add an Elite Talent or Gambler Pilot Ability. Increase Initiative to 3
- Add a Modification slot. Increase Initiative to 4
- Gain the Cutthroat Talent, Add a Gambler Pilot Ability slot. Increase Initiative to 5.
- Add an Elite Talent or Gambler Pilot Ability slot. Increase Initiative to 6
- Add a Modification slot
- Add an Illicit or Sensor slot
Slicer
The Slicer utilizes technology to cause battlefield disruption. If you need to jam someone, the Slicer is your guy.
A Slicer gets a Red Jam action at rank 3, a Linked Red Jam at rank 4, and Replace the Red Jam with a White Jam at rank 5, and replace the Red Linked Jam with a White Linked Jam at rank 8. It is possible to link these Jam Actions to any Action available for the ship type.
The Slicer gets access to Slicer Pilot Abilities at rank 3 and 8 with the option of Pilot Ability or Elite Talent at rank 6. They also get access to the powerful Tech slot at rank 4.
There are a couple of missions with special actions specific for the Slicer career path.
- Initiative 1. TYE-Wing with Homemade Signal Jammer
- Add a Modification slot, Increase Initiative to 2
- Add Slicer Pilot Ability slot. Gain Red Jam Action. Increase Initiative to 3
- Add Tech slot and Modification slot. Gain Linked Red Jam Action.
- Gain the Cutthroat Talent. Replace Red Jam Action with White Jam Action. Increase Initiative to 4.
- Add a Modification or Sensor slot and add a Elite Talent slot. Increase Initiative to 5
- Add an Illicit slot and a Slicer Pilot Ability. Increase Initiative to 6
- Replace the Linked Red Jam Action with a Linked White Jam Action
Gearhead
The Gearhead is an expert mechanic and is prone to modifying their ship beyond belief. There is no such thing as too many upgrades. If you want a hot ride, the Gearhead is your go to.
Their experience of patching ships together and scrounging for parts gives the players the Salvage the Battlefield condition. From level 2, they can also create a Patchwork Y-Wing for 1K credits after purchasing or building a Y-TIE.
By rank 8, the Gearhead has more extra Mod slots than any other Career path. At ranks 4 and 6 they gain access to Gearhead Pilot Abilities. At rank 4 they get an Red Boost Action for any ship with no boost and a White Boost Action on any ship with a Red Boost.
At Rank 1 the
- Initiative 1. TYE-Wing with Podracer’s Handicap. Player ships can Salvage the Battlefield
- Add a Modification slot, Increase Initiative to 2. Ability to Create a Patchwork Y-Wing.
- Add a Modification slot, Increase Initiative to 3
- Add a Gearhead Pilot Ability slot. Gain the Red Boost Action for any ship with no Boost and upgrade any Red Boost actions to White.
- Gain the Cutthroat Talent, Add a Modification slot. Increase Initiative to 4.
- Add an Illicit slot and a Gearhead Pilot Ability slot. Increase Initiative to 5.
- Add a Tech or Sensor slot. Increase Initiative to 6
- Add an Illicit and Modification slot.
Demolitions
Demolitions loves everything bombs, missiles and torpedoes. You need to make something go boom, give them a call.
Demolitions pilots get a 1k discount for each Missile, Torpedo, Payload, or Hardpoint slot a ship has.
Demolitions gets a Red Linked Lock action at rank 4, and a White Linked Lock action at rank 7. It is possible to link these Lock Actions to any Action available for the ship type.
At rank 5 they get a Weapon Hardpoint Slot which allows them to equip an additional Missile, Torpedo, or Cannon slot to any ship they fly.
At ranks 3, 6, and 8 they gain access to Demolitions pilot abilities.
- Initiative 1. TNT/mt with Improvised Bomb Rack
- Add a Modification slot, Increase Initiative to 2, Deadman’s Switch no longer adds a Die to your ejection roles.
- Add a Demolitions Pilot Ability slot. Increase Initiative to 3
- Add a Modification slot. Gain the Linked Red Lock Action.
- Gain the Cutthroat Talent. Add a Hardpoint slot. Increase Initiative to 4.
- Add a Modification or Sensor slot. Add a Demolitions Pilot Ability slot. Increase Initiative to 5.
- Red Linked Lock Action is upgraded to a White Linked Lock Action. Increase Initiative to 6.
- Add an Illicit and Demolitions Pilot Ability Slot.
Cyborg
The Cyborg has had some unfortunate life experiences leaving them part machine. As a result they often find themselves thinking like one, cold and calculating. The upside is they are really good with droids. The Cyborg is the only pilot who may fly the Aggressor Assault Fighter. They are also the only one who can take the IG-88 series Pilot Abilities (note they do not get these abilities for free, just the option to get them by spending XP). Additionally, the Cyborg may hire Scum Crew that are Droids as permanent upgrades using XP.
If the pilot chooses the cyborg path, they replace their Focus action with a Calculate action and get the Contraband Cybernetics upgrade for free on all of their ships without using an Illicit slot.
The Cyborg gets the option of a droid fighter wingman (represented by a Separatist Drone Vulture Droid) starting at rank 3. The first droid fighter is free but you must pay credits to replace or repair it until completing the Lost Loot mission series if it gets destroyed. For repair cost, make an ejection role. Base repair cost is $2k credits. For each Crit rolled, add $10k to the cost, for each Hit rolled add $5k, for each Focus add $2k, add nothing for blanks. It must deploy within range 1 of the Cyborg when deploying. It adds 15 points to your Total Threat Points when calculating Threat Level.
The Droid fighter starts in formation and performs the same maneuver as the Cyborg (even if the maneuver is not on the droid’s dial). When not in formation, the Droid Wingman uses the Vulture Droid AI pilot card under the Attack AI unless given instructions from the Cyborg pilot through the Control Droid action. At rank 3 the Cyborg gains the ability to perform Control Droid as a Red Action. At Rank 4, this becomes a White Action. At rank 6 gain the Linked Red Control Droid Action and your Droid now has the same IG-88 Pilot Abilities as you. At rank 8 gain the Linked White Control Droid Action.
A Red Droid Control Action may only be performed when the Droid wingman is at range 0-2. A White Droid Control Action can be treated as a Red Action to extend the range to range 3. When you perform the Control Droid Action you set the Initiative of the Droid equal to the Cyborg’s Initiative for Engagement phase and may do one of the following:
- Set the AI of the Droid to Strike or Escort and designate a target.
- Set the AI of the Droid to Flee AI causing it to attempt to leave the battlefield and return to the pirate base. This happens automatically if the Cyborg flees the battlefield or if the Cyborg is shot down.
- Set the AI of the Droid to Attack AI
- Coordinate the Droid
- Set the Droid to rejoin formation (can only be chosen if Droid is within range 1).
- Replace the Focus action with the Calculate Action. Initiative 1. TNT/apt, Contraband Cybernetics. The Cyborg always has the Contraband Cybernetics upgrade, it does not take an upgrade slot on his ships.
- Add a Modification slot, Increase Initiative to 2
- Gain a Droid Fighter wingman. Gain the Red Control Droid Action. Increase Initiative to 3.
- Gain a Linked Red Calculate Action. Red Control Droid Action upgrades to White. Add the IG-88A Pilot Ability slot.
- Gain the Cutthroat Talent. Add the IG-88B Pilot Ability slot. Droid Wingman gains a Modification slot. Increase Initiative to 4.
- Add Modification slot and Elite Talent slot. Gain Linked Red Control Droid Action. Droid gains all IG-88 Pilot abilities of Cyborg pilot and all future ones.
- Add the IG-88C Pilot Ability slot. Gain the Linked White Calculate Action. Droid Wingman gains a Missile slot. Increase Initiative to 5.
- Add the IG-88D Pilot Ability slot and add a Tech slot. Increase Initiative to 6.
Miner
The Miner was fired from the Mining Guild for “Inappropriate use of Guild Equipment.” It seems the Guild did not appreciate the stunt flying and tractor beam tricks being done around the mining sites. The pirates however, do. Before they were let go, the Miner developed a friendship with the Guild’s TIE and QuadJumper supplier. They also took a Mining Guild TIE with him when they left.
Their experience working for the Guild also gives the players the Salvage the Battlefield condition.
The Miner has learned all sorts of tricks to pull with the tractor beam as well as a few ways to navigate around debris and asteroids. They start with the Modified TIE/ln (Mining Guild TIE) and can buy the Mining Guild TIE and QuadJumper at a $5k discount. At rank 4 they can choose to install a Tractor Beam Cannon upgrade on any of their ships (must still pay for it).
Miner Talents: Backwards Tailslide, Daredevil, Debris Gambit, Elusive, Ensnare, Interloper Turn, Marg Sabl Closure, Gravitic Deflection, Tieferon Belly Run, Trick Shot (Ignore all ship type and other restrictions on these talents when applying to Miner)
- You start in a Modified TIE/ln (Mining Guild TIE). Initiative 1. You add the Notched Stabilizers ability to all TNT model TIEs that you fly. Player ships can Salvage the Battlefield
- Add a Modification slot, Increase Initiative to 2
- Gain a Miner Talent slot or Miner Pilot Ability slot, Gain the At Home in the Asteroids ability: “While you move, you ignore asteroids”, Increase Initiative to 3.
- Gain a Modification slot and a Tractor Beam Cannon slot. Increase Initiative to 4.
- Gain the Cutthroat Talent. Gain a Miner Pilot Talent slot or Miner Pilot Ability slot. Increase Initiative to 5.
- Add Modification slot or Sensor slot. Increase Initiative to 6.
- Gain a Miner Talent slot or Miner Pilot Ability slot
- Gain a Miner Talent slot or Miner Pilot Ability slot. Gain an Illicit slot.
Career Progression Chart
| Rank 1 | Rank 2 | Rank 3 | Rank 4 | Rank 5 | Rank 6 | Rank 7 | Rank 8 | Path Name |
| Free | 4 XP | 9 XP | 16 XP | 25 XP | 36 XP | 49 XP | 64 XP | |
| I-1 (RCo) | I-2 (Mod) | I-3 (PA)(WCo) | I-4 (Mod) (-> RCor) | I-5 (Cut)(Cr) | I-6 (Mod)/(Sen) | (-> WCor) (Cr) | (Ilct)/(PA) | Organizer |
| I-1 | I-2 (Mod) | I-3 (T)/(PA) | I-4 (Mod) | I-5 (Cut) (T)(PA) | I-6 (Mod)/(Sen) | (T)/(PA) | (Ilct)/(Tech) | Professional |
| I-1 | I-2 (Mod) | I-3 (T)/(PA) | I-4 (Mod) | I-5 (Cut) (PA) | I-6 (T)/(PA) | (Mod) | (Ilct)/(Sen) | Gambler |
| I-1 | I-2 (Mod) | I-3 (PA)(RJam) | (Tech)(Mod) (-> RJam) | I-4 (Cut)(WJam) | I-5 (Mod)/(Sen) (T) | I-6 (Ilct)(PA) | (-> WJam) | Slicer |
| I-1 | I-2 (Mod) | I-3 (Mod) | (PA)(RBoost/R->WBoost) | I-4 (Cut)(Mod) | I-5 (Ilct)(PA) | I-6 (Tech)/(Sen) | (Ilct)(Mod) | Gearhead |
| I-1 | I-2 (Mod) | I-3 (PA) | (Mod) (-> RLk) | I-4 (Cut) (Hrdpt) | I-5 (Mod)/(Sen) (PA) | I-6 (-> WLk) | (Ilct)(PA) | Demolitionist |
| I-1 (Foc becomes Calc) | I-2 (Mod) | I-3 (RConDroid) | (IG-88A PA) (-> RCalc) (RConDroid becomes WConDroid) | I-4 (Cut)(IG-88B PA) | (Mod)(T) (-> RConDroid) (Droid gets IG-88 PAs) | I-5 (IG-88C PA)(-> WCalc) | I-6 (IG-88D PA)(Tech)(-> WConDroid) | Cyborg |
| I-1 | I-2 (Mod) | I-3 (MT)/(PA) (At Home in the Asteroids) | I-4 (Mod)(TracBeam) | I-5 (Cut)(MT)/(PA) | I-6 (Mod)/(Sen) | (MT)/PA) | (MT)/(PA)(Ilct) | Miner |
Credits
Piracy, and crime in general, is all about credits. As such, this is the primary resource and one of the main rewards from each mission. Each pilot gets an equal share of the credits earned from each mission. One share is also set aside for running the operation. If the credits do not divide equally, the extra credits go to the operation share.
The operation deducts half to pay your support crew (rounded up) and the other half goes into the operation bank. For example if each share is 15k Credits, 8k is used to pay the support crew and 7k from the Company share will go into the operation bank. The players may use this bank to pay for Patrol Boat upgrades.
Some missions you will get credits for completing. Some you will get credits for each successful objective completed. And some missions will create an income stream of credits that you get after every mission you complete.
Credits can be used to buy new ships and buy upgrades for your existing ships (think U&M points from Flight Group Alpha), and repair your PB-950 Patrol Boat. Potential expansion ideas are using credits for base crew, contacts and hiring mercenaries / bounty hunters to help you on missions.
Idea for GMs. Give players poker chips or plastic gold coins to represent credits of different denominations as an added pirate treasure prop. Such as:
Selling Your Ship
Sometimes you want to upgrade ships but in order to afford a new one, you need to sell the one you have or one you captured. But the shipyard owners aren’t going to want to buy a pirate ship at full price. Also the market demand is always changing.
When you wish to sell your ship, roll a D6. On a 1 or 2, you are offered 33% (1/3) of the total value (rounded up), on a 3-5 you are offered 50% (1/2) of the total value (rounded up), and on a 6 you are offered 75% (3/4) of the original value plus 50% (1/2) of all the upgrades (rounded up).
For example, you captured a Mining Guild TIE and wish to sell it. If you roll a 1-2 you will be offered $22k/3 = $8k (rounded up), on a 3-5 you will be offered $22k/2 = $11k, and on a 6 you will be offered $22k * 3/4 = $17k (rounded up).
You can choose to accept or reject the offer and try again after the next mission.
Experience / XP
All of the XP earned from a single mission is pooled and dealt out to the pilots that went on that mission. But it is still important to track individual contributions for the Lead by Example bonus (see below). If a pilot chooses to bank some of the XP and then is killed, that XP is lost. Keeping your experienced pilots alive should be top priority.
If earned XP does not divide evenly, the extra XP can be awarded to either the pilot who earned the most XP for the mission or the pilot with the lowest level / least XP to catch them up. (Especially in the case of a pilot being killed and needing to level up a new one)
XP can be spent on leveling up your Pilot, Elite Talents, Scum Pilot Abilities, and Scum Crew upgrades for the Organizer and Cyborg Career paths (see Pilot section for more info).
| During the Engagement Phase each Turn | + XP |
| Deal 1 or more damage to an enemy ship (1x per ship per round) | +1 XP |
| Dealing face up damage cards to an Enemy Ship | +1 XP per face up damage card |
| Assign 1 or more Red or Orange Token to 1 or More Enemy Ships (max 1x per round) | +1 XP |
| Remove a Blue or Green Token from an enemy ship | +1 XP |
| Use an ability to suffer 1 damage for another Friendly ship | +2 XP |
| Destroy Enemy Emplacement | +1 XP |
| Destroy or Permanently Disable an Enemy Ship | +1 XP |
| … and Enemy Ship with Threat Level higher than 1 | +1 XP per Threat Level |
| … and Enemy Ship is Elite | +1 XP for all pilots |
| Damage or Kill Assist (see following section) | +1 XP |
| Protect action on Mission Objective | +1 XP |
| Negative Points | – XP |
| Assign a Friendly ship a red or orange token (except lock) | -1 XP |
| Collide with another Pirate pilot and receive damage | -1 XP |
| Deal damage to a Friendly ship | -2 XP per damage dealt |
| Deal face up damage to another Friendly ship | -3 XP per damage card |
| During Mission Resoultion | |
| Mission Objective bonus or penalty | See mission description |
| Mission Failure, or Eject Role | See mission description and eject table |
Pilots do not gain XP for damage an enemy ship does to itself such as colliding with an asteroid or bumping another enemy ship. They also do not gain XP if a friendly ship (including the Company Patrol Boat) deals the damage. They can still get kill assist XP however if they previously damaged the ship and then it is destroyed by damaging itself or by a friendly ship.
Each pilot gains 1 XP per enemy ship they damage per round. If they attack an enemy ship and deal 2 or more damage, they will only receive 1 XP unless any of the damage is critical damage. However if they drop a bomb and deal damage to 3 separate ships, they gain 3 XP.
Kill and Damage Assists: If pilot A Coordinates pilot B or uses any ability to give pilot B an action, token, charge, etc; then pilot B does damage to an enemy ship or destroys an enemy ship. Pilot A gains 1 XP for assisting.
Lead by Example: If one pilot earned at least 2 more XP than the next closest pilot in a mission gets, they gain +1 XP after the XP pool is dealt out and ejection roles are deducted.
Ejection Roles
Whenever a ship is destroyed or disabled, the pilot makes an ejection roll using Red Attack Dice. The number of dice rolled is determined by the Territory of the mission. Some missions change Territory type depending on your success or failure.
If your ship is destroyed, you do not get it back. You may recover your ship if it is disabled by Ion weapons following the Ionization rules under the same conditions as capturing an enemy ship.
For Friendly Territory, roll 1 Die. For Neutral Territory roll 2 Dice. For Hostile Territory roll 3 Dice.
If your ship is equipped with the Deadman’s Switch Illicit upgrade and is destroyed, add 1 Die to your Ejection roll (Does not apply to Demolitions Career from Rank 2+). Do not add a Die if the ship was disabled by ionization instead.
Consult the following table for the consequences:
| Eject Results | Consequences |
| Crit, Crit, Crit | Pilot Killed – start a new pilot |
| Crit, Crit | Permanent Injury – Lose most expensive Pilot Ability or Elite Talent upgrade. Maximum Initiative is decreased by 1. If the Pilot receives 2 Permanent injuries, they retire – start a new pilot. |
| Crit | Nerve Damage – Play next mission at 1 Initiative lower to a min of 0. If you have not leveled up yet, you pilot plays the next mission at initiative 0. |
| Hit | Bacta Treatment Required – Lose 1d6 x 1K (1k-6k) worth of Credits (this can put you in Negative Credits owing the company to be taken out of future earnings) |
| Eye | Head Injury – Earn Half XP this mission, rounded down (for Eye, Eye, earn 0 XP for this mission) |
| Blank | Ejected Safely |
| Crit, Hit, Eye | Not Enough Bacta in the Galaxy – You were very heavily injured. The rest of the crew may vote to save your life by turning you into a Cyborg at a cost of 50k Credits or allow you to pass on. This cost can be paid out of the injured pilots credits, the remaining pilots credits, and the operation credit bank in any combination and the operation credit bank in any combination as agreed on by the surviving crew. You retain all pilot skills and abilities acquired in your current career to this point but all future level ups are on the Cyborg career path. Swap all Focus actions to Calculates. Note: If the pilot was already a Cyborg, they can still be saved. If the cost to save them is paid, treat the ejection as a Double Eye role and they gain no XP as what they learned is lost in their destroyed cybernetics. |
On pilot death, all the credits they have banked are passed on to their next of kin. If they have a spare ship in the hangar, the surviving crew may vote on whether to assign it to a replacement pilot, bid on it to be their spare ship, or sell it and divide the proceeds. The dead pilot does not get a vote. A pilot who retires from 2 permanent injuries takes their spare ship with them.
Getting a New Ship
After each mission if you have hangar space available you can choose to:
- Search the Junkyard – see below
- Buy a Ship – purchase a ship from one of the ship dealers using credits
- Build a Ship – see Salvage the Battlefield
You must only select 1.
If you choose to Search the Junkyard:
Roll an Attack Die and a d6 and consult the following table to determine what ship you are able to put together. (A Gearhead may choose to reroll either the Attack Die or the D6).
| 1 | 2 | 3 | 4 | 5 | 6 | |
| Blank – TYE-Wing with | Deadman’s Switch | Bolt-on Ion Cannon | Makeshift Hull Plates | Scavenged Shield Generator | Improvised Bomb Rack | Podracer’s Handicap |
| Eye – TNT variant | dt | ab | ic | mt | atp | hv |
| Hit – TYE-Wing with | Targeting Computer | Burnout Thrusters | Hull Upgrade | Shield Upgrade | Stealth Device | Afterburners and Shield Upgrade |
| Crit – Y-TIE with | Makeshift Hull Plates | Improvised Bomb Rack | Dorsal Turret | R4 Astromech | Shield Upgrade | Ion Cannon Turret |
You may use this ship or another ship you own in the next mission. You may not sell this ship until you have owned it for at least 1 mission.
To sell a patchwork ship (other than a Y-TIE) roll an Attack Die, on a Crit you are offered 2k Credits, all other results you are offered 1K Credits. Y-TIEs sell as normal.
Factions
Local Patrols
Most systems have regular patrols to look for suspicious activity and to scout for ships in distress. The equipment allotted to these patrols is usually whatever the local government can find for sale. They are not so desperate as to use junkyard ships as they can acquire their gear through legitimate purchase. If feeling, overwhelmed they will call for Imperial assistance.
The good news is disabling their opponents is the Local Patrols first priority and they will prioritize using Ion based weapons, unless the target has destroyed one of their ships. They also have a high degree of self preservation and will flee if brought too low.
On the mission forces tables, Local Patrols tend to use the following squadron names (Able, Bravo, Charlie, Echo, Foxtrot).
The Local Patrol uses Galactic Republic Clone Z-95s and Y-Wings (BTL-B).
Expected Forces:
- Z-95 Headhunters w/Ion Missiles
- Y-Wings w/Ion Cannon upgrade
- GAT-12h Skipray Blastboats
- PB-950 Patrol Boats
The Empire
The Empire maintains a local force for dealing with Rebels, pirates, and escorting Imperial shipping. Regular patrols are scouting the area and will respond to cries for help. If you become a big enough threat, the Empire will beef up its patrols and may even form a Pirate Hunter squad. There are also rumors of a secret TIE testing facility nearby. When it comes to pirates, the Empire has a shoot first, ask questions later policy.
On the mission forces tables, Imperial Squadrons tend to use Greek letters for squadron names (Alpha, Beta, Delta, Theta, Sigma).
Expected Forces
- TIE/ln Fighters
- TIE/in Interceptors
- TIE/sa Bombers
- Lamda T-4A Shuttles
- VT-49 Decimators
- Experimental/Advanced TIE variants
- Gozanti-Class Cruisers
- Raider-Class Corvettes
Merchants, Smugglers, and Civilians
Freighters are pirates primary prey. The goal is to swoop in and quickly disable them so we can take enough cargo to be profitable but not ruin their business. Many freighter captains run armed and some have even hired escorts as a result of the losses from piracy. Fortunately for you, they can rarely get top of the line fighters and must use whatever is available.
On the mission forces tables, Civilian craft tend to use simple name and number designators for squadron names (Freighter 1, Escort 1, Smuggler 1, etc)
Expected Forces
- TYE Wings
- Y-TIEs
- Z-95 Headhunters
- Y-Wings
- Various Freighters
Mining Guild
The asteroid belt you call home contains an active Mining Guild asteroid mining operation. Your base is actually one of their old mining operation stations in a mined out section of the belt. The Guild’s pilots are at home among the asteroids and the Guild itself has enough financial backing to be dangerous. They are a legitimate operation and can call on Local System and Imperial patrols for aid, though they will be slower to respond as they have to navigate the asteroid field to arrive. This is why the operation maintains its own security force.
On the mission forces tables, the Mining Guild tend to use simple name and number designators for squadron names (Sentry 1, Tugboat 1, Shuttle 1, etc)
Expected Forces
- Modified TIE/ln Fighters
- Z-95 Headhunters
- Y-Wings
- Quadrijet Transfer Spacetugs (Quadjumpers)
- GAT-12h Skipray Blastboats
- Lambda Shuttles
- Freighters
- Mandalorian Mercenary forces (Fangs, Firesprays, Gauntlets)
Hutt Cartel
You aren’t the only ones who decided this area was a good one for piracy. Guula the Hutt has set up an operation somewhere in the system and does not want to share territory. The fact you were here first does not matter to them.
On the mission forces tables, the Hutt Cartel forces tend to use classic weapons as squadron names (Axe, Sabre, Glaive, Pike, Dagger, Mace)
Expected Forces
- Z-95 Headhunters
- TYE Wings
- Y-TIEs
- M3-A Scyk Interceptors
- Kihraxz Fighters
- M12-L Kimogilas
- Freighters of all kinds
- Bounty Hunters and Mercenaries
- Guula’s Elite Guards in Star Vipers
- Rumors of Guula’s flagship CR90 Corvette
Rebels
The Rebels are a blessing and a curse. Their presence keeps the Empire busy, but also draws in more Imperial forces. Sometimes they are your direct competition as they also prey on the Empire’s shipping for supplies and money.
On the mission forces tables, Rebels tend to use colors as squadron names (Red, Blue, Green, Gold, Gray, Black)
Expected Forces
- Z-95 Headhunters
- Y-Wings
- X-Wings
- A-Wings
- B-Wings
- Various Freighters
Flee Thresholds
Each faction has its own risk tolerance for how much damage it will take before attempting to flee. Local Patrol are trying to keep the peace, not fight to the death. While Imperial fighter pilots are fanatically brave, their leaders in the larger ships show more discretion. And elite pilots have survived long enough to get experience by having at least some sense of self preservation.
Below is the general rule for the amount of hull remaining that will cause a ship in each of the factions to swap to Flee AI:
- Local Patrol
- Small ships: 2 Hull
- Medium ships: 3 Hull
- Large ships: 4 Hull
- Empire
- Small ships: 0 Hull
- Elite Small ships: 1 Hull
- Medium ships: 2 Hull
- Large ships: 4 Hull
- Merchants, Smugglers, and Civilians
- Small ships: 2 Hull
- Medium ships: 3 Hull
- Large ships: 4 Hull
- Mining Guild
- Small ships: 1 Hull
- Medium ships: 2 Hull
- Large ships: 3 Hull
- Hutt Cartel
- Small ships: 1 Hull
- Medium ships: 2 Hull
- Large ships: 2 Hull
- Rebels
- Small ships: 2 Hull
- Medium ships: 2 Hull
- Large ships: 3 Hull
Threat Level and Determining Enemy Forces
As you become more skilled and more successful as pirates, your reputation will proceed you and cause the factions in the area to increase their forces in response. This value will determine the upgrades and abilities of the enemy ships on each mission.
Threat level is a combination of the threat level of the ships you are flying (including upgrades) plus the threat level of the pilot skills you have.
How to Calculate Your Threat Level
To get the Threat Level of an individual Pilot add these things together
- XP Cost of all your Pilot Upgrades
- Initiative of pilot x 2
- Base Threat Level of your Ship (See Ship Dealer tables below)
- Cost of all Upgrades equipped to your ship
Average the Threat Levels of the pilots your are bringing on the mission and divide by the number 25, rounding up. This is your Threat level for the mission.
There is a handy dandy threat level calculator here that should get you started:
Enemy Threat Level Upgrades and Abilities
Imperial TIE Fighters will always be Threat level 1 unless they are Elites.
At Threat Level 3, Local Patrol Z-95s gain Dedicated and are Initiative 3.
For Elites, utilize the HotAC Elite Pilot deck for all Imperial ships.
For Scum and Rebel ships, use a Threat Level 1 higher than your current average up to the max from the Threat Level Chart.
| Faction | Ship | Pilot Name | Initiative | Threat Level | Ablities | Loadout |
| Local Patrol | GAR Z-95 | Local Patrol Cadet | 1 | 1 | Ion Missiles | |
| Local Patrol | GAR Z-95 | Local Patrol Cadet | 3 | 3 | Dedicated | Ion Missiles |
| Local Patrol | GAR Y-Wing | Local Patrol Sergeant | 2 | 2 | Ion Cannon Turret | |
| Local Patrol | GAR Y-Wing | Local Patrol Sergeant | 3 | 3 | “Broadside” | Ion Cannon Turret + Shield Upgrade + + Agile Gunner |
| Local Patrol | GAT-12h Blastboat | Local Patrol Lieutenant | 2 | 3 | ||
| Local Patrol | GAT-12h Blastboat | Local Patrol Lieutanant | 3 | 4 | “Sinker” | Shield Upgrade + Perceptive Copilot |
| Local Patrol | GAT-12h Blastboat | Local Patrol Lieutanant | 5 | 5 | “Jag” | Ion Torpedoes + Shield Upgrade + Perceptive Copilot + Veteran Turret Gunner |
| Local Patrol | PB-950 Patrol Boat | Local Patrol Captain | 2 | 3 | ||
| Local Patrol | PB-950 Patrol Boat | Local Patrol Captain | 3 | 4 | “Morna Kee” | Shield Upgrade + Novice Technician + Agile Gunner |
| Local Patrol | PB-950 Patrol Boat | Local Patrol Captain | 4 | 5 | “Rear Admiral Chiraneau” | 2x Shield Upgrade + Hull Upgrade + Tactical Officer + Veteran Turret Gunner |
| Empire | TIE/ln Fighter | Academy Pilot | 1 | 1 | ||
| Empire | TIE/in Interceptor | Alpha Squadron Pilot | 1 | 2 | ||
| Empire | TIE/in Interceptor | Alpha Squadron Pilot | 3 | 3 | Marksmanship + Disciplined | Targeting Computer |
| Empire | TIE/in Interceptor | Saber Squadron Ace | 4 | 4 | Marksmanship + Disciplined | Shield Upgrade + Targeting Computer |
| Empire | TIE/in Interceptor | Saber Squadron Ace | 5 | 5 | Marksmanship + Disciplined + Intimidation | Shield Upgrade x2 + Targeting Computer |
| Empire | TIE/sa Bomber | 1 | 2 | Concussion Missiles | ||
| Empire | TIE/sa Bomber | 2 | 3 | Hull Upgrade + Proton Torpedoes | ||
| Empire | TIE/sa Bomber | 3 | 4 | Hull Upgrade x2 + Proton Torpedoes + Munitions Failsafe | ||
| Empire | Lambda T4-a Shuttle | Omicron Group Pilot | 1 | 2 | Perceptive Copilot | |
| Empire | Lambda T4-a Shuttle | Omicron Group Pilot | 1 | 3 | Perceptive Copilot + Electronic Baffle | |
| Empire | Lambda T4-a Shuttle | Omicron Group Pilot | 3 | 4 | Perceptive Copilot + Electronic Baffle + Admiral Sloane + Hull Upgrade | |
| Rebel | Z-95 | Bandit Squadron Pilot | 1 | 1 | ||
| Rebel | Z-95 | Tala Squadron Pilot | 2 | 2 | Concussion Missiles + Hull Upgrade | |
| Rebel | X-Wing | Blue Squadron Escort | 2 | 2 | ||
| Rebel | X-Wing | Red Squadron Veteran | 3 | 3 | Predator | Hull Upgrade + Proton Torpedo + R5-Astromech |
| Rebel | X-Wing | Red Squadron Veteran | 4 | 4 | Predator + Outmaneuver | Hull Upgrade + Shield Upgrade + Proton Torpedo + R5-Astromech |
| Rebel | B-Wing | Blue Squadron Pilot | 2 | 2 | Heavy Laser Cannon | |
| Rebel | B-Wing | Blade Squadron Veteran | 3 | 3 | Hull Upgrade + Heavy Laser Cannon + Collision Detector + Proton Bombs | |
| Rebel | B-Wing | Blade Squadron Veteran | 4 | 4 | Norra Wexley – While you defend, if there is an enemy ship at range 0-1, you may add 1 Evade result to your dice results | Hull Upgrade + Shield Upgrade + Heavy Laser Cannon + Collision Detector + Proton Bombs |
| Rebel | YT-2400 | Wild Space Fringer | 1 | 3 | ||
| Rebel | YT-2400 | Wild Space Fringer | 1 | 4 | Hot Shot Gunner | |
| Rebel | YT-2400 | Wild Space Fringer | 5 | 5 | While you move you ignore obstacles | Shield Upgrade + Hot Shot Gunner |
Initiative
One of the rules of piracy is to seize the initiative. While the pirates have the element of surprise they have the initiative.
To translate this to gameplay, until the first wave of enemy reinforcements arrive, the pirates have the initiative. Once more enemy ships come into play initiative is lost.
Pirates will always have initiative over civilian ships and freighters.
The Campaign
Below is an outline of the different mission arcs. The format is: Mission Name (closest HotAC or FGA mission for setup – which Campaign that mission is from). Most of the mission setups are borrowed from the original campaigns with some rule variations, often different victory conditions and enemy composition variation so make sure to read the mission setup and conditions carefully.
Each mission has a setup and reinforcement table. The squad names indicate which faction they belong to. Additionally, a letter code in parentheses is being added for clarity. (LP) is Local Patrol, (E) is Empire, (R) is Rebel, (S) is Scum, (HC) for Hutt Cartel, (MG) is Mining Guild, (C) is Civilian.
Choosing a Mission
- Shuffle the Mission Deck and draw 2 Mission Cards from it.
- If a Mission drawn is marked URGENT, you must select that mission.
- If both Missions are marked URGENT, you must do both but select the order in which you play them, do not return either card to the Mission Deck.
- Otherwise, choose the Mission your crew would like to take on and then return the other Mission to the Mission Deck.
Mission Arcs Outline
- Introductory Mission – Primary Opponent: Local System Patrol and Empire
- Vape Bait (Local Trouble – HotAC)
- Mining Guild – Primary Opponent: Mining Guild
- Protection Racket (Miners Strike – HotAC)
- Rude Neighbors (Miners Strike – HotAC)
- Out Bid (Defend Outpost D-34 – FGA)
- Mine Your Manners (Capture the Refueling Station – HotAC)
- Acts of Piracy – Primary Opponent: All Kinds
- Luxury Liners (Capture the Officer – HotAC)
- Unexpected Arrivals (Patrol Jump Point D-34 – FGA)
- Blind Spot (Disable Sensor Net – HotAC)
- Convoy Intercept (Convoy Attack – FGA)
- Wallowing Whale (Rebel Arms Deal – FGA)
- The Sting (Bait – HotAC)
- Illicit Activity – Primary Opponent: Empire and Local Patrols
- Spice Must Flow (Rescue Rebel Operative – HotAC)
- Read the Mail (Secure the Holonet – HotAC)
- Prototype Data (Pride of the Empire – HotAC)
- Rivals – Primary Opponent: Hutt Cartel
- Send a Message (Escorting the Decimator – FGA)
- Retaliation (Local Trouble – HotAC)
- Reclaim (Outpost D-34 has Fallen – FGA)
- Root Out (Destroy Pirate Outpost – FGA)
- Root Out Part 2 (Capture Harkov – FGA)
- Salt to a Slug (Care Package – HotAC)
- Lost Loot – Primary Opponent: Rebels
- Bounty Full Harvest (Capture the Officer – HotAC)
- Treasure Map (Needle in a Haystack – HotAC)
- Blaze a Trail (Tread Softly – HotAC)
- X Marks the Cache (Attack the Nharwaak – FGA)
- Campaign Wrap Up – Primary Opponent: Empire
- Pirate Hunter (RPG Victory Star Destroyer Mission)
- Bonus Missions
- New Rides
Intro Mission – Vape Bait
Rebel activity has caused a great loss to Imperial fighter squadrons in this area. As such their convoys are running with a light escort and many of their pilots are inexperienced. Lure away the escort fighters from one of the convoys while our Patrol Boat impersonates a Local Patrol to hijack some cargo off the freighters. The longer you can keep them occupied, the more loot we can get. But be careful, the longer you wait the more likely a passing patrol will come by to reinforce them. Hopefully we can earn enough to get you out of those flying deathtraps.
Player Setup in Area A, 6 Asteroids placed randomly in Zone B
Objective: Do at least 1 damage per pilot (this is total damage, can all be done by 1 ship), then escape into the asteroid field by fleeing off board edge A after turn 4. Alternatively, destroy all enemy ships by turn 12.
Territory: Neutral
Enemy forces: TIE/ln fighters, TIE Interceptor
Rewards: 25k Credits per pilot + 5k Credits for every 2 turns you end with a ship on the board that escapes after turn 4 up to turn 10 (Escape turn 5 = 25k per, turn 7 = 30k, turn 9 = 35k, turn 11 = 40k). Lose 5k for every point of damage less than the target number. The reward is halved if you flee before turn 5 or if all pirate ships are destroyed.
| Squad | Arrival | Vector | AI | 3p | 4p | 5p | 6p |
| (E)Alpha | Setup | 3 | Attack | 1x TIE/ln Fighter | + TIE/ln Fighter | ||
| (E)Beta | Turn 3 | 4 | Attack | 1x TIE/ln Fighter | + TIE/ln Fighter | ||
| (E)Gamma | Turn 6 | 1d6 | Attack | 1x TIE/in Interceptor | 1x TIE/in Interceptor | ||
| (E)Delta | Turn 8 | 1d6 | Attack | 2x TIE/ln Fighter | +TIE/ln Fighter | + TIE/ln Fighter | |
| (E)Theta | Turn 9 | 1d6 | Attack | 1x TIE/in Interceptor | 1x TIE/in Interceptor |
Defeat
We had to scramble as the patrols came back and were lucky to get away with anything. This little trick is not likely to work again. We probably need to find some better ships to work with.
Gain All Earned XP.
Add Mission Card – New Rides to the Mission Card Deck.
Victory
Well done. You kept the patrols busy long enough for us to grab a heap of cargo off the freighters. Now maybe we can get you into something better than those deathtraps you’re currently flying.
Gain all earned credits and XP.
Add Mission Cards Mining Guild Mission 1, Acts of Piracy Mission 1, and Illicit Activity Mission 1 to the Mission deck.
Letter of Marque Mission 1 – Mayhem and Mischief
Our recent efforts have gotten us some notoriety with the Rebels. We have received an interesting proposition from Rebel Leadership. They are offering to hire us as Privateers to help their war effort. This means less competition for the same prizes but possibly more combat if they ask us to hit military targets.
The first mission is right up our alley. Raise a ruckus to draw off an Imperial patrol vessel.
[Placeholder]
Setup:
Objective: Disable at least 1 Freighter and destroy at least half the escorts (Rounded up) to bait out the Imperial Patrol vessel Hydra. Once the Hydra is in system, engage it for at least 2 rounds before fleeing to hyperspace or off board edge C (left).
Bonus Objective: Destroy the Hydra and all of its Escorts
Territory: Hostile
Enemy Forces: Freighters, Escorts, Gozanti, TIEs
Reward: 100K Credits if the Hydra is successfully baited into arriving, + 10K Credits per round that the pirates stay on the board after the first up to 5 rounds. If the Hydra is destroyed, the reward is 300K Credits.
| Squad | Arrival | Vector | AI | 3p | 4p | 5p | 6p |
| Freighters | Setup | A | Flee | 2x Freighter (VCX-100) | + Freighter | ||
| Escort A | Setup | A | Escort | 2x TYE-Wings | + Z-95 | + Z-95 | |
| Escort B | Setup | A | Escort | 2x TYE-Wings | 2x Z-95s | ||
| Hydra | Special | 1d6 | Attack | Gozanti-class Cruiser | |||
| Alpha | Special | Attack | 2x Elite TIE/ln Fighters | ||||
| Beta | Special | Attack | Elite TIE/ln Fighter | + Elite TIE/ln Fighter | |||
| Gamma | Special | 1d6 | Attack | + TIE/in Interceptor | +TIE/in Interceptor |
The Freighters are fully loaded and have a max speed of 2. They will attempt to move as fast as they can for their escape vector in zone B. Each Freighter is civilian grade and as such is only armed with a Dorsal Turret as their only offensive weapons. They will take the Reinforce action on the side with the most pirate ships as their action. If both sides have the same number they will Reinforce the rear.
Freighters are disabled when they have 1-3 hull remaining or become disabled through ionization. Disabled Freighters stop moving, shooting and taking actions but remain on the board as obstacles.
When 1 of the Freighters is disabled and half of the escort ships are destroyed (or disabled from ionization), the Hydra arrives.
The Hydra is a Gonzanti-class Cruiser with 4 docked TIE Fighters (Alpha squadron and Beta Squadron). It has the upgrades Novice Technician, Suppressive Gunner, Point-Defense Battery, Perceptive Copilot, Comms Team, and Adaptive Shields. The Hydra will attempt to use its actions and energy to Coordinate and protect its fighter squadrons with Adaptive shields as its primary actions.
The TIE Fighters will undock on the first turn following normal TIE fighter AI.
Bonus and Catchup Missions
These are bonus missions. Designed to give players a chance to earn resources at low cost investment from them in the event that they are struggling or have lost several of their ships in a single mission and are low on credits.
Shadowport Search – Special Mission
Your pilots have been struggling. Time to find some help. There are rumors of a Shadowport hidden in a nearby nebula. Find it and see if you can hire a mercenary or bounty hunter to help you out.
Objectives: Find the Shadowport in the Nebula by scanning Ion Clouds. Destroy all patrols.
Territory: Friendly
Enemy Forces: Z-95s, Y-Wings, TIE/ln Fighters
Rewards: $5k per destroyed patrol ship. No reward for ships the Shadowport or its security forces destroy.
| Squad | Arrival | Vector | AI | 3p | 4p | 5p | 6p |
| Scouts | Setup | C | Attack | 2x TYE-Wings | + TYE-Wing | + TYE-Wing | |
| Dagger | Setup | D | Strike | 2x M3-A Scyk | + M3-A | + M3-A | |
| Axe | Setup | E | Attack | 2x Z-95 | + Z-95 | + Z-95 | |
| Mace | Turn 4 | 1d6 | Attack | 1x Y-Wing | +Y-Wing | + Y-Wing | |
| Sabre | Turn 6 | 1d6 | Attack | 2x Khiraxz | + Khiraxz | ||
| Blade | Turn 9 | 1d6 | Attack | 1x M12-L Kimogila | 1x M12-L Kimogila |
When the station is discovered, if there are any enemy ships on the board, the station immediately launches its defense force.
You gain no rewards for ships destroyed by the station or its defenders.
New Rides – Special Mission
These TYE-Wings aren’t going to cut it. We need something with more survivability and firepower. Our Slicer has discovered an impound lot used by Imperial and Local Patrols that has a few ships being held there. We have acquired some Patrol uniforms and false IDs to get into the facility.
We will need to fly out through a canyon to hide from sensors and make good our escape. Be sure to sabotage any alarm systems so local patrols are not alerted to our presence.
Players are stealing ships in this mission and do not choose their ship ahead of time. To determine what ships they find in the impound lot, have each player roll 1 attack die. Consult the following table for the result. An Eye for a Good Ship: Any Gearhead pilot may roll 2 die and pick the preferred result.
| Blank | Z-95 with random Illicit (Roll a d6: On a 1 – Deadman’s Switch, 2 – Makeshift Hull Plates, 3 – Bolt On Ion Cannon, 4 – Improvised Bomb Rack, 5 – Pod Racer’s Handicap, 6 – Cloaking Device) |
| Eye | Y-Wing with Dorsal Turret and a Random Astromech Upgrade (Roll a d6: on a 1 get R5-TK, on a 2-5 get an R(your roll), on a 6 take your pick of the Named Scum Astromechs) |
| Hit | Z-95 with Hull Upgrade and Concussion Missiles or M3-A with Hull Upgrade and Ion Cannon |
| Crit | Choice of Quadjumper or HWK-290. Choice comes with an After Market Engines Upgrade and $10k credits in a smuggler compartment |
Setup: Up to 3-4 player pilots start “deployed” in formation from the Impound Center [C] on turn 1 on the side with the Turret, the remaining pilots start deployed there on the next turn. Make sure your first move clears the way for your fellow pilots to escape. All player ships get Skim tokens to denote they are flying down in the canyon. (use any token handy such as energy, hyperspace, force, etc)
Objectives: Escape off board edge through zone A.
Enemy Forces: Local Patrol Z-95s, Y-Wings, TIE/in Interceptors
Territory: Extremely Hostile: Even if the pilot would survive the ejection role, there is no chance of rescue. Any pilot who is shot down or disabled is considered killed or imprisoned and a replacement pilot will need to be created / hired. This mission is intended to be played early on in the campaign before pilots have been significantly leveled up.
Reward: Ships that got off the board and their contents. Each pilot who navigates the canyon successfully without overlapping a wall with a maneuver or ship (keeps Skim token for the whole mission) gains 4xp directly (non-pooled).
| Squad | Arrival | Vector | AI | 3p | 4p | 5p | 6p |
| (LP)Patrol A | 6 | 4 | Attack | 2x Z-95s | + Z-95, +1 to Arrival Turn | + Z-95 | |
| (LP)Patrol B | 9 | 4 | Attack | 1x Y-Wing | + Y-Wing, +1 to Arrival | ||
| (E)Sigma | Special | Special | Attack | Elite TIE/in Interceptor | + Elite TIE/in Interceptor |
This mission is all about escaping as quickly as possible. However there is only one way to escape.
The Canyon Walls [B] block line of sight for ships flying in the canyon (ships with Skim tokens). This means the Turbolaser Turrets [T] and enemy fighters may not shoot at or lock onto player ships that are obstructed by it and vice versa. Enemy fighters that are on top of Canyon Walls may still shoot and lock as if shooting through an obstruction (+1 defense die for the defender). The Sensor Array [A] gives 1 Calculate token to one of the Turbolaser Turrets each turn.
Disrupted Coms: If all player ships are around the first turn and past the Turret when Patrol A arrives (out of sight), its first move will be a 1 Straight as it receives information from the crew on the ground. Following moves will obey normal AI movement rules.
Flying in the Canyon: If a player ship that has a Skim token makes a move where the maneuver template overlaps a canyon wall but the ship does not end overlapping a wall or having completely crossed a wall, Sigma squadron is not alerted but the both Patrol A and Patrol B arrival turns are decreased by 1. This can be triggered max 1 x per turn. The player ship receives a Stress token for a near miss.
Any turn where a player ship does not have a Skim token decreases the arrival turn of both Patrols by 1.
The first time a player ship overlaps Canyon Walls or a board edge (other than zone A), or makes a maneuver that completely crosses a wall, it executes an incomplete maneuver and acts as though it had overlapped an asteroid obstacle. It loses its Skim token, gains a Stress, and Sigma squadron is alerted and will arrive the following turn. Any ship without a Skim token is treated as the priority target for all enemies.
A player ship may dive back down into the canyon after completing a maneuver that ends with the ship fully off of the terrain and taking the Dive Action.
Flying Out of the Canyon: Players may choose to fly out of the canyon to head for zone A by performing a 1 Straight and taking the Climb Action. If this maneuver overlaps terrain, treat it as overlapping while flying in the canyon. (Still lose Skim but “bump” the wall and gain a Stress). The Climb Action causes them to lose their Skim token.
Sigma Squadron: Sigma squadron will arrive on the vector closest to the player ship that is nearest to Zone A and does not have a Skim token. They arrive on the beginning of the turn after the first player ship loses its Skim token.
Patrol A is armed with Ion Missiles and Patrol B is armed with Ion Cannon Turrets.
Defeat
Maybe they weren’t the hot shot pilots they thought they were.
Guess we will need to find ourselves some more recruits.
None of the pilots made it out. Restart the campaign.
Victory
We swiped those ships right out from under their noses. Good flying boys. It will be much easier to raid shipping now that we aren’t stuck in those flying deathtraps.
Add Mission Cards Mining Guild Mission 1, Acts of Piracy Mission 1, and Illicit Activity Mission 1 to the Mission deck if not already added or completed.
A New Home
Your original base has become uninhabitable and you need a new location to stage your raids from. You have found another small station with some wannabe pirates and scavengers living in it. Kick them out but try not to scratch up the base too much.
Campaign Wrap Up Mission – Pirate Hunter
We are suffering from our success. An Imperial Victory Class Star Destroy has arrived in this sector with a commander known for his success in hunting down pirate groups like ours. Its only a matter of time before we run into it and have to find a way to deal with it.
Objectives: Disable the VSD.
Repairing the Patrol Boat
The PB-950 Patrol Boat comes with you on many missions as a troop carrier and boarding craft. It starts as a Junkyard Special with no weapons and 10 hull with a speed limiter and maneuver restrictions from damaged engines and compensators. The company will set aside a portion of the credits earned from each mission for upgrading the Patrol Boat (Order to be determined by players). Also, any player may choose to pay for an upgrade to the Patrol Boat with their pilot’s credits.
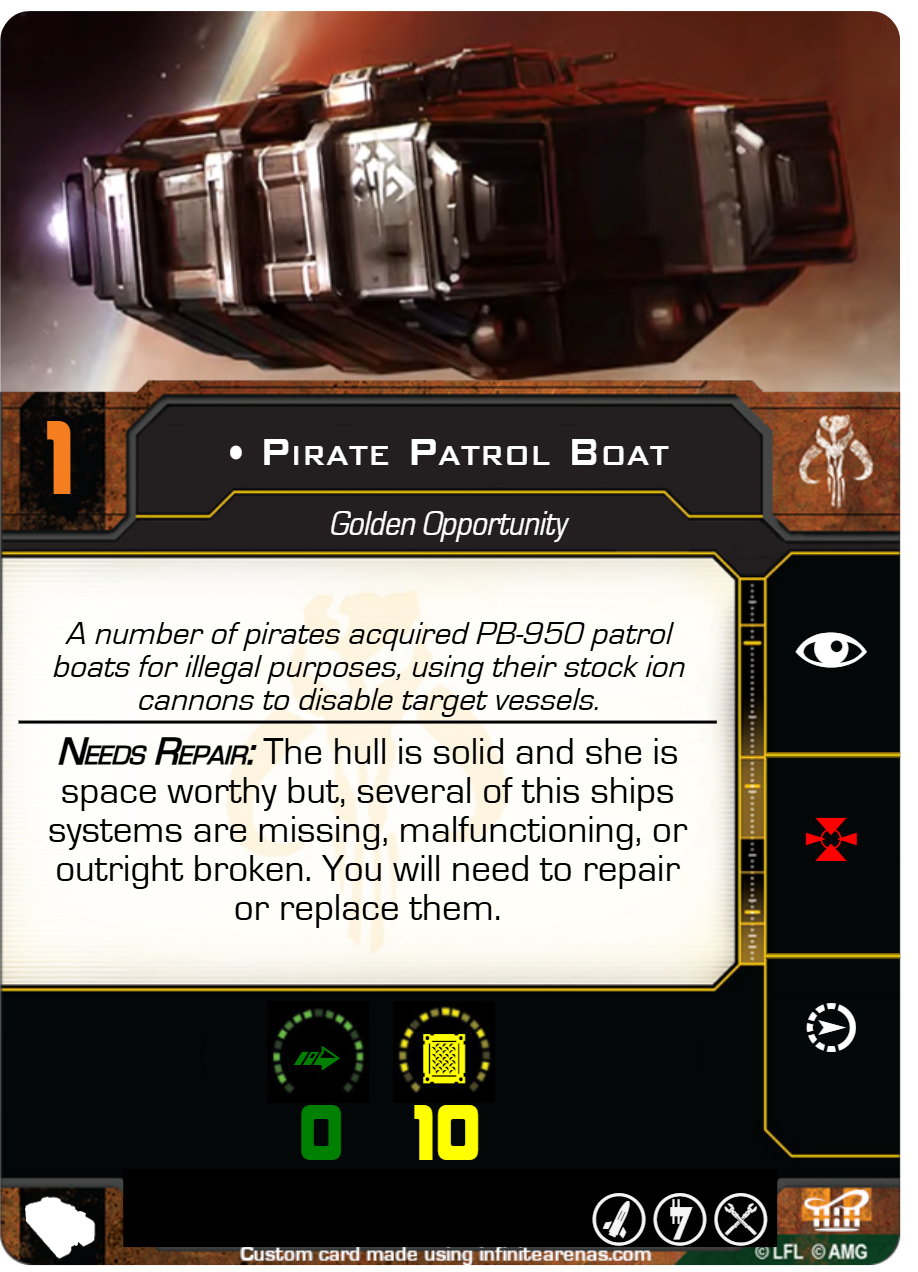
Starting Restrictions
- Max Speed of 2
- All Hard Turns are Red
- No Shields (and cannot buy shield upgrade until projectors repaired)
- No Primary Weapon
- No Turret Weapon
- No Crew slots
- No Gunner slot
- No Coordinate
- No Hyperdrive
- Red Lock
If the Patrol Boat is destroyed on a mission, it gets salvaged and returns to its base form with all starting restrictions.
It has the same upgrade slots as a Patrol Boat you would buy from the used ship market minus the ones that must be unlocked from repairs (Crew and Gunner slots): Missile, Illicit, Mod
Repair and Upgrade Chart
| Upgrade Name | Cost | Prerequisite Upgrade | Affect | |
| Replace Ion Engine Core | $5k | None | Dial no longer restricted to speed 2 and lower | |
| Install New Hyperdrive | $10k | Replace Engine Ion Core | Hyperdrive escape option available | |
| Optimize Nav Computer | $5k | Install New Hyperdrive | When making a Jump to Hyperspace roll, you may change one Blank result to a Focus result | |
| Recalibrate Acceleration Compensator | $5k | None | Hard Turns and Speed > 3 no longer automatically Red maneuvers | |
| Replace Turret Capacitors | $5k | None | Turret weapon is now online | |
| Install Heavy Ion Cannons | $10k | None | Primary weapon Ion Cannons now online | |
| Replace Shield Projectors | $10k | None | Shields now functional | |
| New Crew Compartment Life Support System | $5k | None | Adds 2 Crew Slots and gunner slot | |
| Install Missing Sensor Modules | $5k | None | Replace Red Lock with White Lock | |
| Repair Com Board | $5k | None | Gain Red Coordinate | |
| Improved Shield Power Relays | $8k | Replace Shield Projectors | +1 Shield | |
| Upgraded Shield Generator | $20k | Replace Shield Projectors | Shields regen 1 every turn | |
| Double Plated Hull | $5k | While you defend, if you are not critically damaged, change 1 Crit result to a Hit result. | ||
| Boarding Crew Battle Droid | $5k | None | Boarding Team gains: Before rolling attack die to advance Boarding Team, spend 2 Charges to gain a Calculate Token. (2 Charges Recurring + 1) | |
| Boarding Crew Elite Training | $15k | None | Boarding Team gains: Spend 1 Charge to reroll 1 attack die (2 Charges Non-Recurring) |
Salvage the Battlefield
If you have a Miner or Gearhead in your crew, during a mission the crew can Salvage the Battlefield.
When any non-Huge ship (enemies, players, neutral, etc.) is destroyed (not disabled by ion), it leaves behind Salvage. A player may decide to Recover Salvage during their turn. To Recover Salvage, a player ship must do 1 of the following:
- Overlap the Salvage with their ship base
- Overlap the Salvage with their maneuver template
- Apply a Tractor token to the Salvage
Then declare their Action for the turn is Recover Salvage. Players may perform the Recover Salvage action even while Stressed. They may NOT however Recover Salvage after performing a Red Maneuver.
Player ships may pick up 1 Salvage each for a Small base ship (HWK-290 and Quadjumper may pick up an additional Salvage), 2 for a Medium base, and 3 for a Large base ship. When a ship has the maximum number of Salvage assigned, it is considered Encumbered.
While Encumbered a ship follows the same rules as Towing a supply cache in the Competitive Scenario “Salvage Mission”.
- A ship may not perform a Boost, Barrel Roll, Slam, or Cloak action or receive Cloak tokens. It loses any cloak tokens it had.
- If the ship suffers a Crit damage (even while shielded), Salvage is jettisoned. This happens for every Crit received. If you have 3 Salvage on a Large ship and suffer 2 Crit damage, 2 of the Salvage is jettisoned.
- A ship may choose to jettison any number of Salvage at the end of its activation.
To Jettison Salvage, roll an Attack Die. On a Hit or Crit, drop it behind the ship using a 1 Straight Template, on a Blank use the 1 Bank Right Template, and on a Eye use the 1 Bank Left Template.
In Friendly Territory or Neutral Territory where all enemies have been cleared from the play area and the primary objective is achieved, you receive all the Salvage that has been created, regardless if you have picked it up or not. Otherwise, you receive all salvage that you escaped with.
For each Salvage recovered, roll an Attack Die:
- Blank: too damaged, receive nothing
- Eye: some value, receive a random ship upgrade that was equipped to the destroyed ship. If it had no upgrades, receive 1d6 x $1k Credits.
- Hit: Receive 1 Component of that Ship Chassis
- Crit: Receive 2 Components of that Ship Chassis
With enough Components you can piece together a whole ship. However it is not like it came off the assembly line. Any ship you piece together with Components has the Patchwork Ship Hazard.
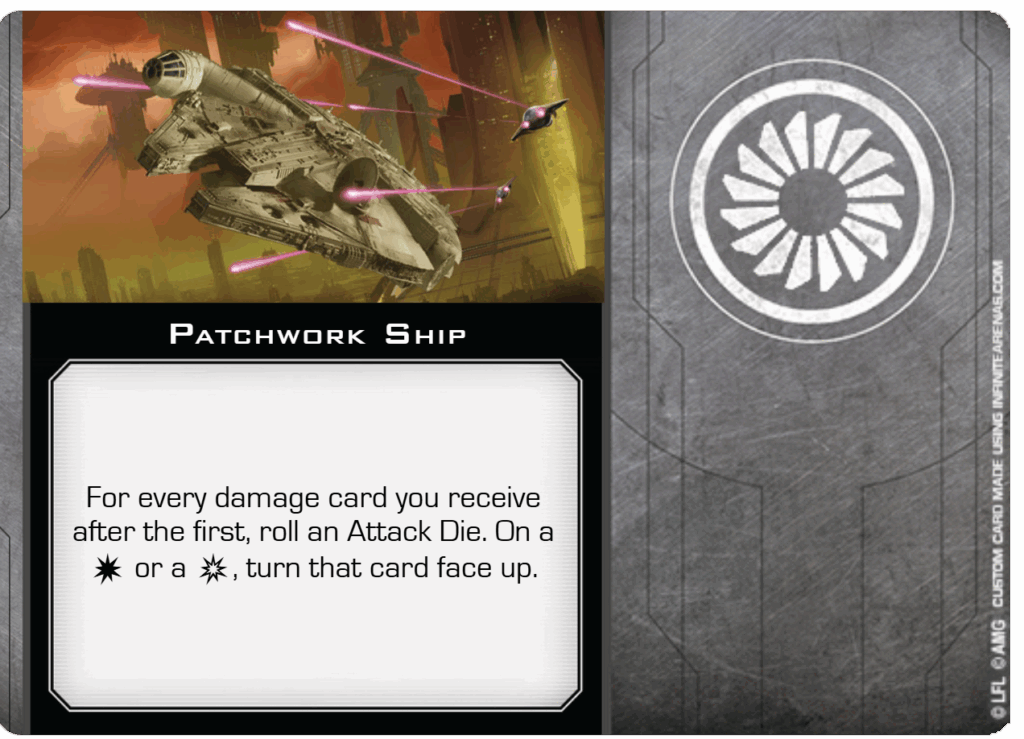
Piecing Together Ships:
Normal ship Chassis can be pieced together from 4 matching Components.
The Made It Myself ships can be pieced together from combinations of Components and Upgrades. You may purchase the upgrade necessary to complete one of the TNT variants if you wish.
- TYE-Wing = 2 TIE/ln + 1 Y-Wing Components
- Y-TIE = 2 Y-Wing + 1 TIE/ln Components
- Patchwork Y-Wing = 2 Y-Wing + 2 of any other Components
- TNT (dt, ab, mt, ic, atp) = 2 TIE/ln Components + Relevant Upgrade (Dorsal Turret, Autoblasters, Concussion Missiles, Ion Cannons, Targeting Computer)
- TNT/hv = 5 TIE of any kind Components + Heavy Laser Cannon
If you choose to sell a ship that you pieced together (other than the I Made It Myself ships), set its value to half of its normal purchase value (rounded up), then proceed with the normal ship selling rules. For example if you had 4 Z-95 Components and Built a Z-95, you would set its base value to half ($22k / 2 = $11k) then roll for an offer from the market following the usual ship selling rules.
Ship, Modification, and Ability Cost Tables
I Made It Myself
These ships are not sold for anything other than parts. If you are flying in one of these, you are most likely desperate or a little crazy.
| Cost | Ship Model | Slots | Base Threat Value |
| * | TYE-Wing | Illicit | 10 |
| * | TNT/dt | Turret, Illicit | 10 |
| * | TNT/ab | Illicit | 10 |
| * | TNT/ic | Illicit | 10 |
| * | TNT/mt | Missile, Illicit | 10 |
| * | TNT/atp | Illicit | 10 |
| * | TNT/hv | Crew, Illicit, Cannon, Mod | 15 |
Totally Legit Used Ship Broker
Sure the serial numbers are missing off most of the ships, but they all work. Cash only, no credit.
| Cost | Ship Model | Slots | Base Threat Value |
| $7k | TYE-Wing | Illict | 10 |
| $11k | Y-TIE | Illicit, Mod, Turret, Astromech | 15 |
| * $1k | Patchwork Y-Wing | Illicit, Mod, Turret, Astromech | 17 |
| $22k | Modified TIE/ln | Mod | 20 |
| $22k | Z-95 Headhunter | Missile, Illicit, Mod | 22 |
| $25k | M3-A Interceptor | Hardpoint, Mod | 25 |
| $28k | Escape Craft | Crew, Mod | 12 |
| $30k | HWK-290 | Crew, Payload, Illicit, Mod, Mod | 30 |
| $30k | Quadrijet Space Tug | Tech, Crew, Payload, Illicit, Mod | 30 |
| $32k | Y-Wing | Turret, Torpedo, Missile, Payload, Illicit, Astromech, Mod | 32 |
| $37k | Rogue-class Fighter | Cannon, Cannon, Illicit, Mod | 35 |
| $40k | Khiraxz Fighter | Missile, Illicit, Illicit, Mod, Mod | 41 |
| $41k | Fang Fighter | Torpedo, Mod | 41 |
| $41k | G-1A Starfighter | Sensor, Crew, Crew, Illicit, Mod | 41 |
| $42k | JumpMaster 5000 | Cannon, Torpedo, Gunner, Crew, Illicit, Mod | 41 |
| $44k | M12-L Kimogila | Torpedo, Missile, Astromech, Illicit, Mod | 41 |
| $45k | Scuurg H-6 | Turret, Crew, Gunner, Payload, Payload, Mod | 45 |
| $47k | ST-70 Assault Ship | Crew, Crew, Gunner, Illicit, Illicit, Mod | 47 |
| $55k | Starviper | Tech, Torpedo, Mod | 55 |
| $56k | GAT-12h Skipray Blastboat | Crew, Missile, Torpedo, Turret, Illicit, Gunner, Mod | 56 |
| $56k | Lancer Pursuit Craft | Crew, Illicit, Illicit, Mod | 56 |
| $60k | YV-666 | Cannon, Missile, Crew, Crew, Gunner, Illicit, Mod | 51 |
| $62k | Gauntlet Fighter | Crew, Gunner, Illicit, Payload, Mod | 54 |
| $63k | PB-950 Patrol Boat | Missile, Gunner, Crew, Crew, Illicit, Mod | 65 |
| $65k | Firespray Patrol Craft | Crew, Cannon, Missile, Payload, Illicit, Mod | 62 |
| $70k | YT-1300 | Missile, Crew, Crew, Illicit, Gunner, Mod | 50 |
| $80k | YT-2400 | Missile, Crew, Crew, Illicit, Mod | 69 |
| *$80K | Aggressor Assault Fighter | Sensor, Cannon, Cannon, Payload, Illicit, Mod, Title | 64 |
| $100k | Luxury Shuttle | Mod, Crew, Crew, Crew, Configuration | 20 |
Fell Off a Freighter Military Surplus Ship Dealer
Everything is for sale somewhere. Even top of the line military hardware. It just costs more to acquire.
| Cost | Ship Model | Slots | Base Threat Value |
| $33k | TIE/ln Fighter | Mod | 22 |
| $65k | TIE/in Interceptor | Mod, Mod | 32 |
| $60k | TIE/sa Bomber | Torpedo, Missile, Missile, Gunner, Payload, Payload, Mod | 29 |
| $90k | Lambda T4-a Shuttle | Sensor, Cannon, Crew, Crew, Mod | 41 |
| $150k | VT-49 Decimator | Torpedo, Crew, Crew, Crew, Gunner, Payload, Mod | 67 |
| $82k | T-65 X-wing | Illicit, Torpedo, Astromech, Mod | 40 |
| $62k | RZ-1 A-wing | Missile, Modification | 30 |
| $83k | A/SF-01 B-wing | Sensor, Cannon, Cannon, Payload, Torpedo, Mod | 40 |
| $88k | UT-60D U-wing | Sensor, Crew, Crew, Illicit, Mod | 43 |
| $50k | Naboo Royal N-1 Starfighter | Sensor, Astromech, Torpedo | 29 |
| $90k | ARC-170 Starfighter | Torpedo, Crew, Gunner, Astromech, Mod | 42 |
| * | TIE Advanced x1 | Sensor, Mod, Missile | 35 |
| * | TIE Phantom | Sensor, Tech, Mod, Gunner | 43 |
| * | TIE Defender | Sensor, Cannon, Missile, Mod, Configuration | 67 |
Upgrades and Modifications
All upgrade costs are in Thousands of Credits. If something cost 6, that means $6K Credits. If the cost/threat points column has a single number then that number also represents how many threat points are added to your ship when the upgrade is applied. If the number is split (i.e. 5/3) then the first number is the cost in thousands of credits and the second number is the number of threat points.
Astromech Upgrades
Non-Generic Astromechs that are lost by a ship being destroyed cannot be repurchased.
| Type | Name | Restrictions | Cost / Threat Points |
| Astromech | R2 Astromech | 6 | |
| Astromech | R3 Astromech | 3 | |
| Astromech | R4 Astromech | 2 | |
| Astromech | R5 Astromech | 4 | |
| Astromech | Watchful Astromech | 2 | |
| Astromech | “Genius” | 2 | |
| Astromech | R4-B11 | 3 | |
| Astromech | R5-P8 | 4 | |
| Astromech | R5-TK | 1 | |
| Astromech | Salvaged Astromech | 2 |
Cannon Upgrades
| Type | Name | Restrictions | Cost / Threat Points |
| Cannon | Autoblasters | 4 | |
| Cannon | Heavy Laser Cannon | 4 | |
| Cannon | Ion Cannon | 7 | |
| Cannon | Jamming Beam | 1/0 | |
| Cannon | Tractor Beam | 4 | |
| Cannon | Proton Cannon | 2 Cannon slots | 5 |
| Cannon | Synced Laser Cannon | 2 Cannon slots | 7 |
Configuration Upgrades
| Type | Name | Restrictions | Cost / Threat Points |
| Configuration | Smuggler Refit | Luxury Shuttle | 5 |
Crew Upgrades
Scum Crew are treated as a single mission upgrade if hired with credits. The Organizer career may spend XP instead to hire a Scum Crew as a permanent Crew upgrade. The Cyborg career may spend XP to hire Droid Scum Crew as a permanent Crew Upgrade. XP cost is 1 XP per Thousand credits. So Boba Fett may be hired for 2K Credits for a single mission by any pilot or for 2 XP as a permanent crew upgrade by an Organizer.
Bad Investment: The first time a pirate ship (including the Patrol Boat) is destroyed or disabled while a Scum Crew or Gunner is equipped, the upgrade cost the next time you want to hire them is doubled. The second time it happens, that Crew or Gunner deems you too high risk to work with and is no longer available for hire. This applies to Crew and Gunner cards that share the same Character name. (i.e. Your ship was destroyed with Boba Fett Crew, his Gunner upgrade cost is doubled as well)
Can’t Be 2 Places at Once: You may not have 2 upgrades with the same Character name in play at the same time. (i.e. Boba Fett Crew and Boba Fett Gunner). This does not apply to pilot abilities.
| Type | Name | Restrictions | Cost / Threat Points |
| Crew | Freelance Slicer | 2 | |
| Crew | GNK “Gonk” Droid | 5 | |
| Crew | Novice Technician | 2 | |
| Crew | Perceptive Copilot | 8 | |
| Crew | Seasoned Navigator | 8 | |
| Crew | Tactical Officer | 3 | |
| Scum Crew | Hondo Ohnaka | Organizer | 5 |
| Scum Crew | 0-0-0 | Organizer/Cyborg | 5 |
| Scum Crew | 4-LOM | Organizer/Cyborg | 2 |
| Scum Crew | Bo-Katan Kryze | Organizer | 2 |
| Scum Crew | Boba Fett | Organizer | 2 |
| Scum Crew | Cad Bane | Organizer | 3 |
| Scum Crew | The Child | Organizer | 6 |
| Scum Crew | Cikatro Vizago | Organizer | 1 |
| Scum Crew | Fenn Rau | Organizer | 8 |
| Scum Crew | Gamut Key | Organizer | 6 |
| Scum Crew | Greef Karga | Organizer | 8 |
| Scum Crew | IG-11 | Organizer/Cyborg | 6 |
| Scum Crew | IG-88D | Organizer/Cyborg | 3 |
| Scum Crew | Ketsu Onyo | Organizer | 3 |
| Scum Crew | Kuil | Organizer | 6 |
| Scum Crew | Lando Calrissian | Organizer | 6 |
| Scum Crew | Latts Razzi | Organizer | 5 |
| Scum Crew | L3-37 | Organizer/Cyborg | 4 |
| Scum Crew | The Mandalorian | Organizer | 4 |
| Scum Crew | Maul | Organizer | 11 |
| Scum Crew | Pelli Motto | Organizer (Medium or Large ship) | 3 |
| Scum Crew | Prime Minister Almec | Organizer | 9 |
| Scum Crew | Protectorate Gleb | Organizer | 6 |
| Scum Crew | Qi’ra | Organizer | 2 |
| Scum Crew | Rook Kast | Organizer | 7 |
| Scum Crew | Savage Opress | Organizer | 12 |
| Scum Crew | Tobias Beckett | Organizer | 2 |
| Scum Crew | Unkar Plutt | Organizer | 2 |
| Scum Crew | Zuckuss | Organizer | 2 |
Gunner Upgrades
Scum Gunners follow the same hiring rules as Crew. They are treated as a single mission upgrade if hired with credits. The Organizer career may spend XP instead to hire a Scum Gunners as a permanent Gunner upgrades. The Cyborg career may spend XP to hire Droid Scum Gunners (and Dengar) as a permanent Gunner Upgrade. XP cost is 1 XP per Thousand credits. So Boba Fett may be hired for 6K Credits for a single mission by any pilot or for 6 XP as a permanent Gunner upgrade by an Organizer.
| Type | Name | Restrictions | Cost / Threat Points |
| Gunner | Agile Gunner | 3 | |
| Gunner | Hotshot Gunner | 6 | |
| Gunner | Skilled Bombadier | 2 | |
| Gunner | Suppressive Gunner | 7 | |
| Gunner | Veteran Tail Gunner | 4 | |
| Gunner | Veteran Turret Gunner | Size=>Cost small=>9 / medium=>8 / large=>7 | |
| Gunner | Weapons System Officer | 5 | |
| Scum Gunner | Boba Fett | Organizer | 6 |
| Scum Gunner | Bossk | Organizer | 8 |
| Scum Gunner | BT-1 | Organizer/Cyborg | 3 |
| Scum Gunner | Dengar | Organizer/Cyborg | 6 |
| Scum Gunner | Gar Saxon | Organizer + Large Ship | 10 |
| Scum Gunner | Greedo | Organizer | 1 |
| Scum Gunner | Migs Mayfield | Organizer | 5 |
Illicit Upgrades
| Type | Name | Restrictions | Cost / Threat Points |
| Custom Illicit | Bolt on Ion Cannon | 2 | |
| Custom Illicit | Makeshift Hull Plates | Agility=>Cost 0=>1 / 1=>1 / 2=>3 / 3=>5 | |
| Custom Illicit | Scavenged Shield Generator | Unshielded | Agility=>Cost 0=>1 / 1=>2 / 2=>3 / 3=>5 |
| Custom Illicit | Homemade Signal Jammer | 1 | |
| Custom Illicit | Improvised Bomb Rack | 2 | |
| Custom Illicit | Podracer’s Handicap | Base Size=>Cost Small=>1 / Med=>3 / Large=>5 | |
| Custom Illicit | After Market Engines | Illicit and Mod slot available | Base Size=>Cost: Small=>5/Med=>8/Large=>12 |
| Scum Illicit | Babu Frik | 7 | |
| Illicit | Cloaking Device | Small or Medium ship | 3 |
| Illicit | Coaxium Hyperfuel | Slam action | 1 |
| Illicit | Contraband Cybernetics | 3 | |
| Illicit | Deadman’s Switch (does not go off if ship is disabled by Ionization instead of destroyed) | 2 | |
| Illicit | False Transponder Codes | 3 | |
| Illicit | Feedback Array | 3 | |
| Illicit | Hotshot Tail Blaster | Medium or Large ship | 2 |
| Illicit | Inertial Dampeners | 5 | |
| Illicit | Overtuned Modulators | 3 | |
| Illicit | Rigged Cargo Chute | Medium or Large ship | 4 |
Missile Upgrades
| Type | Name | Restrictions | Cost / Threat Points |
| Missile | XX-23 S-Thread Tracers | 4 | |
| Missile | Cluster Missiles | 4 | |
| Missile | Concussion Missiles | 6 | |
| Missile | Homing Missile | 5 | |
| Missile | Ion Missile | 4 | |
| Missile | Mag-Pulse Warhead | 6 | |
| Missile | Proton Rockets | 5 | |
| Missile | Diamond-Boron Missile | 2 Missile slots | 5 |
| Missile | Barrage Rockets | 2 Missile slots | 8 |
| Missile | Multi-Missile Pods | 2 Missile slots | 4 |
| Missile | Electro-Chaff Missiles | Missile and Payload slot | 4 |
| Separatist Missile | Discord Missile | Droid Wingman, Aggressor | 4 |
Modification Upgrades
| Type | Name | Restrictions | Cost / Threat Points |
| Scum Modification | Burnout Thruster | Small or Medium ship | 6 |
| Modification | Ablative Plating | Medium or Large ship | 4 |
| Modification | Advanced SLAM | Slam Action | 3 |
| Modification | Afterburners | Small Ship | 6 |
| Modification | Angled Deflectors | Small or Medium Ship, Shielded | 4 |
| Modification | Beskar Reinforced Plating | Fang, Firespray, Gauntlet, Star Viper | 6 |
| Modification | Delayed Fuses | 1 | |
| Modification | Drop Seat Bay | Gauntlet | 1 |
| Modification | Electronic Baffle | 2 | |
| Modification | Engine Upgrade | Red Boost Action | Base Size=>Cost Small=>3 / Med=>4 / Large=>7 |
| Modification | Hull Upgrade | Agility=>Cost 0=>2 / 1=>3 / 2=>5 / 3=>7 | |
| Modification | Mandalorian Optics | Fang, Firespray, Gauntlet, Star Viper | 5 |
| Modification | Munitions Failsafe | 1 | |
| Modification | Precision Ion Engines | TIE, Agility 3 | 2 |
| Modification | Shield Upgrade | Agility=>Cost 0=>3 / 1=>4 / 2=>6 / 3=>8 | |
| Modification | Spare Parts Canisters | Astromech Equipped | 3 |
| Modification | Static Discharge Vanes | 5 | |
| Modification | Stealth Device | Agility=>Cost 0=>3 / 1=>4 / 2=>6 / 3=>8 | |
| Modification | Tactical Scrambler | Medium or Large ship | 2 |
| Modification | Targeting Computer | 2 |
Payload Upgrades
| Type | Name | Restrictions | Cost / Threat Points |
| Payload | Blazer Bomb | 4 | |
| Payload | Cluster Mines | 7 | |
| Payload | Concussion Bombs | 4 | |
| Payload | Conner Nets | 4 | |
| Payload | Ion Bombs | 6 | |
| Payload | Proton Bombs | 4 | |
| Payload | Proximity Mines | 6 | |
| Payload | Seismic Charges | 3 | |
| Payload | Thermal Detonators | 5 | |
| Payload | Electro-Proton Bomb | Payload and Modification slot, Reload Action | 8 |
| Payload | Bomblet Generator | 2 Payload slots | 3 |
Sensor Upgrades
| Type | Name | Restrictions | Cost / Threat Points |
| Sensor | Advanced Sensors | Base Size=>Cost Small=>13 / Med=>11 / Large=>9 | |
| Sensor | Collision Detector | 6 | |
| Sensor | Fire-Control System | 2 | |
| Sensor | Passive Sensors | 6 | |
| Sensor | Trajectory Simulator | Base Size=>Cost Small=>7 / Med=>6 / Large=>5 |
Tech Upgrades
| Type | Name | Restrictions | Cost / Threat Points |
| Tech | Advanced Optics | 4 | |
| Tech | Automated Target Priority | 2 | |
| Tech | Biohexacrypt Codes | Lock Action | 1 |
| Tech | Deuterium Power Cells | Mod slot | 8 |
| Tech | Ferrosphere Paint | 5 | |
| Tech | Pattern Analyzer | 5 | |
| Tech | Primed Thrusters | Small ship | 9 |
| Tech | Targeting Synchronizer | Lock Action | 3 |
Title Upgrades
| Type | Name | Restrictions | Cost / Threat Points |
| Title | Andrasta | Firespray | 2 |
| Title | Havoc | Scurg H-6 | 2 |
| Title | Hound’s Tooth | YV-666 | 1 |
| Title | IG-2000 | Aggressor | 0 |
| Title | Lando’s Falcon | Customized YT-1300 | 2 |
| Title | Marauder | Firespray | 6 |
| Title | Mist Hunter | G1-A | 1 |
| Title | Moldy Crow | HWK-290 | 16 |
| Title | Nightbrother | Gauntlet, Modification slot | 3 |
| Title | Outrider(2023) | YT-2400 | 8 |
| Title | Punishing One | JumpMaster 5000 | 5 |
| Title | Razor Crest | ST-70 Assault Ship | 6 |
| Title | Shadow Caster | Lancer | 1 |
| Title | Slave 1 (Scum) | Firespray | 6 |
| Title | Virago | StarViper | 7 |
| Title | Xanadu Blood | Rogue | 2 |
Torpedo Upgrades
| Type | Name | Restrictions | Cost / Threat Points |
| Torpedo | Advanced Proton Torpedoes | 5 | |
| Torpedo | Homing Torpedo | 5 | |
| Torpedo | Ion Torpedo | 7 | |
| Torpedo | Plasma Torpedo | 7 | |
| Torpedo | Proton Torpedoes | 12 |
Turret Upgrades
| Type | Name | Restrictions | Cost / Threat Points |
| Turret | Dorsal Turret | 2 | |
| Turret | Ion Cannon Turret | 6 | |
| Turret | Turbolaser Turret | Non-small, Illicit slot | 9 |
Organizer Pilot Abilities
| Career Path | Minimum Initiative | XP Cost | Pilot Name | Ability Text |
| Organizer | 1 | 2 | Hondo Onakha | Action: Choose 2 non-huge ships at range 0-3 that are not friendly to each other. Each chosen ship may perform an action that is on your action bar, even while stressed, in the order of your choice. Then, gain 1 calculate token. |
| Organizer | 2 | 4 | Torkil Mux | At the start of the Engagement Phase, you may choose 1 ship in your firing arc. If you do, that ship engages at initiative 0 instead of its normal initiative value this round. |
| Organizer | 2 | 4 | Overseer Yushyn | Before a friendly ship at range 1 would gain a disarm token, if that ship is not stressed, you may spend 1 Charge. If you do, that ship gains 1 stress token instead. (1 Charge, Recurring) |
| Organizer | 3 | 6 | Doctor Aphra | Before you engage, you may spend 1 green token and 1 Charge. If you do, you may choose another ship at range 0-1 that is not stressed. The chosen ship gains 1 stress token. (3 Charges, Non-Recurring) |
| Organizer | 3 | 6 | Gamut Key | At the start of the End Phase, you may spend 2 Charges to choose yourself or a ship in your Turret Arc with 1 or more circular tokens. During the End Phase, circular tokens are not removed from that ship. (2 Charges, Recurring) |
| Organizer | 3 | 6 | Kaa’to Leechos | At the start of the Engagement Phase, you may choose 1 friendly ship at range 0-2. If you do, transfer 1 focus or evade token from that ship to yourself. |
| Organizer | 3 | 6 | Manaroo | At the start of the Engagement Phase, you may choose a friendly ship at range 0-1. If you do, transfer all green tokens assigned to you to that ship. |
| Organizer | 4 | 8 | Drea Renthal | While a friendly (ship) performs an attack, if the defender is in your firing arc, the attacker may reroll 1 attack die. |
| Organizer | 4 | 8 | Kath Scarlett | While you perform a primary attack, if there is at least 1 friendly (ship) at range 0 of the defender, roll 1 additional attack die. |
| Organizer | 4 | 8 | Prince Xizor | While you defend, after the Neutralize Results step, another friendly ship at range 0-1 and in the attack arc may suffer 1 Hit or Crit damage. If it does, cancel 1 matching result. |
| Organizer | 5 | 10 | Ketsu Onyo | At the start of the Engagement Phase, you may choose 1 ship in both your Primary Arc and Turret Arc at range 0-1. If you do, that ship gains 1 tractor token |
| Organizer | 5 | 10 | Serissu | While a friendly ship at range 0-1 defends, it may reroll 1 of its dice. |
Professional Pilot Abilities
| Career Path | Minimum Initiative | XP Cost | Pilot Name | Ability Text |
| Professional | 3 | 6 | Captain Jostero | After an enemy ship suffers damage, if it is not defending, you may perform a bonus attack against that ship. |
| Professional | 3 | 6 | Tor Phun | After you perform an attack, if the defender was destroyed or permanently disabled, you may perform an action, even while stressed. Then you may gain 2 strain tokens to perform a bonus attack. |
| Professional | 4 | 8 | Bossk | While you perform a primary attack, after the Neutralize Results step, you may spend 1 Crit result to add 2 Hit results. |
| Professional | 4 | 8 | Graz | While you defend, if you are behind the attacker, roll 1 additional defense die. While you perform an attack, if you are behind the defender, roll 1 additional attack die. |
| Professional | 4 | 8 | N’dru Suhlak | While you perform a primary attack, if there are no other friendly ships at range 0-2, roll 1 additional attack die. |
| Professional | 5 | 10 | Boba Fett | While you defend or perform an attack, you may reroll 1 of your dice for each enemy ship at range 0-1. |
| Professional | 5 | 10 | Guri | At the start of the Engagement Phase, if there is at least 1 enemy ship at range 0-1, you may gain 1 focus token. |
| Professional | 5 | 10 | Talonbane Cobra | While you defend at attack range 3 or perform an attack at attack range 1, roll 1 additional die. |
| Professional | 5 | 10 | The Mandalorian | While you defend or perform an attack, if you are in the Front Arc at range 1-2 of 2 or more enemy ships, you may change 1 of your blank results to a Focus result. |
| Professional | 5 | 10 | Old Teroch | At the start of the Engagement Phase, you may choose 1 enemy ship at range 1. If you do and you are in its Front Arc, it removes all of its green tokens. |
| Professional | 6 | 12 | Dengar | After you defend, if the attacker is in your Front Arc, you may spend 1 Charge to perform a bonus attack against the attacker. (1 Charge, Recurring) |
| Professional | 6 | 12 | Fenn Rau | When you defend or perform an attack, if the attack range is 1, you may roll 1 additional die. |
Gambler Pilot Abilities
| Career Path | Minimum Initiative | XP Cost | Pilot Name | Ability Text |
| Gambler | 1 | 2 | Nom Lumb (Rogue) | At the start of the Engagement Phase, you may choose 1 enemy ship in your Front Arc. If you do, treat your initiative as equal to that ship’s until the end of the round. |
| Gambler | 1 | 2 | Sunny Bounder | While you defend or perform an attack, after you roll or reroll your dice, if you have the same result on each of your dice, you may add 1 matching result. |
| Gambler | 2 | 4 | Inaldra | While you defend or perform an attack, you may suffer 1 Hit damage to reroll any number of your dice. |
| Gambler | 2 | 4 | Lapin | While you defend or perform an attack, if the enemy ship is stressed, that ship’s dice cannot be modified. |
| Gambler | 3 | 6 | Koshka Frost | While you defend or perform an attack, if the enemy ship is stressed, you may reroll 1 of your dice. |
| Gambler | 3 | 6 | Laetin A’shera | After you defend or perform an attack, if the attack missed, gain 1 evade token. |
| Gambler | 3 | 6 | Rook Kast | Before you engage, you may gain 1 strain token. While you perform a primary attack, if you are strained, you may change one of your blank or Focus results to a Hit result. |
| Gambler | 3 | 6 | Zuckuss | While you perform a primary attack, you may roll 1 additional attack die. If you do, the defender rolls 1 additional defense die |
| Gambler | 4 | 8 | Dalan Oneros (SV) | After you fully execute a maneuver, you may gain 1 stress token to rotate your ship 90° |
| Gambler | 4 | 8 | Kad Solus | After you fully execute a red maneuver, gain 2 focus tokens. |
| Gambler | 4 | 8 | Lando Calrissian | After you roll dice, if you are not stressed, you may gain 1 stress token to reroll all of your blank results. |
| Gambler | 4 | 8 | Torani Kulda | After you perform an attack, each enemy ship in your Bullseye suffers 1 Hit damage unless it removes 1 green token. |
| Gambler | 4 | 8 | Viktor Hel | After you defend, if you did not roll exactly 2 defense dice, the attacker gains 1 stress token. |
Slicer Pilot Abilities
Gearhead Pilot Abilities
Demolitions Pilot Abilities
| Career Path | Minimum Initiative | XP Cost | Pilot Name | Ability Text |
| Demolitions | 0 | 4 | G4R-GOR | After you defend, each other ship at range 0 suffers 1 Crit damage. |
| Demolitions | 3 | 6 | Ahhav | While you defend or perform an attack, if the enemy ship is a larger size than you, roll 1 additional die. |
| Demolitions | 3 | 6 | Padric | After a friendly device that you have locked detonates, each enemy ship at range 0-1 of that device gains 1 strain token. |
| Demolitions | 3 | 6 | Quinn Jast | At the start of the Engagement Phase, you may gain 1 disarm token to recover 1 Charge on 1 of your equipped (Munition) upgrades. |
| Demolitions | 3 | 6 | Sol Sixxa | If you would drop a device using a 1 Straight template, you may drop it using any other speed 1 template instead. |
| Demolitionist | 4 | 8 | Constable Zuvio | If you would drop a device, you may launch it using a 1 Straight instead. |
| Demolitions | 4 | 8 | Eemon Azameen | If you would drop a device using a 1 Straight template, you may use the 3 Turn Left , 3 Straight, or 3 Turn Right template instead. |
| Demolitions | 4 | 8 | Joy Rekkoff | While you perform an attack, you may spend 1 Charge from an equipped Torpedo upgrade. If you do, the defender rolls 1 fewer defense die. |
| Demolitions | 4 | 8 | Tel Trevura | If you would be destroyed, you may spend 1 Charge. If you do, discard all your damage cards, suffer (Your Base Hull – 1) Hit damage, and place yourself in reserves instead. At the start of the next Planning Phase, place yourself within range 1 of your player edge. (1 Charge, Non-Recurring) |
| Demolitions | 5 | 10 | Captain Nym | Before a friendly bomb or mine would detonate you may spend 1 Charge to prevent it from detonating. While you defend against an attack that is obstructed by a bomb or mine roll 1 additional defense die. (1 Charge, Recurring) |
Cyborg Pilot Abilities
Miner Pilot Abilities
| Career Path | Minimum Initiative | XP Cost | Pilot Name | Ability Text |
| Miner | 2 | 4 | Lapin | While you defend or perform an attack, if the enemy ship is stressed, that ship’s dice cannot be modified. |
| Miner | 2 | 4 | Sarko Plank | While you defend, you may treat your agility value as equal to the speed of the maneuver you executed this round. |
| Miner | 2 | 4 | Unkar Plutt | At the start of the Engagement Phase, if there are one or more other ships at range 0, you and each other ship at range 0 gain 1 tractor token. |
| Miner | 3 | 6 | Ahhav | While you defend or perform an attack, if the enemy ship is a larger size than you, roll 1 additional die. |
| Miner | 3 | 6 | Captain Seevor | While you defend or perform an attack, before attack dice are rolled, if you are not in the enemy ship’s Bullsey Arc, you may spend 1 Charge. If you do, the enemy ship gains 1 jam token. (1 Charge, Recurring) |
| Miner | 3 | 6 | Latts Razzi | At the start of the Engagement Phase, you may choose a ship at range 1 and spend a lock you have on that ship. If you do, that ship gains 1 tractor token. |
| Miner | 4 | 8 | Foreman Proach | Before you engage, you may choose 1 enemy ship in your Bulleseye Arc at range 1-2 and gain 1 disarm token. If you do, that ship gains one tractor token. |
| Miner | 4 | 8 | Moralo Eval | If you would flee, you may spend 1 Charge. If you do, place yourself in reserves instead. At the start of the next Planning Phase, place yourself within range 1 of the edge of the play area that you fled from. (2 Charges, Non-Recurring) |
| Miner | 5 | 10 | Ketsu Onyo | At the start of the Engagement Phase, you may choose 1 ship in both your Front Arc and Turret Arc at range 0-1. If you do, that ship gains 1 tractor token. |
Elite Talents
| Talent | XP Cost | Charges | Ability Text |
| Lone Wolf | 5 | 1 Charge ^ | While you defend or perform an attack, if there are no other friendly ships at range 0-2, you may spend 1 Charge to reroll 1 of your dice. |
| Notorious | 5 | 2 Charge ^ | After you defend, if the attacker is in your firing arc, you may spend 1 Charge. If you do, the attacker gains 1 strain token. While you perform an attack, if the defender is strained, you may reroll 1 blank result. |
| Squad Leader | 10 | Add a Red Coordinate to your action bar. While you coordinate, the ship you choose can perform an action only if that action is also on your action bar. | |
| Clan Training | 3 | 1 Charge | Before you engage, if you are not focused and there is an enemy ship in your Front Arc at range 1, you may spend 1 Charge to perform a red Focus action. After you perform an attack, if the defender is destroyed, recover 1 Charge. |
| Composure | 1 | After you fail an action, if you have no green tokens, you may perform a Focus (Calculate for Cyborg) action. If you do, you cannot perform additional actions this round. | |
| Crack Shot | 3 | 1 Charge | While you perform a primary attack, if the defender is in your Bullseye Arc, before the Neutralize Results step, you may spend 1 Charge to cancel 1 Evade result. |
| Deadeye Shot | 1 | While you perform a primary attack, if the defender is in your Bullseye arc, you may spend 1 Hit result or change 1 Crit result to a Hit result. If you do, the defender exposes 1 of its damage cards. | |
| Enduring | 2 | While you defend, if you are not in the attacker’s Bullseye Arc, Crit results are neutralized before Hit results. After you suffer Crit damage, you may perform a Calculate or Focus action on your action bar, even while stressed, treating that action as red. | |
| Expert handling | 4 | If your ship does not have a Barrel Roll on its action bar, gain a Red Barrel Roll. If it has a Red Barrel Roll, the Barrel Roll is now treated as White. | |
| Fearless | 3 | While you perform a Front Arc primary attack, if the attack range is 1 and you are in the defender’s Front Arc, you may change 1 of your results to a Hit result. | |
| Feedback Ping | 2 | After an enemy ship executes a maneuver, if it is at range 0-1 of a friendly device, you may acquire a lock on that ship, ignoring range restrictions. | |
| Intimidation | 3 | While an enemy ship at range 0 defends, it rolls 1 fewer defense die. | |
| Juke | 6 | While you perform an attack, if you are evading, you may change 1 of the defender’s Evade results to a Focus result. | |
| Marksmanship | 1 | While you perform an attack, if the defender is in your Bullseye Arc, you may change 1 Hit result to a Crit result. | |
| Outmaneuver | 6 | ||
| Predator | 2 | While you perform a primary attack, if the defender is in your Bullseye Arc, you may reroll 1 attack die. | |
| Saturation Salvo | 3 | While you perform a Torpedo or Missile attack, you may spend 1 Charge from that upgrade. If you do, choose two defense dice. The defender must reroll those dice. | |
| Snap Shot | 8 | Add a Front Arc, 2 Range attack that rolls 2 attack die. After an enemy ship executes a maneuver, you may perform this attack against it as a bonus attack. Attack: Your dice cannot be modified. |
Miner Career Talents
| Talent | XP Cost | Charges | Ability Text |
| Backwards Tailslide | 2 | While you boost or barrel roll, you can move through and overlap obstacles. After you boost or barrel roll through an obstacle, if you are not at range 0 of it, gain 1 evade token. | |
| Daredevil | 2 | While you perform a white Boost action, you may treat it as red to use the [1 Turn Left] or [1 Turn Right] template instead. | |
| Debris Gambit | 3 | Adds a Red Evade to your Action Bar. While you perform a red Evade action, if there is an obstacle at range 0-1, treat the action as white instead. | |
| Elusive | 2 | 1 Charge | While you defend, you may spend 1 Charge to reroll 1 defense die. After you fully execute a red maneuver, recover 1 Charge. |
| Ensnare | 17 | At the end of the Activation Phase, if you are tractored, you may choose 1 ship in your turret arc at range 0-1. Transfer 1 tractor token to it. | |
| Interloper Turn | 1 | Before you execute a speed 1-2 turn or speed 1-2 Koiogran Turn, if you are at range 0-1 of an asteroid, structure, or huge ship, you may gain 1 tractor token. | |
| Marg Sabl Closure | 1 | After you fully execute a maneuver, if you moved through an obstacle, structure, or huge ship, or if you deployed, you may choose 1 enemy ship in your Front Arc at range 1-2. That ship gains 1 strain token. | |
| Gravitic Deflection | 2 | While you defend, you may reroll 1 defense die for each tractored ship in the attack arc. | |
| Tieferon Belly Run | 1 | You can perform special attacks even while at range 0 of asteroids. While you defend, if you are at range 0 of an obstacle, attack dice cannot be rerolled. | |
| Trick Shot | 4 | While you perform an attack that is obstructed by an obstacle, roll 1 additional attack die. |