
Lost Loot Mission 1 – Bounty Full Harvest
Normally we aren’t bounty hunters but this one has practically fallen into our lap. An Imperial Defector is set to meet with the Rebels in this sector and we have obtained information on the meeting time and place. Swoop in and grab him so we can ransom him off to the highest bidder.
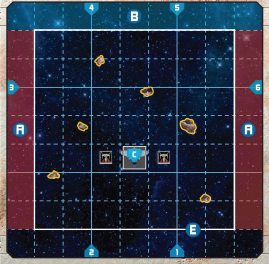
Setup: The Defector’s Shuttle and escorts are placed facing away from board edge B. Player’s setup in zone A. Place 6 asteroids in zone E, >= range 1 of each other and not in the range 1 zone in front of the shuttle or escorts.
Objectives: The Defector’s Shuttle must be disabled and your PB-950 must dock with the disabled Shuttle to capture the Defector. Then the PB-950 must be docked for at least 1 full turn, then survive and flee off any board edge except B or jump to hyperspace.
If at any point the shuttle is disabled and there are no more enemy ships on the board, the mission ends in success.
Territory: Neutral
Enemy Forces: Lambda Shuttle, Z-95s, X-Wings, A-Wings, YT-2400
Rewards: $15k Credits per pilot
| Squad | Arrival | Vector | AI | 3p | 4p | 5p | 6p |
| (R)Shuttle | Setup | C | Special | 1x Lambda Shuttle | + 2 Shield | + 2 Shield | + 2 Shield |
| (R)Blue | Setup | C | Escort | 2x Z-95 | + Z-95 | + Z-95 | |
| (R)Elite | Turn 2 | 1d6 | Attack | Elite X-Wing | + X-Wing | ||
| (R)Gray | Turn 4 | 1d6 | Escort | 2x Z-95 | +Z-95 | ||
| (R)Green | Turn 8 | 1d6 | Escort | 2x A-Wing | + A-Wing | ||
| (R)Red | Turn 11 | 1d6 | Escort | 2x X-Wing | + X-Wing | +X-Wing | |
| Patrol Boat | Special | A | Player | PB-950 Patrol Boat | |||
| (R)Rebel Freighter | Special | B | Strike | YT-2400 |
The Shuttle will engage and attack the nearest target as usual. Once it has suffered 5 damage of any kind (shield or hull) it will switch to Flee AI and try to escape from edge B. Treat that edge as the priority target for movement, and always use the shuttle’s maximum speed for the selected bearing.
The Shuttle is represented by the Omnicron Group Pilot and has the upgrade Anti-Pursuit Lasers: After an Enemy ship performs a maneuver that cause it to overlap you ship, roll 1 Attack die. On a Hit or a Crit result, the Enemy ship suffers one damage.
The Shuttle is disabled immediately when it has 1-3 Hull remaining. However if the shuttle is reduced to 0 Hull, it is still destroyed as usual and the players fail the mission. The player that disables the shuttle gains 4xp.
The Escort Z-95s will move and attack as normal. However if they are within range 1 of the Shuttle they will prioritize the Protect action on it.
The Patrol Boat: The Pirate Patrol Boat arrives the turn after the shuttle is disabled. Player ships may perform the Protect action on the Patrol Boat.
Once the Patrol Boat arrives, all ships with Escort AI switch to Strike AI against the Patrol Boat.
When the Patrol Boat undocks from the Shuttle, remove the Shuttle from the board.
The Rebel Freighter arrives the turn after the Patrol Boat arrives and has Strike AI targeting it. It will come in the middle of zone B or whatever is the closest to the shuttle not facing an asteroid or on top of another ship.
All Rebel ships have been told this mission has increased priority and their Flee threshold is reduced by 1 Hull (1 for small ships, 1 for medium, 2 for large).
Defeat
I can’t believe you fouled that up. That would have been a big catch.
Oh well guess we will have to try some other scheme to earn credits.
Earn all XP for this mission.
If you have completed Illicit Activity 2, add Lost Loot Mission 2 Mission Card to the Mission Deck. Otherwise add Illicit Activity 2 to the Mission Deck and when it is done, Add Lost Loot 2. When you play Lost Loot 2 enemy reinforcements arrive 2 turns earlier.
Victory
Well done. You snagged that Imperial Defector right out from the Rebel’s grasp.
Lets start the auction and see how much he is worth to both sides.
Earn all rewards for this mission.
Add Mission Card for Lost Loot Mission 2 to the Mission Deck.
Lost Loot Mission 2 – Lost Treasure Map
Lost Loot 1 Victory: Our captive has negotiated terms of his release without the mess of a ransom drop. He has agreed to lead us to an old Separatist research base and supply cache in the sector. There is supposedly a smugglers cargo container with the coordinates lost somewhere in a nearby ion storm. The Rebels were told about this as well but don’t know which area to search. You can bet they will be nearby.
Lost Loot 1 Defeat: It seems the Imperials aren’t the only ones using the Holonet. One of our slicers picked up a hidden message out to Rebel Command. It seems the Defector knew about a map to an old Separatist research base and supply cache that was lost in a nearby ion storm. Those supplies could be worth quite a lot. Lets find that map before the Rebels do. Between the message and our scouts reports on Rebel activity, we know the general area. Be quick, they will have a head start. Modifier: All Rebel ships arrive 2 turns earlier (Green squadron deploys on Setup).
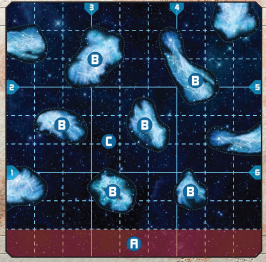
Setup: Place Ion Storm obstacles as shown in the setup map. See Setup Search below for how to setup search tokens. Players setup in Zone A.
Objectives: Scan the Ion Clouds to find the Cargo Container. Each scan is worth 1xp until the Cargo is discovered. Recover the Cargo with the PB-950 or with a pilot who is flying a Freighter (Quadjumper, HWK-290, YT-1300, YT-2400, VCX-100, YV-666). Recovery ship must escape from edge A. Alternatively, destroy all enemy forces. Ion Storm means No Hyperspace jumps for fleeing. Once the recovery ship is off the board, the mission is over and the Rebels retreat.
Secondary Objective: If the Rebel Freighter recovers the cargo and is then destroyed/disabled or the pirate ship carrying the cargo is destroyed / disabled, it drops the Cargo Container and if the pirates have any eligible ship, they may attempt to recover it again and escape. If there are no eligible ships to carry the cargo, the pirates must clear the board of enemy forces in order to succeed.
Enemy Forces: Z-95s, X-Wings, B-Wings
Territory: Neutral,
Rewards: 10k Credits per Pilot
| Squad | Arrival | Vector | AI | 3p | 4p | 5p | 6p |
| Green | Turn 2 | 1d6 | Attack | 2x Z-95 | + Z-95 | + Z-95 | |
| Gray | Turn 3 | 1d6 | Special | 1x B-Wing | + B-Wing | ||
| Blue | Turn 5 | 1d6 | Attack | 2x Z-95 | +Z-95 | + Z-95 | |
| Red | Turn 7 | 1d6 | Attack | 1x X-Wing | + X-Wing | +X-Wing | |
| Patrol Boat | Special | A | Player | PB-950 Patrol Boat | |||
| Rebel Freighter | Special | Special | Strike | YT-2400 |
Gray squadron will attempt to scan for the cargo as well as long as they do not have an enemy in their arc at range 1. Set their maneuver by targeting the nearest ion cloud that they have not scanned. If they find it, the Rebel Freighter arrives the following turn and attempts to pick it up.
Rebel Freighter: If the players find the cargo module, the Rebel Freighter arrives at the entry vector (1-6) furthest from where the cargo module is discovered and attempts to move to and pick up the cargo module. It must escape from the same board edge it arrived on if it is able to pick up the cargo.
To pick up the cargo container the ship attempting to pick it up must end its maneuver with its base overlapping. It does not take an action to pick up the container since Ion Storms skip the action step. Alternatively, any ship with the Scrapper Arm upgrade may retrieve the Cargo Container at range 0-1.
As soon as the Patrol Boat or a player pirate ship picks up the cargo, all Rebel squadrons switch to Strike AI against that ship. Other pirate ships may perform the Escort action on the cargo carrying ship.
Search Setup: Get a number of Tokens equal to the number of player pilots + 4 (for 3 pilots use 7 tokens, for 4 pilots use 8, etc). Place a token on each cloud not adjacent to a board edge (all clouds marked B in the diagram) starting with the clouds furthest from Zone A. Once each cloud has a token, place the remaining tokens randomly but no more than 3 per cloud. Prepare a draw bag (or preferred random draw method of your choice such as a small stack of shuffled playing cards) with 1 item representing the cargo module and 1 item for each non cargo module token. For example for 3 pilots using playing cards put 1 face card and 6 non-face cards in a deck and shuffle.
Finding the Cargo Container: Players may attempt to locate the Cargo Container by performing the Scan action at range 1 of an Ion Cloud. Whenever you scan a cloud with a marker, draw a random indicator and remove a marker and gain 1xp.
If a player ship finds the cargo container, the pirate Patrol Boat arrives in Zone A the following turn. The Rebel freighter arrives the turn after the Patrol Boat. If a QuadJumper or HWK-290 pirate ship picks up the cargo container, it gains the Encumbered status.
If a Rebel B-Wing finds the cargo container, the Rebel Freighter arrives on a random vector (1d6) the following turn. The pirate Patrol Boat arrives the turn after the Rebel Freighter.
Ion Storm Reminder: If a ship template or base overlaps an Ion Storm, they skip their perform action step then roll an Attack Die. This effect happens even if they start the turn overlapping the Ion Storm. On a Crit, the ship suffers 1 Hit and gains 2 Ion Tokens. The ship will gain the Ion Tokens even with their shields up following the PLotAC Ion Rules. Reminder that if a ship becomes Ionized by an Ion Storm, they will lose all shields at the start of the next turn.
A ship may barrel roll or boost into an Ion Storm obstacle.
Ion Storms obstruct shots giving the defender an additional Defense die. The defender may also change 1 blank result to an Evade result.
AI does not swerve for Ion Storms.
Defeat
It is unfortunate that the Rebels got the cargo module. But if we track their movements closely they may lead us to the prize.
Receive XP from this mission and no other rewards.
Add Lost Loot Mission 4B to the Mission Deck
Victory
Nothing like a treasure map to brighten a pirate’s day. And it looks like that defector was liberating some credits in that cargo module as well.
Receive full XP and credits from this mission.
Add Lost Loot 3 to the Mission Deck
Lost Loot Mission 3 – Blaze a Trail
Alright, the good news is we have the coordinates. The bad news, our scouts indicated they place the facility in the middle of an old Separatist mine field. Lets clear a path for our freighter and see if this info is worth the Defector’s freedom.
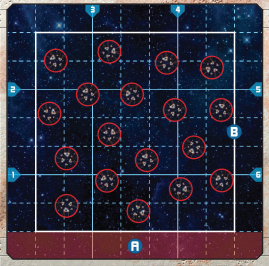
Setup: Players will set up in Zone A
Objectives: Make a path through the minefield by destroying all minefield tokens. The mission is a success when there are fewer minefields remaining than the total number of players and no Mine Layers are on the board. If all the minefield tokens are destroyed all pilots gain 2xp. If no replacement minefields are laid, each pilot gains 1xp.
Territory: Hostile (its a Minefield)
Expected Enemy Forces: Vulture Droids, Hyena Bombers, Mines, Elite Droid Tri Fighter
Rewards: None.
| Squad | Arrival | Vector | AI | 3p | 4p | 5p | 6p |
| Mine Layers | Special | 3 | Attack | 2x Hyena Bomber | + Hyena Bomber | ||
| Patrol 1 | Turn 2 | 4 | Attack | 2x Vulture Droid | + Vulture Droid | +Vulture Droid | |
| Elite | Turn 5 | 1d6 | Attack | Elite Droid Tri Fighter | (TL 3+) Elite Droid Tri Fighter | ||
| Patrol 2 | Turn 5 | 1d6 | Attack | 2x Vulture Droid | + Vulture Droid | +Vulture Droid |
Minefield Setup: During setup, place 3 minefield tokens per player pilot then place 1 extra minefield token (10 for 3 pilots, 13 for 4 pilots, etc). Each minefield must be just beyond Range 1 from at least 1 other minefield and at Range 2 or further from the board edge adjacent to Zone A, and Range 1 or further from the opposite edge. No range restrictions on the 2 side edges.
These minefield tokens are hostile to player ships and will detonate if overlapped by them. Droid ships will not detonate mines but will be damaged by mines that explode if overlapping at the same time as a player ship. The Cyborg Droid Wingman will not detonate minefields.
Pilots gain 1xp for destroying a minefield token with an attack or device. No xp is gained for destroying a minefield by overlapping it and detonating it.
Minefields receive Ion Tokens as normal and are considered Ionized when they have 2 Ion Tokens. An Ionized minefield will not detonate when overlapped. Minefields clear 1 Ion token at the beginning of each turn.
Mine Layer Squad: The Mine Layer squad arrives the turn after the first minefield is destroyed. Each Hyena Bomber in the Mine Layer squad uses the standard Attack AI unless a Mine Field has been destroyed. If a Mine Field has been destroyed, a member of the Mine Layer squad will attempt to deploy a new minefield (using normal device/bomb dropping rules). The new token can only be deployed within range 2 of another minefield and cannot overlap a ship or minefield. Each member of the Mine Layer squad will attempt to lay a mine until one is successful. Only 1 Mine Layer will deploy a mine each turn.
If there are no mines to replace, no Mine Layer can legally deploy one, or the Mine Layers are out of charges (3 charges per bomber), then no replacement minefield is deployed.
Minefield Reminder: On Template or Ship Overlap suffer 1 Hit damage then, roll an attack die for each hull point the minefield has over 1 (2 hull = 1 die, 3 hull = 2 die). Suffer the Hit and Crit results shown on the dice. Demolitions careers do not suffer an automatic damage but roll a die for every hull point on the Minefield instead.
Attacking Minefields: Minefields have 3 hull and 1 agility. They can be targeted and attacked as usual, but each Critical hit counts as 2 damage. Remove destroyed minefields from play. Demolitions careers may change one of their Hit results to a Crit result when attacking minefields.
Elite Tri-Fighter:
Defeat
That is a thick minefield. The automated defenders refill it too quickly. We will have to try again later.
Gain all earned XP.
Put this mission back in the mission deck.
Victory
Well done. You might even be able to make a career out of clearing old mine fields if this pirate thing doesn’t work out.
Gain all earned XP.
Add Lost Loot Mission 4A to the mission deck.
Lost Loot Mission 4A – X Marks the Spot
There is a space station in the middle of that mine field. Some kind of cloaking system makes it hard to detect at range. Close in and scout it making sure there are no automatic defenses still up. Once the coast is clear, signal our Patrol Boat to come drop the loot team.
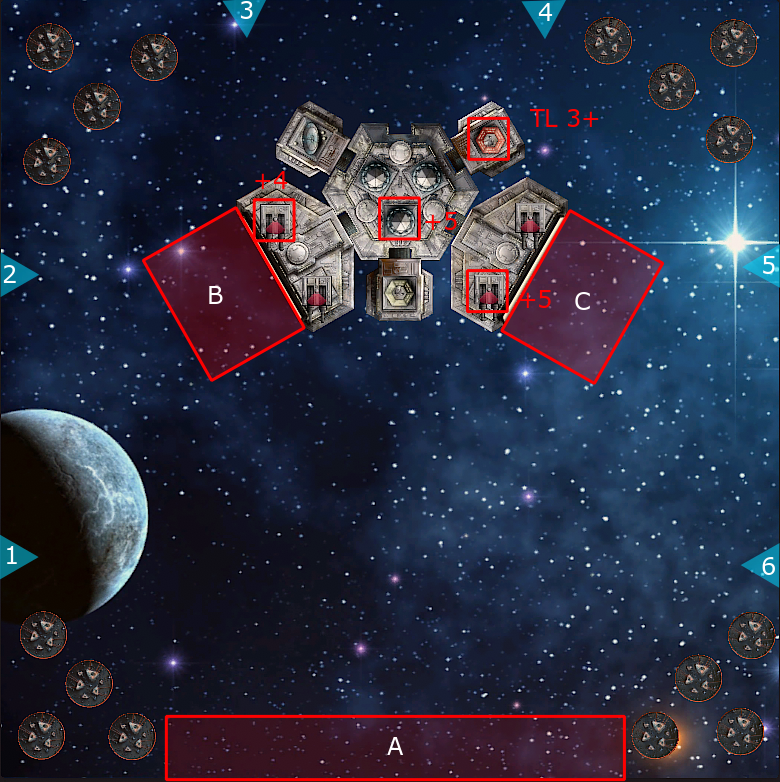
Setup: Players setup in zone A.
Objectives: Destroy or disable the stations shields. Land the Patrol Boat in either Dock B or C and capture the station by advancing the boarding team onto the command module. Then destroy or disable any remaining Guardians.
Territory: Hostile unless station captured, then Neutral.
Rewards: $80k Credits per Player and 1 Aggressor Assault Fighter. Can repair the Aggressor in the shipyard for $80k if it is lost in combat. Cyborg Droid Wingman replacement is now $2k maximum.
| Squad | Arrival | Vector | AI | 3p | 4p | 5p | 6p |
| Sentry 1 | Setup | B | Attack | 2x Haor Chall Prototype | + Haor Chall Prototype | +Haor Chall Prototype | |
| Sentry 2 | Setup | C | Attack | 2x Haor Chall Prototype | + Haor Chall Prototype | +Haor Chall Prototype | |
| Guardian 1 | Turn 3 | 1d6 | Attack | Elite Aggressor Assault Fighter | |||
| Guardian 2 | Turn 3 | 1d6 | Attack | Elite Aggressor Assault Fighter | |||
| Patrol Boat | Special | A | Players |
Whenever a droid fighter from Sentry 1 or Sentry 2 is destroyed, a new fighter will launch from the station the following turn until the station is captured. No experience is gained for fighters destroyed after the first 4 in each group.
Station Modules: The Station Command Module gives 1 Calculate token to the first Turbolaser turret to fire each round. The Sensor module (upper right), allows 2 Turbolasers to take a Lock each turn. The Wing Command module (at TL 3+) Coordinates 2 Haor Chall Prototyes each turn at any range.
Capturing the Station: Once the Station’s Shield Generators are destroyed, the Player Patrol Boat arrives.
The Patrol Boat may land in either docking bay B or C by performing a non-red maneuver such that the maneuver template overlaps the docking bay entrance.
Once the Patrol Boat has landed, the boarding team will need to advance to the Command module.
Advancing the Boarding Team: At the end of each turn, make a contested attack die roll of 3 die vs 3 die. If the boarding crew rolls more hits (including crits) than the defenders, advance the team to the next location (Landing Bay, Center Console, Command Module).
Once the team has reached the Command Module, the players gain control of the turrets and all remaining Haor Chall Prototypes are now friendly.
Guardians remain hostile and must be neutralized to complete the mission.
Lost Loot 5B – Lead Us to the Prize
The Rebels have lead us right to the cache. Looks like an old station hidden in the middle of a minefield. They have already been there for a while and begun to loot. Lets swoop in and take the treasure for ourselves.