
Mining Guild Mission Arc
Mining Guild Mission 1 – Protection Racket
We have encouraged a local asteroid mining company to hire us for protection. They have refused. Lets show them why it would be a good idea by damaging one of their installations. Get in and get out before the Local System Patrols can respond with reinforcements. If we can demonstrate our pilots skill vs theirs it might help convince them they need protecting.
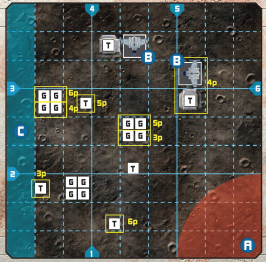
Player Setup in Area A
Objective: Destroy at least 1 cargo module (G) + 1 per the highest Threat Level of your pilots. Then at least 1 pirate must escape off a board edge adjacent to deployment zone A (bottom edge or right edge). Do to the installation location, hyperspace jumps are not a viable means of escape in this mission.
Bonus Objective: Destroy at least one Mining Guild Fighter (Modified TIE or Z-95) and lose none of your ships.
Territory: Hostile
Enemy forces: Mining Guild TIE Fighters, Z-95 Headhunters, Turrets, Local Patrol
Rewards: 10k Credits per pilot now (20k per pilot if you met the bonus objective) and +3k Credits per pilot (4k if you met the bonus objective) after each mission going forward even if that mission is a failure.
| Squad | Arrival | Vector | AI | 3p | 4p | 5p | 6p |
| (MG)Cargo 1 | Setup | B | Special | 1x Lambda Shuttle | 1x Lambda Shuttle | ||
| (MG)Sentry 1 | Setup | 3 | Attack | 1x Mining Guild TIE | + Mining Guild TIE | ||
| (MG)Sentry 2 | Setup | 4 | Attack | 1x Mining Guild TIE | + Mining Guild TIE | ||
| (MG)Guard 1 | Turn 6 | 1d6 | Attack | 2x Z-95 Headhunters | + Z-95 Headhunter | +Z-95 Headhunter | |
| (LP)Able | Turn 8 | 1d6 | Attack | 1x Skipray Blastboat | + Y-Wing | + Skipray Blastboat | + Y-Wing |
Cargo 1 Shuttles do not move on turn 1 as they are lifting off. Treat the maneuver as a White Stop (they still get an action). They will attempt to flee off board edge C. While on the board they will Coordinate any friendly ships if they are not in arc of a pirate, otherwise they will reinforce.
Defeat
We need to be more convincing than that. Let’s regroup and try again later.
Gain all earned XP for this mission.
Shuffle this mission card back into the mission deck.
Victory
The Foreman of the local Guild operation has realized that they do in fact need some higher quality protection and we have come to terms.
Gain all earned mission rewards and XP.
Add Mission Cards for Mining Guild Mission 2 to the Mission Deck.
Mining Guild Mission 2 – Rude Neighbors
We were hired for protection. Now it’s time to actually protect. The Mining Guild realized we would be a faster response than the Local Patrols. It seems someone else had the bright idea to try to get protection money from the Guild. Wipe out these fools.

Player Setup Area A
Objective: At least 1 Shuttle and half the cargo modules must survive. Destroy, disable, or make flee all enemy ships.
Bonus Objective: All Cargo Modules and Shuttles must survive.
Territory: Friendly
Enemy Forces: Z-95s, Y-Wing, M3-As, Khiraxz
Rewards: $5k Credits bounty per Threat Level of each enemy ship you destroy or disable. No reward for ships that flee or ships that the Mining Guild ships and turrets take out. $15k Credits for each Shuttle that survives. $20k Credits if all Cargo Modules survive.
| Squad | Arrival | Vector | AI | 3p | 4p | 5p | 6p |
| (MG)Cargo 1 | Setup | B | Special | 2x Lambda Shuttle | + Shield | +Shield | +Shield |
| (S)Axe | Setup | 3 | Strike 1 | 2x Khiraxz | + Khiraxz | +Khiraxz | |
| (S)Dagger | Setup | 1 | Strike 2 | 2x M3-A Scyk | + M3-A Scyk | + M3-A Scyk | |
| (MG)Sentry 1 | Setup | 5 | Escort | 1x Mining Guild TIE | + Mining Guild TIE | + Mining Guild TIE | + Mining Guild TIE |
| (S)Glaive | Turn 2 | 1 | Strike 3 | 1x Y-Wing | + Y-Wing | + Y-Wing | |
| (S)Sabre | Turn 4 | 1d6 | Attack | 2x Z-95 Headhunters | + Z-95 Headhunter | +Z-95 Headhunter |
- Strike 1 AI will target the Shuttles, then Enemy Fighters, then Turrets, then Cargo Modules
- Strike 2 AI will target Enemy Fighters, then Turrets, then Cargo Modules
- Strike 3 AI will target the Cargo Modules, then Enemy fighters, then Turrets
The Turrets and Mining Guild TIEs are friendly to you.
Axe Squadron will be equipped with Proton Rockets. Glaive Squadron will be equipped with Thermal Detonators.
The Shuttles will not move on turn 1 as they are lifting off. Then they will Flee toward board edge C. You may perform the Protect action on the Shuttles. Sentry 1 will also try to Protect the Shuttles as their highest priority action.
Defeat
The Mining Guild is non too happy with our “Protection” service. Those meddlesome scallywags that attacked need to be taught a lesson.
Gain XP for this mission.
Add Mission Cards for Mining Guild Mission 3 and Rivals Mission 1 to the Mission Deck.
Victory
The Foreman tried not to show it but he was pleasantly surprised that we showed up and actually protected the site. Now time to find out who those pirates who trespassed in our space were.
Gain all earned mission rewards and XP.
Add Mission Cards for Mining Guild Mission 3 and Rivals Mission 1 to the Mission Deck.
Mining Guild Mission 3 – Out Bid
It seems the Mining Guild got a new Foreman who no longer wants our protection and have hired a group of Mandalorian mercenaries. They have found our base in the asteroid field. Defend it and send them packing.
Note: Once this Mission has been drawn from the Mission Deck, players no longer receive protection money from the completion of Mining Guild Mission 1 after every mission.
This Mission is marked URGENT
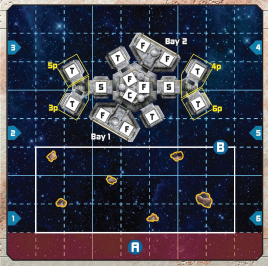
Players setup in Zone A. Place 6 Asteroids randomly in Zone B.
Objective: Any one of the station’s emplacements and at least 1 player ship must survive until the end of round 10. Alternatively, all enemy ships destroyed, disabled or in flee mode by round 10.
Bonus Objective: Add 1xp per player pilot for each emplacement that was not destroyed after the primary objective has been fulfilled.
Enemy forces: Z-95s, Fang Fighters, Firespray Patrol Ships, Gauntlet Troop Transport
Territory: Friendly
Rewards: 10k Credits for each small ship, 15k for each medium ship, and 20k for each large ship from the bounties on the heads of the mercenaries you shoot down.
| Squad | Arrival | Vector | AI | 3p | 4p | 5p | 6p |
| (S)Hunter | Setup | 2 | Strike | 2x Z-95 | + Z-95 | + Z-95 | |
| (S)Skull | Turn 2 | 5 | Strike | 2x Fang Fighter | + Fang Fighter | ||
| (S)Viper | Turn 5 | 3 | Strike | 1x Firespray | 1x Firespray | ||
| (S)Wraith | Turn 8 | 1d6 | Strike | 1x Gauntlet | 1x Gauntlet |
The enemy fighters all have Strike AI targeting the nearest station emplacement.
Loaded For Rancor: The Z-95s in Hunter Squadron are loaded with Concussion Missiles. The Fang fighters in Skull Squadron are loaded with Proton Torpedoes.
Pirate Station: The station has 2 types of emplacements: Shield Generators and Turbolaser Towers. The amount depends on the number of player pilots. The players control the towers. No XP is gained from damage or kills caused by the towers.
Defeat
Such a shame. This was a good hideout. We lost some supplies and need to find a new base now.
Players and the Company lose half of their banked credits rounded up. Receive half XP for this mission. Receive half credit reward.
Add Mission Cards for Mining Guild Mission 4 and [TBD] to the Mission Deck.
Victory
Ha! You get what you pay for. Those mercs never stood a chance. Guess we need to teach the new Foreman why he needs protection.
Receive all earned mission rewards and XP.
Add Mission Card for Mining Guild Mission 4 to the Mission Deck.
Mining Guild Mission 4 – Mine Your Manners
In spite of the failure of the mercenaries to destroy our base, the Mining Guild has stopped paying for protection. We have located the new Guild Foreman and are preparing to give him an early retirement so we can replace him with someone more agreeable. Be wary as the Mandalorian Mercenaries are still under contract with the Guild.
Player setup Zone A with the Patrol Boat. Place 6 asteroids in Zone B Range > 1 apart from each other and board edge. Turbolasers (T) begin facing Zone A.
Objective: Destroy the Shield Generators. Pilots gain +1xp for destroying a Shield Generator emplacement. After the Shield Generators are destroyed, the Patrol Boat must land in a station docking bay (Bay 1 or 2). The Boarding Team must capture the Command Center module to secure the Guild Foreman. Survive until the end of Turn 12 or destroy all enemies. If the primary objective is completed the Territory changes to Neutral at the end of the battle.
Bonus: +2xp for each emplacement that is not damaged or destroyed. +$5k credits for each Fuel Tank that is not damaged or destroyed.
Enemy forces: Mining Guild Ties, QuadJumpers, Fangs Fighters, Firespray Patrol Ship
Territory: Hostile
Rewards: $15k Credits per pilot now and a recurring payment of $3k credits per pilot, plus $1k credit for the Company operations after each mission following this one.
| Squad | Arrival | Vector | AI | 3p | 4p | 5p | 6p |
| (MG)Sentry 1 | Setup | 3 | Attack | 3x Mining Guild TIE | + Mining Guild TIE | + Mining Guild TIE | |
| (MG)Skull | Setup | 4 | Attack | 1x Fang Fighter | + Fang Fighter | + Fang Fighter | |
| (MG)Sentry 2 | Turn 4 | Bay 1 | Attack | 2x Mining Guild TIE | + Mining Guild TIE | + Mining Guild TIE | |
| (MG)Tug Team 1 | Turn 5 | Bay 2 | Attack | 2x Quadjumper | + Quadjumper | ||
| (MG)Viper | Turn 8 | 1d6 | Attack | 1x Firespray | |||
| (E)Omega | Turn 13 | 1d6 | Attack | 1x Elite Decimator | |||
| (E)Alpha | Turn 13 | 1d6 | Attack | 2x Elite TIE/in Interceptors | + Elite TIE/in Interceptor | + Elite TIE/in Interceptor | |
| (E)Delta | Turn 14 | 1d6 | Strike | 2x Elite TIE Advanced/X1 | + Elite TIE Advanced/X1 | + Elite TIE Advanced/X1 |
The Station Command Module can give 1 of the Turbolaser modules a Calculate Token each turn before the Turbolasers activate.
Assaulting the Station: Players ships may perform the Protect action on the Patrol Boat. To Unload the Boarding Team, the Patrol Boat must land in one of the station’s Docking Bays after the Shield Generators have been destroyed. Place a Tracking Token on the Docking Bay tile to represent the Boarding Team.
The Patrol Boat may deploy from the Docking Bay that it landed in on any of the following rounds.
Advancing the Boarding Team: At the end of each turn, roll 3 attack dice. If the number of hits rolled is equal to or greater than the number of emplacements on that station tile, players may move the commandos to an adjacent station tile. Otherwise, they may destroy one emplacement on that tile or simply wait until the next round. Players may choose if Fuel Tanks destroyed this way explode.
The Boarding Teams attack dice can be modified depending on the upgrades purchased for the Patrol Boat.
Capturing the Guild Foreman: The Boarding Team must reach the large central station module with the Command Center. Then they must succeed in their advancement roll to enter the Command Center and capture the station. Any remaining Turbolaser emplacements are now under Pirate control. Players may choose their facing and attack targets for the rest of the mission. If the command center is destroyed no rewards are gained from completing this mission.
Enemy Target Priority: Once the station is captured and the turbolasers start shooting at the Mining Guild and mercenary ships, they will attempt to destroy the station’s defenses without damaging the rest of the station. Target priority will be any Player ships (including Patrol Boat) in firing arc followed by station turbolaser towers.
If the Pirates have control of the station at the end of turn 12, the territory is considered neutral and the enemy forces retreat and the mission ends. Note: unless you have destroyed or disabled all enemy ships by the end of turn 12, you cannot capture disabled ships.
The Pirates may continue to pursue the primary objective after turn 12 but the Imperial forces will not retreat once the station is captured. Delta squadron has Strike AI against the station if it is captured. Imperial ships have target priority of Player ships in arc, then station modules in order of Command Center, Turbolaser, Fuel Tank.